What's new
VORON Design

Register a free account today to become a member! Once signed in, you'll be able to participate on this site by adding your own topics and posts, as well as connect with other members!

My Voron: LDO Trident 300 (VT.1054)

Out of curiosity, have you installed the reverse bowden tube yet? That's necessary to keep the filament fed at a consistent rate, and not have the filament be tugged by the motion of the gantry.
I have not, so I guess that's next. Thanks for the suggestion.

e: Printing hinges for the front doors today, but I've got tomorrow's plate sliced and have the exhaust assembly included in it to set up that tubing.
 
Last edited:
Out of curiosity, have you installed the reverse bowden tube yet? That's necessary to keep the filament fed at a consistent rate, and not have the filament be tugged by the motion of the gantry.
Print failure when trying to print yesterday led to finding this:
PXL_20230331_024415612.jpg

You called it.
Dunno if its ABS in general or the KVP ABS in particular, but it doesn't want to stay on the spool as nicely as the PLA I've used before has.
The exhaust cover and fan cover got printed, the rest of that assembly is printing now.
Skirts are next. Im feeling like, if I get the exhaust on and that reverse bowden tube on, along with the panels (pending latches) and doors attached properly (printing done)... I might have a functional and reliable printer! Doing magnetic side panels and easy remove doors because I still have a bunch of PLA stuff to print.

Current webcam does NOT have a great field of view, so I've got one advertised to be wider coming, actually 2 of them, to better monitor the status remotely. Because the C920 looks like this and that just ain't gonna cut it.

download.png
 
Last edited:
PXL_20230331_024415612.jpg


You called it.
Dunno if its ABS in general or the KVP ABS in particular, but it doesn't want to stay on the spool as nicely as the PLA I've used before has.
The exhaust cover and fan cover got printed, the rest of that assembly is printing now.
Sorry to hear of the failure. Hopefully it didn't cause the spool to partially unwind as well!

Might be the angle of the photo, but did you insert PTFE tubing into the spool holder? It's mentioned on page 314 of the Voron Trident manual, and can also help with things feeding smoothely. My spools flop around a bit on my holder, but that's partially because I have the extended width one for larger spools (I like Replitech's PLA, and theirs come on wider spools that hold 600 meters of filament, so about 1.82kg for PLA)
 
Day 12: A whole week (roughly)

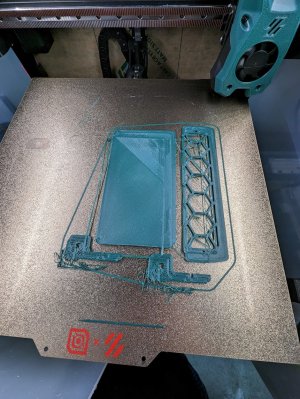
So immediately after I took that screenshot of the webcam the print failed with layer shift. And every print since then has failed the same way. Something went wrong with the printer mechanics.

On Saturday I moved it back inside. And it refused to boot completely.

I hate Raspberry PIs, they seem to corrupt super easily. But at least I have a few of them lying around. Reinstalled raspbian and mainsail and etc on a new microSD card. Grabbed the printer configs from the old card... and it booted fine. *whew*. Everything was good again, except it still fails with the layer shift. Did the belt tension stuff again, double-checked the belt path, etc. No change. Welp. There was also a panic moment when I thought the X/Y front idlers were cracked, but I got that figured out pretty quickly that they are 2 pieces and just not matched perfectly.

One of my regrets on this build has been not doing a thorough cleaning on the linear rails when they arrived. So.... time to fix that. Tonight I tore the whole X/Y motion system apart. Pulled the rails off, and they are currently soaking in mineral spirits with quality lube waiting for them. I'll let them soak until tomorrow after work, and then lube and re-assemble. It'll be a pain, but it'll also be a better printer. I'll do the Z rails next.

I did order and receive a new camera, so I'll check the FOV on that one and maybe order another. It was cheap.

Before all this I did get the door hinges printed, some of the exhaust stuff printed. I like the doors, but these are the VHB tape version, so I need to reprint the bolted version for better stability. Made a list of things to print once its back together, so I'll be working through that list. Eventually.
PXL_20230402_162405852.jpg

PXL_20230407_000417315.jpg

PXL_20230407_000422658.jpg

E: screw it. Soak all the rails.
 

Attachments

  • shift.jpg
    shift.jpg
    407.3 KB · Views: 7
  • PXL_20230402_162427328.jpg
    PXL_20230402_162427328.jpg
    142.2 KB · Views: 6
Last edited:
Day 13: Weekend

Pulled the rails out of the bath and reassembled.
Pulled each of the rails off individually, greased them, and re-re-assembled. Dropped several bearings out in the process. Even so, they slide much better than before. Ordered bulk replacement 1/16 and 3/32 bearings.
Re-tensioned the belts.
Make a huge filament ball mess with the 0.4 nozzle. Pulled it out and dropped in a 0.8 nozzle. She prints!
Submitted for a serial. Ordered a triple pack of 0.4 nozzles, and a pair of obxidian nozzles since they are coming soon and I want to print some abrasive stuff.
The 0.8 nozzle flies through filament (makes sense), and really is limited by the revo. Oh well, I'll live.
I'll get the nozzles and bearings, get them all set/installed,then re-run belt tension and input shaper, then start trying to crank the speed. I'll probably also print a rapido toolhead just to have on hand...

PXL_20230410_031047355.jpgPXL_20230410_031141242.jpg
 
Last edited:
Hmm. Still having first layer issues scattered around the bed. I'll need to work on z offset this weekend.

On the plus side, this is now officially VT.1054!
 
Going to spend some time this weekend (rainy) getting the tool head dialed in with the new bearings and running input shaper / etc. Tired of having to keep ripping it apart every weekend, so of course I ordered stuff to require another weekend doing so. Ordered a BTT EBB SB2209 and U2C setup to switch to CAN. At least I won't have to worry about configuring sensorless homing simultaneously. I did resist the urge to order a rapido at the same time. But I'm sure it is coming at some point. Also looking at a v0.2 or PFA Micro (basically a 180^3 v0 with a flying gantry) or a 250 v2.4r2. But those are a ways in the future (hopefully).

I am also collecting info on building a hexapod. Both as the next electronics project to play around with/learn on and as something semi-practical to use the printer for. Maybe a quadcopter FPV drone after that...
 
Last edited:
Day 14: Weekend

Didn't bother doing all the tuning stuff because the replacement bearings didn't arrive. I did tighten all the screws available and re-do Z-offset, and went from 4 failed prints in a row to 4 successful prints in a row. VERY happy with that. Bearings will be done tonight, I'll re-adjust Z offset again and try to run input shaper.
Printed another camera mount but not 100% happy with it. Have a different one printing now.
Printing nevermore tonight to help with fumes, the bag of charcoal stuff arrives tonight as well. Should have had it going in the current print, but *shrug*.
Having issues getting 2 USB cameras to both show. The Logitech works, the amazon camera works, but it seems to be either/or, not both. I want both. And a third, if possible.
Anyway, Im pretty happy with it right now overall.
 
Day 15: Tuesday/Wednesday

Canbus stuff arrived, and as printing has gotten pretty much plug and play I immediately tore into it again. Glutton for punishment I guess.

Damn, those are some small connections. Got the toolhead board installed, got the can stuff flashed. Turned on power with the can cable connected and got a loud *POP*. Oops. The pi boots, but klipper keeps dying and the toolhead board doesn't light up. I had the USB 5v jumper installed, I think I fried the board. Oops. Im thinking/hoping it's only the 2209 board and not the U2C.

So I ordered a replacement and have to wait for it to arrived. It'll be here soon enough. Need to go through and adjust all the pin assignments. That'll be fun.

No work on it this weekend, we're going out of town again. But I'll have some time next week I hope.
 
Day 16: Uh, I've lost count.

I found out what caused the *POP*! Turns out the CAN board does not appreciate getting fed 120vAC instead of 24vDC. Jumper had nothing to do with it. Replaced the board, replaced the U2C for good measure, spent an hour in the CAN discord trying to troubleshoot (green and yellow are not to be confuzelled) and voila, CANbus! Nothing like spending weeks of downtime for what should have been a fairly simple procedure. Light on TAP wouldn't switch away from red, had signal/ground backward on the connector. Maybe wiring really isn't my thing.

She homes, she levels. I'll try re-doing z-offset and some test prints tonight, was almost 11 when I got it this state last night, and my brain was completely fried. Need to blow out dust and get the panels back in place, but at least the end of building and beginning of printing is somewhat in sight. My folks are in town next week, I'd like to be 100% functional before they arrive without having to spend all the time before that working on it. Wife is annoyed enough about the printer as is.
PXL_20230503_032726602.jpg
 
I hate Raspberry PIs, they seem to corrupt super easily. But at least I have a few of them lying around.
I'm no expert, but given that the RPIs use a memory card, not a more robust memory solution, the issue is a forced shutdown vs issuing a command prompt elegant shutdown. Just turning off the power will sometimes corrupt the memory stick.
 
Day 17:

Done a bunch of work to try and help reliability. Tuned pressure advance, input shaper, extrusion, most of the Ellis guide. With all that and a good build plate cleaning, things seem reliable. Switched to a new chamber thermistor. Added a high flow Revo nozzle (0.6mm).

And then today I printed a new spool holder, and the brand new spool had a tangle halfway through. Humbug.

Still haven't printed all the skirts and stuff yet. I'll get to that eventually.

I designed and printed a model and it worked, so I'm happy about that.

Yeah on the memory card. I'm just annoyed at how easily they corrupt.

I'm still getting warping with ABS, which doesn't make much sense to me. Clean textured PEI build plate, heated bed, enclosure... Everything people suggest I've got in place as far as I can tell.
 
Last edited:
To be honest I've never had the best experience with raw PEI from known "good" brands like Energetic, LDO, Fulament etc... I've always had to use some form of bed adhesive with ABS and beyond. Used to use Magigoo, currently I'm really happy with Vision Miner nano polymer. I dilute it by half with 70% Alcohol, apply one good layer and it holds for ~40hrs of print time.
 
Day 18:

Well I fucked up.
Back when I was first building this beast I attached the magnetic sheet *over* the plastic covering on the bed. It decided to finally delimate and lift off the build plate.
That wasn't fun.

Spoke with LDO about it, they had a good laugh (probably), but pointed me in the right direction. Ordered a replacement magnet, got the goop scraped off, and the new one attached. TAP deviation went down significantly, who knew? Got a new PEI sheet with it, just because. No print lift issues since then either. I might actually have a reliable printer, now that I've fixed all my dumbass mistakes.

Got the second webcam running, which is nice. Used up so much of my black and accent rolls I ordered more. Finally getting around to printing skirts for the damned thing. Ordered a high flow 1.0 nozzle to go with the 0.6 nozzle, so that's nice. Printing is fast and reliable now.

I do NOT want to add up what I've spent on this stupid printer.
 
Day 19:

Since I put on the new magnetic sheet I've been printing almost non stop. Printed all the skirt pieces, printed the nevermore pieces, printed around 50 of the little LED clip thingies for the top extrusions. 100%. Heightmap is still showing .124mm of total variance, but that could be worse and Im not gonna cry about it. Got prints sliced for tomorrow during work and after (KVP spool and another spool holder), I'll figure out a plan for after that at work tomorrow. Probably panel clips for the sides, top, and door handles. Finally in a good spot.

I'm finally, freaking, happy with it.

Skirts and LCD will go on this weekend and I'll update the pictures then.
 
Day 20:

Did the thing. Skirts are on. Skirt fans are on. Nevermore is on. Light baffle thingies are on. LCD is on (but not set up yet). The second webcam is mounted (I'm going to design/print a better mount for it tomorrow). Side panels are properly mounted. Top panel is properly mounted. Replaced the reverse bowden tube as it was kind've kinked. Replaced the spool holder with more sturdy better print of it.

Gotta figure out proper door handle set up, as something doesn't quite seem right. Will probably replace the top panel mounts with magnetic latches, and maybe the side panels with the latch versions.

But for now, printer is running well and I'm happy.
PXL_20230624_203345640.jpg

PXL_20230624_203327301.jpg

PXL_20230624_203601484.jpg
 
Top