m00dawg
Well-known member
- Printer Model
- LDO Trident 300
- Extruder Type
- Galileo
- Cooling Type
- Stealthburner
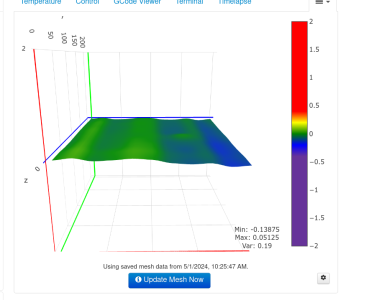
Seeking some guideance on how to improve besh bed leveling. I've confirmed it works since turning it off and just relying on Z-TILT is definitely worse. I've gotten things to be where the corners seem to have a similar layer height, but the center is higher. I think the problem has to do with my bed having a sort of "wave" to it which has been a bit tough to work around. For parts where the first layer isn't seen, what I have works well enough. But a lot of the parts I make the first layer ends up being the most visible part of the model and would like to get my bed leveling up to where my MK3's are. Here's what my current mesh looks like:

Range is around -0.128 to .029.
I went a bit crazy with 11x11 just to try and map things out well enough. I'm using the inductive probe but have a Beacon in a box and that would make quick work of making a dense bed mesh. It was meant for my 2.4 but I think I may put it on the Trident as my 2.4 seems appropriately flat (I got the Beacon just to make the bed mesh process faster on the 2.4). I'm not using an umbilical yet though so haven't figured out how best to hook that thing up since they don't recommend running through drag chains at present. Other option is to just replace the bed. For that I was curious if anyone knows where I can buy a good replacement that already has the heater and magnets attached. Wondering if the wave is caused by my poor application of the magnet (it's waving in the wrong direction though as I applied the magnet front to back).
Here's my current mesh bed config:
I normally use 7,7, but have been trying other values just to see what the mesh looks like. Curious as to if anyone has any ideas on how I might improve things?

Range is around -0.128 to .029.
I went a bit crazy with 11x11 just to try and map things out well enough. I'm using the inductive probe but have a Beacon in a box and that would make quick work of making a dense bed mesh. It was meant for my 2.4 but I think I may put it on the Trident as my 2.4 seems appropriately flat (I got the Beacon just to make the bed mesh process faster on the 2.4). I'm not using an umbilical yet though so haven't figured out how best to hook that thing up since they don't recommend running through drag chains at present. Other option is to just replace the bed. For that I was curious if anyone knows where I can buy a good replacement that already has the heater and magnets attached. Wondering if the wave is caused by my poor application of the magnet (it's waving in the wrong direction though as I applied the magnet front to back).
Here's my current mesh bed config:
Code:
[probe]
pin: ^PG15
x_offset: 0
y_offset: 25.0
z_offset: 0
speed: 10.0
samples: 3
samples_result: median
sample_retract_dist: 3.0
#samples_tolerance: 0.006
samples_tolerance: 0.004
samples_tolerance_retries: 3

...

[bed_mesh]
speed: 300
#horizontal_move_z: 10
horizontal_move_z: 5
#mesh_min: 40, 40
#mesh_max: 260,260
mesh_min: 30,30
mesh_max: 270,270
zero_reference_position: 150,150 #for use with stock z endstop
fade_start: 1
fade_end: 10.0
#probe_count: 7,7 # Values should be odd, so one point is directly at bed center
#probe_count: 9,9 # Values should be odd, so one point is directly at bed center
#probe_count: 3,3 # Values should be odd, so one point is directly at bed center
probe_count: 11,11 # Values should be odd, so one point is directly at bed center
algorithm: bicubic
mesh_pps: 3,3
split_delta_z: .020    # Default is 0.025
I normally use 7,7, but have been trying other values just to see what the mesh looks like. Curious as to if anyone has any ideas on how I might improve things?


