What's new
VORON Design

Register a free account today to become a member! Once signed in, you'll be able to participate on this site by adding your own topics and posts, as well as connect with other members!

LDO Leviathan Control Board Information

Dave32

Well-known member
Ok, so you might have seen Jason’s (@JasonfromLDO) teaser about the “Leviathan” coming soon.

And like me, you might have asked “What the heck is the Leviathan?”… but alas, the vendor post is locked for replies. 😔


Off to Google we go, and we find… very very little. Except for two YouTube videos… in German… which I unfortunately do not speak!
So, to save everyone else the effort, here is the more recent YouTube video, plus the transcript, which I have run through an auto-translation in chunks, and manually un-mangled the formatting.

If anyone else knows more about this collaboration… or knows German better than the auto-translation (“Woron”, LOL) and has a better insight, please clue us in!


[edit: Due to the per-post character limits, the transcript will be pasted in chunks over several posts below.]
 
0:05 [Music]
0:37 That's how mystically we want it to be here today
0:40 don't start but yes it has a small
0:44 little to do with mysticism
0:47 welcome here in my chaos cellar
0:49 I am the Christa Kaarst printer and
0:50 We'll chat about that today
0:52 Leviathan what you are here with me now
0:54 There are a few on the table
0:56 Boards that have me now a whole
0:58 They've been around 3D printing for a while now
1:00 They'll do this for a while
1:02 still know this pretty thing here and that
1:04 Arduino is just missing but otherwise there are
1:06 that's where the first circuit boards were
1:09 we started our printer
1:10 to rebuild and control with others
1:12 Drivers after that came a bit like that
1:15 SKR waste here or in a circle
1:17 Waste
1:20 I still have F6 from Freising here
1:22 different boards installed in 13
1:26 They also became quieter in some cases
1:27 to make such a small circuit board here
1:31 which I personally have with me in what Zero
1:34 in it and then here is a current one
1:36 Circuit board of an octopus from Big
1:41 treetech there are many, many others
1:43 I also have a few circuit boards
1:44 Here it is in the devices
1:45 built-in
1:47 Spider and
1:50 skr1314 for example the skr13 was like that
1:54 the relatively most popular board
1:58 which was installed in worons
2:01 However, they all have connections
2:03 which also have a circuit board on it
2:05 Now, as I said, the octopus but like this
2:08 An SKR has all the connections
2:10 Those who are so into it have it
2:12 not necessarily enough for one
2:14 To fire the entire living space and there is
2:17 you then came up with the idea
2:18 just took two boards around everyone
2:21 Having connections available
2:22 However, two boots need again
2:24 much more space
2:25 You have to supply both with power then
2:28 you have so many connections again
2:29 you don't need all of them and so on
2:31 on and on and then there is
2:32 probably the idea at some point
2:35 Leviathan came into being
2:39 and let's take a look
2:44 Leviathan to the mystical circuit board
2:49 has swept away or will sweep away all the others
2:53 this board should be at the moment where that
2:57 Video is currently being recorded here
2:59 today it will be Leviathan
3:02 officially presented in the USA by ldu
3:07 introduced and even a raffle
3:10 That's what this video was made for
3:12 now depending on he doesn't see it
3:13 come that can still be put online
3:14 Maybe you can still register there
3:17 I'll grab a circuit board to win a link
3:19 everything below otherwise
3:21 forgot what I just said
3:24 Circuit board is now presented which is
3:27 will soon be available in the um
3:30 Where do kids from ldu live?
3:34 delivered and why me personally
3:37 I also think this board is so cool
3:40 also another story about it
3:41 give me now here in the video
3:43 not on
3:44 but if you want you can take the long one
3:48 Watch the stream again
3:50 linked
3:52 the builder creator create this
3:56 Platine was live here in my basement
3:59 we always have several hours left
4:00 I can grasp this circuit board here
4:03 this again very briefly today
4:05 together there is the beautiful piece of us
4:08 let's take a look again
4:10 a bit better in detail but first
4:12 Let's give a rough overview of the part
4:17 I already have a mount at the back
4:19 screwed on
4:20 are exactly the same brackets as in
4:25 So you can do the same with an octopus
4:27 Print mounts and these directly
4:29 but let's go into detail
4:32 there we have the complete circuit board
4:38 and then I rotate them occasionally
4:41 a little more but we'll see
4:43 Let's start with this from above
4:46 kept simple and simple
4:48 largely black, very tidy
4:51 and only the most necessary things on it
4:55 perhaps an or is used like this
4:57 two little things extra but basically
4:59 just what we need
 
5:03 start with the power connection
5:06 we have once over here in the
5:09 Normally 24 volts
5:13 here comes one
5:15 Screw connection and once over here
5:19 We also have 24 volts or 48 volts here
5:24 namely two in quotation marks
5:27 High current
5:29 Driver stepper driver for the motors
5:33 from XY depending on what we call ourselves
5:36 we would like to have here and after
5:38 we steppers
5:40 0123 and 4 for various Z for extruders
5:45 whatever you use it for
5:47 So you want these two to be able to do it at 24
5:51 or operated with 48 volts
5:54 So this connection here has to be here
5:55 Power in once and 24 here
5:58 Volts for the normal on-board current
6:01 Drivers are generally required
6:04 we've just gone through it
6:07 see we have heat sinks on here
6:10 So we don't have any pluggable ones here
6:12 Drivers but we already have them here
6:15 permanently installed stepper drivers
6:19 There are two big ones
6:23 51/60 and the little ones are 22 09 why
6:28 they have now decided on this
6:30 already installed firmly
6:33 There are several reasons given to me
6:35 On the one hand, it was obviously them
6:38 are installed, they can do a lot
6:40 be better cooled there are equal um
6:42 thick fat cooling fins attached to both
6:46 above and below as a result
6:49 The stepper drivers can be much quieter
6:50 be refrigerated is next
6:54 They can probably be controlled completely differently
6:56 to be addressed, which of course then
6:58 is also a huge advantage
7:00 that they will then be operated better
7:03 can be operated more effectively
7:04 can be the main reason though
7:07 it was probably just about you
7:10 safer to do, easier not to do
7:13 Making mistakes with ah we have to do that
7:15 to be jumped now
7:17 how much do I have to put it on?
7:19 yes, always one or the other
7:21 which the operator may have given us incorrectly
7:22 or sit on it the wrong way around and
7:25 then the driver or in
7:27 worst case in the word broken
7:28 made to prevent this
7:31 Here's the side effect right away
7:34 was definitely the much better one
7:36 Cooling and much better
7:39 control behavior is therefore fixed
7:42 installed but let's see something
7:45 we still have the ones over here again
7:47 We have screw connections
7:50 Main output for the hot end and that has
7:52 Bed
7:54 We have that next to it
7:57 CAN bus connection four pins completely normal
8:02 stop the fuses that are on there
8:05 to secure these connections
8:08 but a remnant from ancient times
8:10 one or the other uses it
8:12 maybe the Mini 128 64 after all
8:15 Displays can still be used here
8:16 be connected
8:19 we have an extra LED output here
8:24 for normal stripes always
8:27 should be fired
8:29 we have a direct connection here
8:31 for the Z pro we have one
8:34 Fan
8:36 1,234 of these can also each
8:39 can be jumpered with 5 volts or 24 volts
8:44 We also have four connections for
8:47 thermooren
8:48 1234 so we can do up to four
8:51 Connect the thermistors next to it
8:53 Connection for neopixe we have one
8:56 Connection for a filament run out
8:58 Sensor and back here we have the xy
9:00 and z Ensdorf at the back is another one
9:05 Connection for
9:06 usb-c and we still have that back here
9:10 The connection for the pie is yours
9:14 see the beautiful logo here with the
9:17 mystical form of a water monster
9:20 in this case the Leviathan
9:23 Leviathan whatever you want to call it
9:26 There are very nice Wikipedia entries
9:28 to the Leviathan not to the board
9:31 but to the sea monster to that
9:33 Monsters will be down here too
9:36 linked in the video description
9:39 Definitely a very nice board
9:42 But if someone says it now
9:45 That's not enough for him then we have here
9:47 still this power strip
9:52 where another nice pin-out
9:54 it's where you can do everything else
9:57 you can connect to something here now
9:59 should be missing at the top
 
10:00 We have them here too
10:04 Preparing for a Raspberry Pi
10:08 or
10:09 You would have a Raspberry Pi Zero
10:13 Possibility then right away or something like that
10:16 around
10:17 to screw directly onto the circuit board and
10:21 possibly also other controller boards
10:24 but here it is from a Raspberry Pi
10:27 went out those were still times when that
10:29 was planned where the price was still good
10:32 The back was very clean
10:35 There's not really anything else on it
10:38 As I said, the connections fit exactly
10:41 to an octopus you can exactly
10:43 use the same holders for it
10:48 Here we have the motor drivers again
10:50 or the motor connections here again
10:54 the screw connection for 24 or 28 48
10:58 volt
10:59 the extra PIN row if you have anything else
11:02 should be missing with the USB
11:05 Connect the endstops with all fans
11:09 Thermistors light connections everything
11:12 Jumper bar here in front of the fans
11:14 to 5 volts or 24 volts
11:18 the LAN bus connection or the CAN bus
11:22 not charging where is the can bus connection
11:24 the screw connections lead input and
11:26 again output fuses everywhere
11:29 Make sure you don't break anything if possible
11:30 can do or
11:32 protected from that, something is broken
11:35 to make a very pretty board
11:38 I'm very happy that I did that back then
11:41 a few weeks ago in the live stream
11:43 I was able to look at it and I'm even more pleased
11:46 more that this board now finally
11:49 is on the market
11:51 newer residential kids will now then
11:55 soon with this Leviathan
12:01 delivered so I'm happy about that
12:03 which is now finally available
12:06 Please write to me below
12:09 Comments
12:10 did you already know about the Leviathan?
12:12 did you already know that?
12:14 excited for it, if so you will be
12:17 get it immediately, how do you find it and
12:19 so on and so forth, leave it all
12:21 Let me know in the comments below
12:23 I'm very happy and interested in this
12:27 That's supposed to be it with that one
12:30 a brief introduction and
12:32 Summary of the board where I am the PI
12:37 right now I have it all over again
12:39 Just in case anyone still has connections
12:42 would like to have HDMI moderately is here on the
12:45 Board extra recess a recess
12:48 left on it to have HDMI
12:51 To be able to make or use connections
12:53 to be able to
12:54 You need the connection for the electricity
12:57 not myself because it comes directly from Bo
13:01 is eaten and you have it
13:03 Communication and power supply
13:05 ensured with the pie coming here
13:07 at the back of all the connections on it itself
13:09 now that the new part 5 is coming out
13:11 should change back here
13:13 maybe a little something but that
13:15 influences that here in front
13:17 not at all, so you can too
13:18 newer price and older price here
13:22 Use this board, that's what it's supposed to do
13:25 Thank you very much for watching
13:27 and until next time, ciao
13:31 [Music]
13:38 [Music]
 
It pretty much is an alternative to Manta for a unified Voron/ 3D-printer electronics solution. It's based on a full-sized Pi instead of a compute module.

Pros - built-in beefier 5160s, better input protection (larger fuses, more protection), lower cost (since it includes drivers).
Cons - only 5 other stepper ports, soldered on 2209s. single CAN port, single LED port, lower current on LED port, messier physical configuration (since you need power and data shunts to the Pi.
 
Has anyone here tried to install the Leviathan? I have recently received mine and have some questions that the current documentation does not address. Specifically, there is a plugin board that appears to be what is needed if one wishes to configure the Pi for UART communication vice USB. Is this correct? Will the menu build selections for UART work correctly? The manaul does not address htis. Also, in printer.cfg, is identifying the motor drivers as 2160 vice 2209 sufficient, or is there other config data that mut be entered?
 
There was a commit to the Klipper repository just a few days ago I believe with a baseline Leviathan configuration?

//edit: Yep, found it. Does this have what you needed?
I think this will go a very long way to getting me up and running. Thanks! On an entirely different note, nothing in the manual indicates that the threads on the mounts for the Pi are M2.5. Everything else in the Voron is M3.0.
 
Dumb question - please forgive my ignorance. I am trying to set up my Leviathan, and have already created my SSD card. My Pi Zero 2 W is mounted on the board. My question - where do I insert the SSD card? I cannot see a socket for it..... Thanks in advance for anyone's help!
 
Got my Leviathan up and running on the bench with a BTT SB2209 toolhead board. Took me a while to get everything flashed and working in Klipper. This is my first time messing with canbus. Waiting on some wiring and connectors before transplanting in my V2.4. The documentation is still a bit poor. Not sure what the jumper by the CAN port is used for...1706073060556.png
 
Well, I rebuilt my printer with the leviathan and canbus to the tool head. Everything is working as it should. Problem I'm having is within a minute of printing, I get the dreaded "MCU shutdown timer too close." Also, LDO claims that the dedicated led strip light port for your case lighting is "flicker free". It flickers worse than when driven by the octopus 1.1. That's a fail. So far I'm not very happy with this product. Screenshot 2024-02-08 032324.jpgScreenshot 2024-02-08 032228.jpg
 
OK I fixed my issue and I'm now happy with this controller board. I looked at the klippy log file and the errors were due to running out of buffer space. I found a typo in the can config file (/etc/network/interfaces.d/can0). Now everything is working great.
 
I was going to say that mine been pretty flawless so far but I'm on a brand new Linneo harness,nitehawk PCB just showed up.
When this harness goes I'll switch over to the Nitehawk.
Im running a 350 w 48v psu and 200w 24v psu
I need to start pushing the speeds I think
 
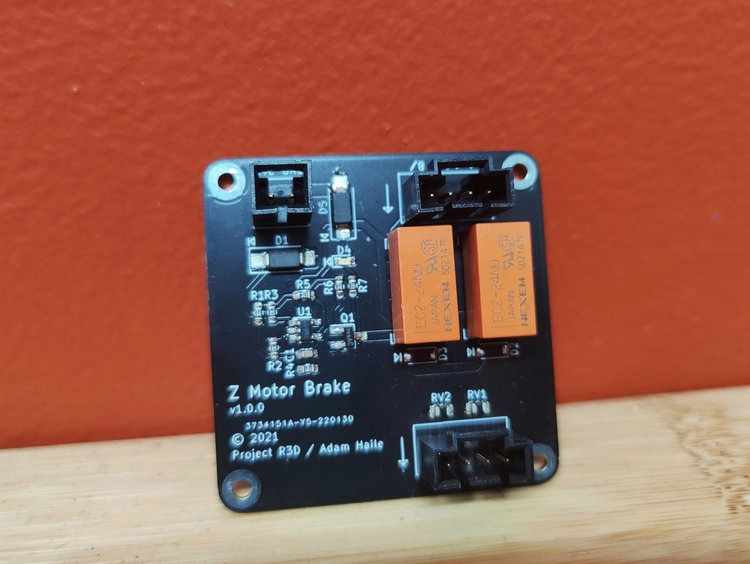
What are these?
If i recall correctly those are stepper brake modules/boards from ProjectR 3d, there's another person who makes them also


they make it so your Z gantry doesn't sag down when the motor is not energized
 
Did you manage to fix the flicker issue as well?
Flickering can be a issue when your cycle_time of your LED's , extruder a somehow interfere with each other

Check which item either hotend or bed see causes you flickering with your LEDs by turning you LED's on, then turn on your hotend,

if one or the other flickers add "cycle_time: 0.01" to the LED and "pwm_cycle_time: 0.01" to the extruder causing the flickering

If its your bed it's another similar config, I can't recall off the top of my head but that would be similar to pwm_cycle_time or just cycle_time
ie.

[extruder]
...
pwm_cycle_time: 0.01 # Required so power supply stops flickering the lights

[output_pin caselight]
...
pwm: True
hardware_pwm: True
cycle_time: 0.01
 
Top