The current documentation regarding getting these two parts working together from BTT is incomplete and user made info is scattered. I'm going to take a crack at fixing (some) of that.
I would recommend doing all of this configuration before installing it into your printer if you can, it will make things a bit easier.
This guide assumes that you have installed the OS on your CM4 or CB1 along with at least Klipper.
The hardware I'm using.
- Manta M8P v2.0 & CM4
- EBB SB2209 CAN v1.0 & EBB SB0000 CAN v1.0
I'm going to provide config details for other versions where I can find it, but I can't verify function as I don't have hardware to test. YMMV.
Note: Versions covered by this guide are v1.1 and v2.0 only. v1.0 doesn't have CAN bus headers direct on board.
Sources:

 letstry.science

 gist.github.com

 github.com

 github.com
You will need an SSH client. I'm using MobaXterm for SSH, use your favourite.

 mobaxterm.mobatek.net
Start with the EBB unplugged, we are going to flash the M8P first.
M8P Flashing
1) Clone Katapult (Formerly CanBoot) into your home directory
2) Switch directories to Katapult and enter the make menu
3) Configure as shown below for your M8P version.
Quit and save
4) Build it
5) Switch directories to Klipper and enter the make menu
6) Configure as shown below for your M8P version.
Quit and save
7) Build it
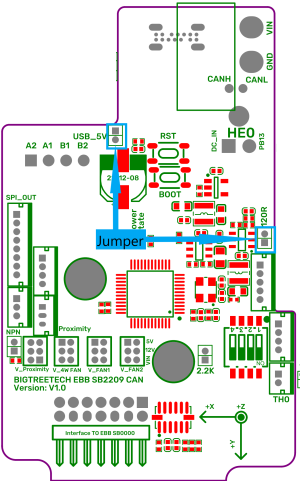
8) Install a jumper for the CAN bus resistor on the M8P
v1.1
v2.0
9) Put the M8P into DFU mode by holding BOOT0 and then pressing RESET
10) Verify DFU mode by checking USB devices
You should see something similar to this:
If you don't see the device in DFU mode try to enter again, power cycle the board if you have to. If your ID number is different, you will need to copy it to the flash commands. (In my case it wasn't)
11) Flash Katapult
You should see this output, the error at the end is normal:
12) Reset the M8P by pressing RESET then put it back into DFU mode by holding BOOT0 and then pressing RESET
13) Flash Klipper
v1.1
v2.0
You should see this output:
14) Reset the M8P again
15) Validate that the firmware was flashed sucessfully:
You should no longer see the STMicreoelectronics device and should now see something like:
Post 1 of 2
I would recommend doing all of this configuration before installing it into your printer if you can, it will make things a bit easier.
This guide assumes that you have installed the OS on your CM4 or CB1 along with at least Klipper.
The hardware I'm using.
- Manta M8P v2.0 & CM4
- EBB SB2209 CAN v1.0 & EBB SB0000 CAN v1.0
I'm going to provide config details for other versions where I can find it, but I can't verify function as I don't have hardware to test. YMMV.
Note: Versions covered by this guide are v1.1 and v2.0 only. v1.0 doesn't have CAN bus headers direct on board.
Sources:
Flashing BigTreeTech Manta M8P V2.0
Notes on getting the BigTreeTech Manta M8P v2.0 printer MCU flashed and working, plus some clarifying points that should be useful to owners of an M8P v1.0/v1.1

BTT Manta M8P v1.1 + BTT EBB 2209 Canbus setup
BTT Manta M8P v1.1 + BTT EBB 2209 Canbus setup. GitHub Gist: instantly share code, notes, and snippets.
Manta-M8P/V2.0 at master · bigtreetech/Manta-M8P
Contribute to bigtreetech/Manta-M8P development by creating an account on GitHub.
EBB/EBB SB2240_2209 CAN/Build Guide at master · bigtreetech/EBB
Contribute to bigtreetech/EBB development by creating an account on GitHub.
You will need an SSH client. I'm using MobaXterm for SSH, use your favourite.

MobaXterm free Xserver and tabbed SSH client for Windows
The ultimate toolbox for remote computing - includes X server, enhanced SSH client and much more!
Start with the EBB unplugged, we are going to flash the M8P first.
M8P Flashing
1) Clone Katapult (Formerly CanBoot) into your home directory
Code:
cd ~
git clone https://github.com/Arksine/katapult.git
2) Switch directories to Katapult and enter the make menu
Code:
cd ~/katapult/
make menuconfig
3) Configure as shown below for your M8P version.
| V1.1 | V2.0 | |
| Micro-controller Architecture | STMicroelectronics STM32 | STMicroelectronics STM32 |
| Processor model | STM32G0B1 | STM32H723 |
| Build Katapult deployment application | Do not build | Do not build |
| Clock Reference | 8 MHz crystal | 25MHz crystal |
| Communication interface | CAN bus (on PD12/PD13) | CAN bus (on PD0/PD1) |
| Application start offset | 8KiB offset | 128KiB offset |
| CAN bus speed ***Actual number isn't really important, pick a number and use it for the rest of the config*** | 250000 to 1000000 | 250000 to 1000000 |
| GPIO pins to set on bootloader entry | ( ) | ( ) |
| Support bootloader entry on rapid double click of reset button | [*] | [*] |
| Enable bootloader entry on button (or gpio) state | [ ] | [ ] |
| Enable status LED | [ ] | [ ] |
Quit and save
4) Build it
Code:
make clean
make
5) Switch directories to Klipper and enter the make menu
Code:
cd ~/klipper/
make menuconfig
6) Configure as shown below for your M8P version.
| V1.1 | V2.0 | |
| Enable extra low-level configuration options | [*] | [*] |
| Micro-controller Architecture | STMicroelectronics STM32 | STMicroelectronics STM32 |
| Bootloader offset | 8KiB bootloader | 128KiB bootloader |
| Processor model | STM32G0B1 | STM32H723 |
| Clock Reference | 8 MHz crystal | 25MHz crystal |
| Communication interface | USB to CAN bus bridge (USB on PA11/PA12) | USB to CAN bus bridge (USB on PA11/PA12) |
| CAN bus interface | CAN bus (on PD12/PD13) | CAN bus (on PD0/PD1) |
| CAN bus speed | ***Use same as first config*** | ***Use same as first config*** |
| GPIO pins to set on bootloader entry | ( ) | ( ) |
Quit and save
7) Build it
Code:
make clean
make
8) Install a jumper for the CAN bus resistor on the M8P
v1.1
v2.0
9) Put the M8P into DFU mode by holding BOOT0 and then pressing RESET
10) Verify DFU mode by checking USB devices
Code:
lsusbBus 001 Device 011: ID 0483:df11 STMicroelectronics STM Device in DFU Mode
If you don't see the device in DFU mode try to enter again, power cycle the board if you have to. If your ID number is different, you will need to copy it to the flash commands. (In my case it wasn't)
11) Flash Katapult
Code:
sudo dfu-util -a 0 -D ~/katapult/out/katapult.bin --dfuse-address 0x08000000:force:leave -d 0483:df11You should see this output, the error at the end is normal:
dfu-util 0.11
Copyright 2005-2009 Weston Schmidt, Harald Welte and OpenMoko Inc.
Copyright 2010-2021 Tormod Volden and Stefan Schmidt
This program is Free Software and has ABSOLUTELY NO WARRANTY
Please report bugs to http://sourceforge.net/p/dfu-util/tickets/
dfu-util: Warning: Invalid DFU suffix signature
dfu-util: A valid DFU suffix will be required in a future dfu-util release
Opening DFU capable USB device...
Device ID 0483:df11
Device DFU version 011a
Claiming USB DFU Interface...
Setting Alternate Interface #0 ...
Determining device status...
DFU state(2) = dfuIDLE, status(0) = No error condition is present
DFU mode device DFU version 011a
Device returned transfer size 1024
DfuSe interface name: "Internal Flash "
Downloading element to address = 0x08000000, size = 4676
Erase [=========================] 100% 4676 bytes
Erase done.
Download [=========================] 100% 4676 bytes
Download done.
File downloaded successfully
Submitting leave request...
dfu-util: Error during download get_status
12) Reset the M8P by pressing RESET then put it back into DFU mode by holding BOOT0 and then pressing RESET
13) Flash Klipper
v1.1
Code:
sudo dfu-util -a 0 -d 0483:df11 --dfuse-address 0x08002000 -D ~/klipper/out/klipper.bin
Code:
sudo dfu-util -a 0 -d 0483:df11 --dfuse-address 0x08020000 -D ~/klipper/out/klipper.binYou should see this output:
dfu-util 0.11
Copyright 2005-2009 Weston Schmidt, Harald Welte and OpenMoko Inc.
Copyright 2010-2021 Tormod Volden and Stefan Schmidt
This program is Free Software and has ABSOLUTELY NO WARRANTY
Please report bugs to http://sourceforge.net/p/dfu-util/tickets/
dfu-util: Warning: Invalid DFU suffix signature
dfu-util: A valid DFU suffix will be required in a future dfu-util release
Opening DFU capable USB device...
Device ID 0483:df11
Device DFU version 011a
Claiming USB DFU Interface...
Setting Alternate Interface #0 ...
Determining device status...
DFU state(2) = dfuIDLE, status(0) = No error condition is present
DFU mode device DFU version 011a
Device returned transfer size 1024
DfuSe interface name: "Internal Flash "
Downloading element to address = 0x08020000, size = 36112
Erase [=========================] 100% 36112 bytes
Erase done.
Download [=========================] 100% 36112 bytes
Download done.
File downloaded successfully
14) Reset the M8P again
15) Validate that the firmware was flashed sucessfully:
Code:
lsusbBus 001 Device 015: ID 1d50:606f OpenMoko, Inc. Geschwister Schneider CAN adapter
Post 1 of 2


