What's new
VORON Design

Register a free account today to become a member! Once signed in, you'll be able to participate on this site by adding your own topics and posts, as well as connect with other members!

Twigets Enderwire IDEX Printer

twiget

Member
Printer Model
EnderWire IDEX
Extruder Type
Galileo
Cooling Type
Stealthburner
I've been feeling (overly?) ambitious and I decided that instead of the relatively easy task of converting my E3 Pro to a Switchwire using boubounokefalos resources, I'd complicate things by making an IDEX Enderwire. Why? I've got a Raise 3D E2 that is IDEX and being able to print with dual materials or having disolvable supports has been a game changer. The problem with the E2 is it's sllllloooooowwwww and IdeaMaker, while a good slicer, doesn't get nearly as much love as Prusa Slicer or Cura. So I thought "Lets do this!" That being said, all the printed parts will be done on the E2 in ASA.

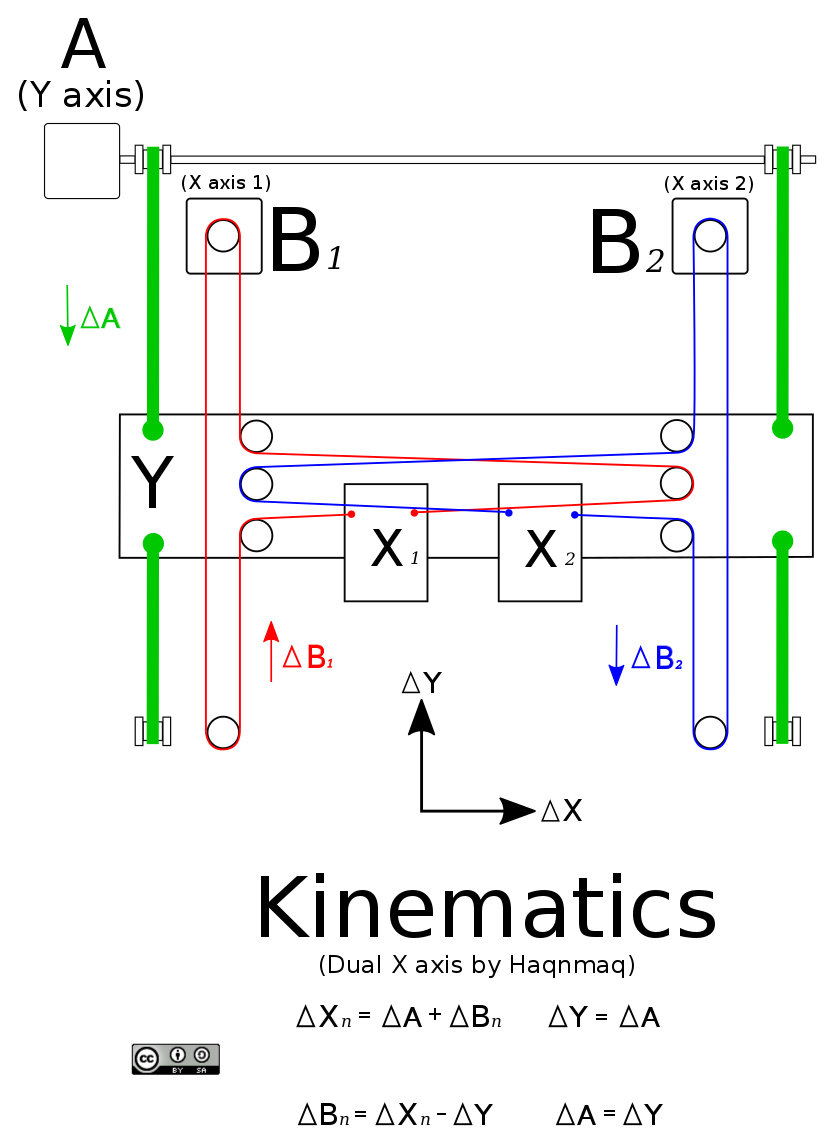
Anyway, I've been researching the EW IDEX conversion for awhile and I've come across a couple helpful git's (ankurv2k6's and cabhinlab's) that where enough to get me started, but neither git has been updated in over 2 years. The Cabinlab blog did help with one key problem, kenematics for an EW IDEX.

7c94364dd5f34a85f8c700666f814dafac3a8e0e.png


Design Goals:
  • Use as many parts from my E3 Pro as possible
  • Core XZ'ish
  • Stealthburners with Gallaleo 2 extruders, hotends are TBD
  • CANBUS on both extruders
  • I want to experiment with Nylon's and glass and CF blends, so fully enclosable and maybe active heating?
  • Nevermore or some other air circulation system (possibly integrate a heater into this?)
Major Changes to Meet those Goals:
  • Widened printer by 110mm to 440mm
  • Remixed the Z-axis motor mounts (botom motors) so that they clamp on the inside of the frame instead of the outside. This allows for smooth outter pannels with fewer protrusions.
    • 1716949652557.jpeg
  • For the X gantry I'm going to use a 350mm rail along with a 350mm extrusion.
  • Still need to remix the XZ blocks for IDEX, these will probably be unique for each side.
  • Remixed the Stealthburner brackets so that the belt channels are wider on one side than the other to allow for minimial interfearance with the belt as the other extruder moves.
    • 1716949683047.jpeg
  • The eagle eyed may have noticed that I removed the belt tensioner off the Z motor mounts. With the new mounting location, tensioning the belts would have been a PITA. Instead, I took inspiration from my V0.1 and designed a tensioner mechanisim around the x-axis motors. They are mostly the same from one side to the other but I did integrate the counterweight pulley into the left motor mount (not shown).
    • 1716949669006.jpeg
  • The big milled 40 x 40 extrusion that the y-axis rests on will be reused. I think the plan for that is going to be getting another 40 x 40 extrusion and cutting it down to size and then printing some parts to stitch it together into one piece. Alternatively, I can print one big piece and use an M5x100mm bolt to hold everything together. This will take a bit more thought.
  • Pannels, I need to remix the pannels, covers, extensions and grills. though they are low priority.
  • Electronics. I doubt the stock E3 Pro power supply can handle double the motors and extruders, so I'll gonna to have to source a more robust one. For the MCU, I'm thinking about the BTT Octopus, and I'll likely use a Raspberry Pi 4b and a 5VDC buck converter to power it.
 
And here's the current status of my IDEX EW.
EW IDEX.jpg
I hope to be printing parts in a week or so. I want to figure out the XZ blocks before I start making parts.
 
Thanks for sharing your design and some resources!!

I'm hoping you continue to share more updates on this build, but for now I have some questions.

  • Did you keep the same print volume as the original Ender 3 Pro?
    • I'm planning to increase my volume to maybe around 300mm on x and y, but I don't see many folks doing that out there.. I'm wondering if there's a concern with moving a heavier bed and such.
  • For the Kinematics of the dual x axes, is that something klipper already supports? Or is it something you're planning to implement with klipper?
    • I haven't done too much research into IDEX stuff. Your post is the first time I came across this term 😂

Thanks!
 
You know what they say, "If you want to make God laugh, tell him your plans."

I was hoping to have the Galileo extruders put together this weekend and have some progress pics to post, but things didn't go according to plan. In stead of using ASA as I originally planned, I decided to use some old ABS that I've had for a couple of years. Between the old ABS (which was thoroughly dried), and not taking the time to accurately calibrate the x & y offset between the extruders on my E2, none of the parts I printed fit together like they should have. So it's back to square 1 with the printing. This time I really am going to use ASA and the extruders will be properly calibrated.

On the plus side, I'm a lot poorer and the guys at West3D are doing pretty well. My (hopefully) last order for this printer is supposed to arrive today. I decided to go with the the BTT Kraken since it supports IDEX tool heads, including CANBUS support. I also went with the BTT Pi, which I can power straight from the 24vdc power supply instead of having to get a separate PSU for the Pi.

To answer your questions @ther4nd0moo, I'm using the standard E3P bed. I had to widen it by 110mm on the x to fit both extruders, so it's already going to be a huge printer once it's fully enclosed. Having to source a new bed, heater and longer rails would have been a lot more expensive too. If you're interested, check out the Ender Extender.

Klipper does support IDEX. When I started this, I thought building the printer was going to be the easy part and figuring out the control side of things was going to be the hard part. It looks like I may have had it backwards. The more I research how to make IDEX work, the less daunting it becomes.

I'll post some pics of parts and assembly, once I get them. Hopefully this weekend, maybe next.
 
I got my E2 dialed in earlier this week and I started printing mirrored Stealthburner and Galileo 2 parts. The SB on the left is the regular one, and the mirrored one is on the right. I'm pretty happy with how they came out, they have to be the sexiest hot glue guns I've ever seen. Plus, the front covers look like Spiderman.
Mirrored Stealthburners Small.jpg

I do have a few things to fix though. I'm using Phaetus neXt G hotends, which are supposed to be the same form factor as the Dragon hotend. That may be true, but the cable strain relief seems to be different. On the normal SB, even with the strain relief on the thermistor, there is way too sharp of a bend for my liking. The heater and thermister cables almost do a 180 on the mirrored one, no surprise there. So it looks like remixing and reprinting the Dragon mounts is in order.
Mirrored Stealthburners Bottom Small.jpg

I've also got the X & Z axis motor mounts printed and I've designed the parts needed to widen the frame 110mm, I just need to print them. I aslo need to extend the wires for the LED's as they are not long enough to reach the EBB36 board I'm mounting on the back of the extruder motor. And I need to print the diffuser for the logo LED, I've got some translucent red PETG that I think will look nice. I just need to create a profile on my V0.1 to print that. Next week is a 3-day work week, which means 4 whole days to focus on getting this thing put together!
 
Top