What's new
VORON Design

Register a free account today to become a member! Once signed in, you'll be able to participate on this site by adding your own topics and posts, as well as connect with other members!

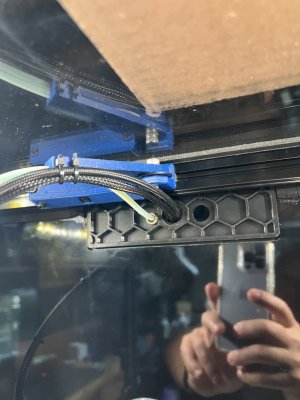
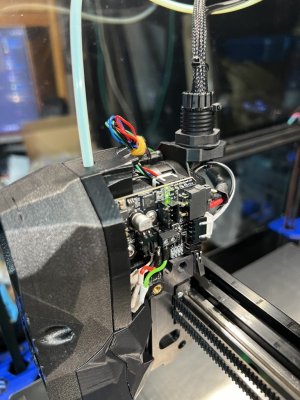
a secondhand Voron 2.4 350 being rebuild after it traveled nearly 2000 km by air, in a suitcase!

I never did it before and eventually I will also not do it on this machine. But this machine is still new to me so I like to understand everything before I will chop features.
I also think that running a bedmesh every few months, or after mayer rework, is enough. This way it would also drop that bed mesh calibrate from the start macro.
I also run with a clicky probe but I do not know yet how many points it takes or where to set it from.
I did find a useful macro from https://github.com/jschuh/klipper-macros, where he also has a fast bed mesh which sets the size to check to the size of your print. Once I got that working I think I will run that for a while and see what I think of it.
take a good amount of time to understand things do not rush, this is the right approach.
 
regarding bed mesh points

Code:
[bed_mesh]
speed: 300
horizontal_move_z: 10

## 300mm build
mesh_min: 40, 40
mesh_max: 260,260
zero_reference_position: 150,150 #for use with stock z endstop # sanket: check if we need this ?
## 300mm build

fade_start: 0.6
fade_end: 10.0
probe_count: 5,5 # Values should be odd, so one point is directly at bed center
algorithm: bicubic

probe_count is where we assign , this sample has 5 x 5 point mesh, I have this as 9,9 for a 9 x 9
found it:

speed: 500
horizontal_move_z: 12
retries: 5
retry_tolerance: 0.0075
max_adjust: 12

[bed_mesh]
speed: 500
horizontal_move_z: 10
mesh_min: 30,50
mesh_max: 330, 308
probe_count: 5,5

when my bed level check print is ready I will change this to 9,9 also.
 
found it:

speed: 500
horizontal_move_z: 12
retries: 5
retry_tolerance: 0.0075
max_adjust: 12

[bed_mesh]
speed: 500
horizontal_move_z: 10
mesh_min: 30,50
mesh_max: 330, 308
probe_count: 5,5

when my bed level check print is ready I will change this to 9,9 also.
Note the more the mesh point the more time it takes
 
This seems to show you run an umbilical from the tool-head rather than the cable chains. Why did you do this and how does it perform? How did you fix this to the top of the printer and what happens to the umbilical once you reach higher levels?
I need to reprint the exit at the top since I have an extra hole but the umbilical runs out the top where the exhaust fan used to be and I have an arm that helps the wires swivel and extend. I make sure and move the toolhead to the front far corner to make the length fit with just a small bit of slack.
Not having chains can greatly reduce the weight of the gantry and increase speeds.
The toolhead wires have to be secured very well since all the movement. I attach the cables and zip tie them to relieve the wiggle, then up and out.
 

Attachments

  • IMG_0322 (Medium).JPG
    IMG_0322 (Medium).JPG
    132.4 KB · Views: 6
  • IMG_0323 (Medium).JPG
    IMG_0323 (Medium).JPG
    170.6 KB · Views: 6
I need to reprint the exit at the top since I have an extra hole but the umbilical runs out the top where the exhaust fan used to be and I have an arm that helps the wires swivel and extend. I make sure and move the toolhead to the front far corner to make the length fit with just a small bit of slack.
Not having chains can greatly reduce the weight of the gantry and increase speeds.
The toolhead wires have to be secured very well since all the movement. I attach the cables and zip tie them to relieve the wiggle, then up and out.
I might do something similar eventually. Not a fan of drag chains for these small things. We use them a lot in industrial machines but they are really serving a purpose there. Lots of movements and mixed sorts of services going through them such as data, power, air and hydraulics. This on these diddly little printers seems overkill and more for the show. The ones in the photos are 120 mm wide I think. Separate chambers for different functions. Steel chewing monsters of machines, if your cables or hoses are left to float about the place you are waiting for a disaster to happen. I like your umbilical solution and with that moving support arm it will look just as finished IMHO.
 

Attachments

  • signal-2024-06-30-181149_002.jpeg
    signal-2024-06-30-181149_002.jpeg
    147.2 KB · Views: 3
  • signal-2024-06-30-181149_003.jpeg
    signal-2024-06-30-181149_003.jpeg
    75.7 KB · Views: 3
I might do something similar eventually. Not a fan of drag chains for these small things. We use them a lot in industrial machines but they are really serving a purpose there. Lots of movements and mixed sorts of services going through them such as data, power, air and hydraulics. This on these diddly little printers seems overkill and more for the show. The ones in the photos are 120 mm wide I think. Separate chambers for different functions. Steel chewing monsters of machines, if your cables or hoses are left to float about the place you are waiting for a disaster to happen. I like your umbilical solution and with that moving support arm it will look just as finished IMHO.
Those are big chains!

My Bambu labs has a slightly different style cable chain connecter and I think its slightly better but with the few cables, umbilical is much better.
Most people run the umbilical over to the A motor (right side) and then down into the electrical chamber. I did care that I have cables running down the back hence why I went up and out.
 
Top