kholland15
Member
My first printer was an Ender 3V2. I learned the ins and outs of 3D printing on it and I heavily modified it. Some of the main upgrades I did were CRTouch, PEI magnetic bed, BMG Extruder in Bowden configuration, Slice Engineering Bimetal Heatbreak with Copper Plated heat block, Gulf Robotics bed, and Creality Popup Enclosure.
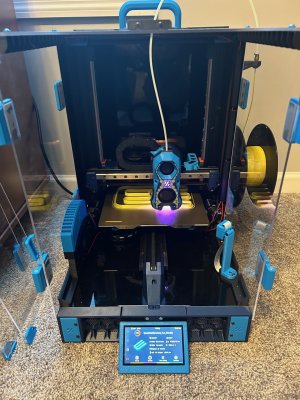
My next printer was a Voron V0.2r1 kit I got from Formbot. I printed the parts on my trusty Ender and thoroughly enjoyed the process. After the V0.2 was built I found myself using it more and more mainly because of the speed at which I could print things, I only ever used my Ender for larger prints that I could not fit on the build plate of the Voron otherwise it sat idle. I was contemplating getting a 2.4 or Trident to print larger items but then I found people were converting Enders to Switchwires for significantly less money I felt like that was a perfect solution.
I went with the SIboor Kit, I looked at self sourcing because I planned on reusing a lot of my upgrades but I could not come close to price of the kit even when excluding the things I didn't need. The kit parts themselves are fairly good quality except the no-name hotend with no replaceable nozzle, I threw it in the trash. That was ok because I wanted to reuse my creality hotend with Slice heatbreak (more on this later). The directions to put it together are mediocre and not to the same standards as the official Voron manuals. A lot of times the directions would skip steps, or call out the wrong type of screws.
My Ender control board had all of its connectors hot glued on and I could not free them so I decided to use a SKR Pico like in my Voron V0.2 since I could copy a lot of the klipper config and Sibor does not supply any sort of official config to use the Ender's mainboard anyway. That was a great idea until I realized I had to re-crimp the entire wiring harness that comes with the kit, that was not fun but that one was on me.
My biggest complaint with the Sibor kit is the enclosure. If you put it together the way its meant to be you will never be able to remove it easily since it is held together almost entirely with VHB tape. I modified it so the back panel and both top panels could be removed separately and I modded the doors to use magnetic hinges so those could be removed as well.
So once I got the printer configured and working, I started tuning the print quality. I kept on hearing clicking every so often so i investigated to see if the motion system was hitting something. After awhile I realized it must be the extruder because I was getting really bad top layers when tuning the flow. I had to take apart the Stealthburner to diagnose the problem. This would have been extremely difficult had I not modified the enclosure to be able to be removed. I tuned up the CW2 got it running smoother and put it all back together but still heard the clicking. Then it dawned on me that I should probably do a a max flow test. My naive self thought that since my upgraded creality hotend was essentially the same as my dragon hotend on the V0.2 (Copper heat block, bimetal heatbreak, and same 60W heater) that I could drive the same 12-15mm/s3. Nope, the PLA+ I was trying to tune topped out at 8mm/s3 on the Enderwire at my usual temperatures. I had never experienced higher flow rates when it was an Ender because I did not drive it faster than 100mm/s. So now I'm debating on upgrading the hotend or just waiting awhile.
Anyway here are some things I take away from the conversion and the Sibor kit...
1) Do not build the Siboor kit as your first Voron experience. I know it seems like an inexpensive way to dip your toe into Vorons, but you're gonna have a bad time.
2) Modify the enclosure to be removable!
3) You will need a working 3D printer on hand because of step 2 and the instructions are not very clear on what 3D parts you need. You will re-print things.
4) Be careful with what parts you want to reuse from the old Ender, most of my headaches came from trying to reuse things.
5) With a Formbot Trident or 2.4 250x250 kit coming in at <$700, and you get premium upgrades like a screen, TAP, CAN toolhead, CB1(Rpi replacement). I don't think this conversion is worth it. I think I only did it out of nostalgia and a sunk cost fallacy if I'm being honest with myself.


