
JendaDH
Active member
So the whole "in-layer" material change started when I printed solo the MiniSB head for Micron and the logo. Even when I sanded both parts, the fit was not good enough. Most problematic was the MiniSB cowling with those "bridges". The logo is I think two layers thick only, maybe three, not more. So the long extrusions in the air dropped a bit making it difficult to press something in.
I then checked the Github repo to see there is MMU model as well. Did a bit of research and what you need is STL file, that has more than one object / bodu defined. This is important for the multi-material print.
I am using Prusa Slicer (PS) therefore all the settings are for that SW, but similar would be for others I suppose.
I went in PS to Printer Settings and in Genral section I selected that I have two extruders:

The actual Extruder settings in PS I left as they were.
In Custom G-code after experiments, I ended up adding the M600 macro to the Tool change section:

I have not changed anything in Print Settings, went to Plater and checked the object. There you have the option to break the SLT apart to "Objects" and "Parts". Not sure what the difference in detail is now, but I used parts and that will list individual components in the object list:

There you can assign different materials to different objects. Since I am doing this manually, it really does not matter in my opinion, I only picked different filament profiles I have created in past with different colors so I can verify I am going to get what I am after (looking at plate from below):

With this set, I sliced the model and saved the G-Code, All done for PS.
Before we dive into Klipper configuration, there are things PS entered into the G-code for me that I had to manually take out (comment), like setting temperature before PRINT_START macro, or sending M1 and M300 (M1/0 is unconditioned pause, M300 is likely Marlin beep signal), I honestly don't know where these came from.
In order to find these, I implemented logging for the G-code into the command window in Klipper. To do that, you need to put this in your printer.cfg:
With this in mind, here is snipped of the G-code I modified so I can see what is going on to give you an idea (the respond type ERROR will make your line pop up in the console as it will be in red colour):
Now the Klipper side. Upload the gcode and go to your printer.cfg. You need to make alias for T0 and T1 (two extruders, if you select more, then you would need to increase the number of aliases).
In the Tx.
Here I am saying to activate "extruder" with the tool change. It is the same for both as we do have only one in place. The M900 is Marlins linear advance, so it is blank here as we have Pressure Advance (PA) set in our printer.cfg
Here is just for reference my M600 macro for filament change:
It could be probably optimised, but that I will do later. What happens is the toolhead goes to the XY home position and then moved to the middle front so you can access it with hands. I am using this pause as you need to hit "RESUME" to manually push a bit of filament through to clear the plastics as sometimes it takes significant amount of filament. This way I can ensure extruder can grab the filament properly and the colour will not have any shifting. I use this opportunity to inspect the nozzle as well for any filament leftover removal.
You will probably need to check if this plays well with your PRINTER_START macro as well, that is why the logging into console. I included the ACTIVATE_EXTRUDER in PRINTER_START as well just as precaution, if used on already active extruder, you'll just get notification that particular extruder is already active.
!! Important thing, check in your slicer the tool path first, you will see what will be printed first, so you can prepare the correct colour.
Hope this helps, if there is something unclear, let me know. And share your result when you test ;-)
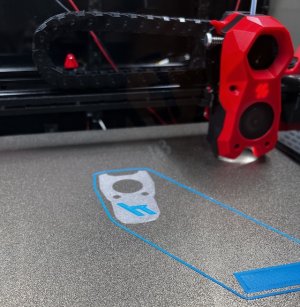
Here is 1st layer of my print -> layer_1.jpg
Here is 2nd layer of my print -> layer_2.jpg
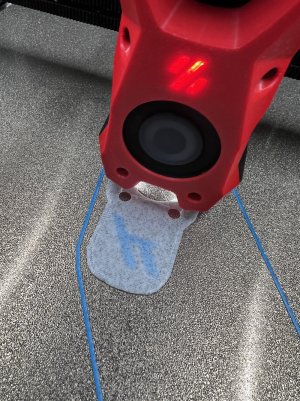
Here is the logo fully baked in -> baked.jpg
I then checked the Github repo to see there is MMU model as well. Did a bit of research and what you need is STL file, that has more than one object / bodu defined. This is important for the multi-material print.
I am using Prusa Slicer (PS) therefore all the settings are for that SW, but similar would be for others I suppose.
I went in PS to Printer Settings and in Genral section I selected that I have two extruders:
The actual Extruder settings in PS I left as they were.
In Custom G-code after experiments, I ended up adding the M600 macro to the Tool change section:
I have not changed anything in Print Settings, went to Plater and checked the object. There you have the option to break the SLT apart to "Objects" and "Parts". Not sure what the difference in detail is now, but I used parts and that will list individual components in the object list:
There you can assign different materials to different objects. Since I am doing this manually, it really does not matter in my opinion, I only picked different filament profiles I have created in past with different colors so I can verify I am going to get what I am after (looking at plate from below):
With this set, I sliced the model and saved the G-Code, All done for PS.
Before we dive into Klipper configuration, there are things PS entered into the G-code for me that I had to manually take out (comment), like setting temperature before PRINT_START macro, or sending M1 and M300 (M1/0 is unconditioned pause, M300 is likely Marlin beep signal), I honestly don't know where these came from.
In order to find these, I implemented logging for the G-code into the command window in Klipper. To do that, you need to put this in your printer.cfg:
Code:
[respond]
default_type: echo
#   Sets the default prefix of the "M118" and "RESPOND" output to one
#   of the following:
#       echo: "echo: " (This is the default)
#       command: "// "
#       error: "!! "
#default_prefix: echo:
#   Directly sets the default prefix. If present, this value will
#   override the "default_type".
With this in mind, here is snipped of the G-code I modified so I can see what is going on to give you an idea (the respond type ERROR will make your line pop up in the console as it will be in red colour):
Code:
RESPOND TYPE=error MSG='M107'
M107
RESPOND TYPE=error MSG='M190 S110'
M190 S110 ; set bed temperature and wait for it to be reached
;M104 S265 T0 ; set temperature => this I had to comment out to get rid of "unknknown extruder error" in Klipper
;M104 S265 T1 ; set temperature => this I had to comment out to get rid of "unknknown extruder error" in Klipper
;TYPE:Custom  => this up to M221 S95 comes from your slicer's custom G-Code START section
; M190 S0
; M109 S0 ; uncomment to remove set&wait temp gcode added automatically after this start gcode
; print_start EXTRUDER=265 BED=110

RESPOND TYPE=error MSG='Set print stats'
SET_PRINT_STATS_INFO TOTAL_LAYER=181
RESPOND TYPE=error MSG='PRINT START'
PRINT_START BED_TEMP=110 EXTRUDER_TEMP=265
RESPOND TYPE=error MSG='M221 S95 - EM profile'
M221 S95
RESPOND TYPE=error MSG='M109 S265 T0 => excluded'
;M109 S265 T0 ; set temperature and wait for it to be reached
RESPOND TYPE=error MSG='M109 S265 T1 => excluded'
;M109 S265 T1 ; set temperature and wait for it to be reached
RESPOND TYPE=error MSG='G21'
G21 ; set units to millimeters
RESPOND TYPE=error MSG='G90'
G90 ; use absolute coordinates
RESPOND TYPE=error MSG='M83'
M83 ; use relative distances for extrusion
RESPOND TYPE=error MSG='G1'
G1 Z.2 F18000
;HEIGHT:0.2
;TYPE:Wipe tower
;WIDTH:0.5
;--------------------
; CP PRIMING START
;--------------------
M220 B
M220 S100
G1  X7.000 Y0.260   F7200

RESPOND TYPE=error MSG='M600 - Material change'
M600
RESPOND TYPE=error MSG='T1 - Tool change'
T1
Now the Klipper side. Upload the gcode and go to your printer.cfg. You need to make alias for T0 and T1 (two extruders, if you select more, then you would need to increase the number of aliases).
In the Tx.
Here I am saying to activate "extruder" with the tool change. It is the same for both as we do have only one in place. The M900 is Marlins linear advance, so it is blank here as we have Pressure Advance (PA) set in our printer.cfg
Code:
######################################################################
# Multi Material Macros
######################################################################
[gcode_macro M900]
gcode:
    #default_parameter_K: 0 gcode : SET_PRESSURE_ADVANCE ADVANCE={K}

[gcode_macro T0]
gcode:
    ACTIVATE_EXTRUDER EXTRUDER=extruder


[gcode_macro T1]
gcode:
    ACTIVATE_EXTRUDER EXTRUDER=extruder
Here is just for reference my M600 macro for filament change:
Code:
######################################################################
# Filament Change
######################################################################

# M600: Filament Change. This macro will pause the printer, move the
# tool to the change position, and retract the filament 50mm. Adjust
# the retraction settings for your own extruder. After filament has
# been changed, the print can be resumed from its previous position
# with the "RESUME" gcode.

[gcode_macro M600]
gcode:
    {% set X = params.X|default(150)|float %}
    {% set Y = params.Y|default(0)|float %}
    {% set Z = params.Z|default(15)|float %}
    SAVE_GCODE_STATE NAME=M600_state
    PAUSE
    G91
    G1 E-.8 F2700
    G1 Z{Z}
    G90
    G1 X{X} Y{Y} F3000
    G91
    G1 E-50 F1000
    RESTORE_GCODE_STATE NAME=M600_state
It could be probably optimised, but that I will do later. What happens is the toolhead goes to the XY home position and then moved to the middle front so you can access it with hands. I am using this pause as you need to hit "RESUME" to manually push a bit of filament through to clear the plastics as sometimes it takes significant amount of filament. This way I can ensure extruder can grab the filament properly and the colour will not have any shifting. I use this opportunity to inspect the nozzle as well for any filament leftover removal.
You will probably need to check if this plays well with your PRINTER_START macro as well, that is why the logging into console. I included the ACTIVATE_EXTRUDER in PRINTER_START as well just as precaution, if used on already active extruder, you'll just get notification that particular extruder is already active.
!! Important thing, check in your slicer the tool path first, you will see what will be printed first, so you can prepare the correct colour.
Hope this helps, if there is something unclear, let me know. And share your result when you test ;-)
Here is 1st layer of my print -> layer_1.jpg
Here is 2nd layer of my print -> layer_2.jpg
Here is the logo fully baked in -> baked.jpg
Attachments

Last edited:
")