Laserbea4k43
Well-known member
Hi,
Printing bigger PLA parts always ends badly.
eSun PLA+ 225C/60C
Fan @ 100% after layer 1
I
1st attempt:


2nd attempt (print started out in the middle of the bed):

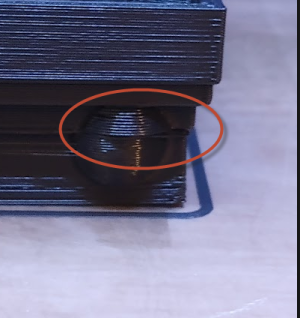
I'm wondering if my toolhead sees the hole in my PEI and GTFO of Dodge...
Going through the list by @bythorsthunder:
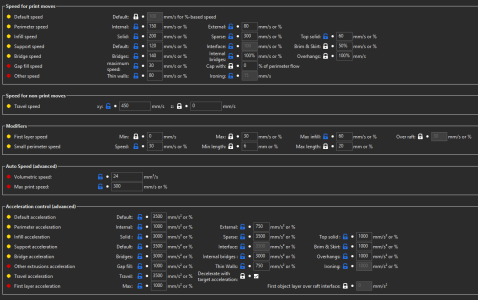
1. Speeds -Check your speeds and accels, especially travels. Limit A and B steppers to 300mm/s and 5k accels for testing. Stealthchop Disabled.
I'm using Ellis' print tuning config as a default. Should I slow it down?

2. Belt Routing -Ensure belts are not touching plastic on the back of the A or B drives. Post a photo if unsure.
Everything looks good here
3. Grubs -Check A and B motor grub screws. Make sure they are tight and on the flats of the motor shaft.
I check this fairly regularly. For SnG, I'll check now. Looks good
4. Belt Tension -Make sure your belts are not too loose or too tight. 110hz on a 150mm length of belt.
I can't seem to measure above 105Hz. Once my belts go tighter, my ipad Air (latest) registers the sound created as something around 30Hz
Maybe I should just plug a condenser mic up and check with that....
5. Stepper Drivers -Ensure heatsinks are installed and you have cooling fans blowing air over the mcu.
Working on the insides and replaced the fan mounts yesterday. This is looking good.
6. Panels -Ensure rear panel has not warped inwards making contact with the belts on the back of the gantry. Check with hot chamber.
There's a 2 or 3 inch wide bubble on my back panel but still plenty of clearance, at least when printing PLA. Will check again the next time I need to close the chamber.
7. Stepper Motors -Set to a reasonable current. 0.8amps-1amp for most common motors.
All motors set to 1A
8. Gantry Check -Disable motors, center the toolhead and push the Y axis towards the back without touching belts or toolhead. Does the X axis move?
No
9. Slicer- Ensure you are not over-extruding. This can cause the nozzle to snag while printing.
Just finished the 2 stage filament flow calibration script in SS
10. Cooling -Corners curling up can also snag the nozzle. Use Z hop if possible.
No curling on the corners, that I can see, but I'm thinking my walls or infill are trouble.
I've set Lift Z to 1 in my filament overrides
11. Linear Rails -Snagging of the carriage while moving on the rail can cause shifts. This can often be heard as loud clicking during rapid toolhead movements or can be felt during manual movements.
There was a weird "snag/bump" on y movement that I was trying to figure out. It prompted me to do a gantry check several times. I didn't find anything, and I don't hear it anymore. It lasted for a day or 2 after I upgraded my rails to install TAP.
Printing bigger PLA parts always ends badly.
eSun PLA+ 225C/60C
Fan @ 100% after layer 1
I
1st attempt:
2nd attempt (print started out in the middle of the bed):
I'm wondering if my toolhead sees the hole in my PEI and GTFO of Dodge...
Going through the list by @bythorsthunder:
1. Speeds -Check your speeds and accels, especially travels. Limit A and B steppers to 300mm/s and 5k accels for testing. Stealthchop Disabled.
I'm using Ellis' print tuning config as a default. Should I slow it down?

2. Belt Routing -Ensure belts are not touching plastic on the back of the A or B drives. Post a photo if unsure.
Everything looks good here
3. Grubs -Check A and B motor grub screws. Make sure they are tight and on the flats of the motor shaft.
I check this fairly regularly. For SnG, I'll check now. Looks good
4. Belt Tension -Make sure your belts are not too loose or too tight. 110hz on a 150mm length of belt.
I can't seem to measure above 105Hz. Once my belts go tighter, my ipad Air (latest) registers the sound created as something around 30Hz
Maybe I should just plug a condenser mic up and check with that....
5. Stepper Drivers -Ensure heatsinks are installed and you have cooling fans blowing air over the mcu.
Working on the insides and replaced the fan mounts yesterday. This is looking good.
6. Panels -Ensure rear panel has not warped inwards making contact with the belts on the back of the gantry. Check with hot chamber.
There's a 2 or 3 inch wide bubble on my back panel but still plenty of clearance, at least when printing PLA. Will check again the next time I need to close the chamber.
7. Stepper Motors -Set to a reasonable current. 0.8amps-1amp for most common motors.
All motors set to 1A
8. Gantry Check -Disable motors, center the toolhead and push the Y axis towards the back without touching belts or toolhead. Does the X axis move?
No
9. Slicer- Ensure you are not over-extruding. This can cause the nozzle to snag while printing.
Just finished the 2 stage filament flow calibration script in SS
10. Cooling -Corners curling up can also snag the nozzle. Use Z hop if possible.
No curling on the corners, that I can see, but I'm thinking my walls or infill are trouble.
I've set Lift Z to 1 in my filament overrides
11. Linear Rails -Snagging of the carriage while moving on the rail can cause shifts. This can often be heard as loud clicking during rapid toolhead movements or can be felt during manual movements.
There was a weird "snag/bump" on y movement that I was trying to figure out. It prompted me to do a gantry check several times. I didn't find anything, and I don't hear it anymore. It lasted for a day or 2 after I upgraded my rails to install TAP.
Last edited:


