What's new
VORON Design

Register a free account today to become a member! Once signed in, you'll be able to participate on this site by adding your own topics and posts, as well as connect with other members!

Solved Probe samples exceed samples tolerance

Laserbea4k43

Well-known member
Hi,
Just got Unklicky Tap running, but I can't get consistent measurements.

CSS:
05:18:07 // Klipper state: Ready
05:18:29 $ G28
05:19:12 // probe at 50.000,25.000 is z=6.603000
05:19:13 // probe at 50.000,25.000 is z=6.635500
05:19:13 // Probe samples exceed tolerance. Retrying...
05:19:13 // probe at 50.000,25.000 is z=6.648000
05:19:14 // probe at 50.000,25.000 is z=6.635500
05:19:14 // Probe samples exceed tolerance. Retrying...
05:19:15 // probe at 50.000,25.000 is z=6.618000
05:19:16 // probe at 50.000,25.000 is z=6.655500
05:19:16 // Probe samples exceed tolerance. Retrying...
05:19:17 // probe at 50.000,25.000 is z=6.635500
05:19:17 // probe at 50.000,25.000 is z=6.633000
05:19:18 // probe at 50.000,25.000 is z=6.660500
05:19:18 !! Probe samples exceed samples_tolerance

My probe from printer.cfg:
CSS:
[probe]
pin: ^PG15
x_offset: 0
y_offset: 0
speed: 5.0
samples: 3
samples_result: median
sample_retract_dist: 1.0

samples_tolerance: 0.01
samples_tolerance_retries: 3

Not sure why it's so inaccurate

I asked over on the github. Not sure how to delete here.
 
Last edited:
Just to be clear, you have TAP running and not Unkicky correct? I ask because they are two different things as far as I know.

My printer is torn apart right now so I cannot do a probe test to compare. Do you have a start print macro setup? You could test with that to see if it work.
 
I believe the OP is referring to TAP with an unclicky style "switch" instead of the spec optical sensor. Unfortunately that's about as much help as I can provide.
 
I would say he means UnTap. I have the same running right now because of user error in parts ordering.
I am seeing the same issue with my UnTap. When doing a z_tilt_adjust I get the probe samples exceed tolerance error way too often. I have sanded the moving screw/wire mount bit to make sure it easily moves within the saddle part. I've used 30AWG super floppy wire left over from my SB LED harness build, and carefully routed & secured the wires to try and minimize any binding from those. Still get this inconsistent behavior.
 
I'm using Unklicky_TAP.
I believe it's the same as what @claudermilk is referring to.
I didn't zip-tie my wires down. You may have something there. Still if the behavior of it is this wild over 2 loose wires, when part of it is free-floating itself, I'm having my doubts that I'll be able to get it to work.
(no knock on the the developers)
 
I would not think it would be the Z belts. Could there be something loose on the toolhead? I was getting lots of inaccuracy with klicky after some time and the mount on the tool head had come just slightly loose.
 
Meh...I just bought a TAP kit from DeepFriedHero
LOL, my extra parts arrived, so I'm going back to trying the spec optical sensors. I have a lifetime supply of 2.2 ohm resistors now and a couple of stand-alone wired optical sensors (OPB991T55Z).
 
My opinion is that you have a mechanical issue. Check the tightening of all your screws (magnets included). Are your belts well fastened enough?
 
My opinion is that you have a mechanical issue. Check the tightening of all your screws (magnets included). Are your belts well fastened enough?
must be... I've moved the samples tolerance back to .05 from .01 and it's working....
I do need to tune my belts, haven't done so since installing the R2 rail and Tap.
Spoke too soon. Still getting errors in my QGL. Can't get it within tolerance range...
// Retries: 5/5 Probed points range: 0.027500 tolerance: 0.007500
!! Too many retries
QGL works fine until I heat up the hot end and bed. And I’m only running at 60C for PLA right now.
 
Last edited:
CSS:
22:17:38  // PROBE_ACCURACY at X:175.000 Y:175.000 Z:20.030 (samples=10 retract=1.000 speed=5.0 lift_speed=5.0)
22:17:41  // probe at 175.000,175.000 is z=6.744598
22:17:42  // probe at 175.000,175.000 is z=6.774598
22:17:42  // probe at 175.000,175.000 is z=6.779598
22:17:43  // probe at 175.000,175.000 is z=6.789598
22:17:44  // probe at 175.000,175.000 is z=6.792098
22:17:45  // probe at 175.000,175.000 is z=6.799598
22:17:46  // probe at 175.000,175.000 is z=6.772098
22:17:46  // probe at 175.000,175.000 is z=6.804598
22:17:47  // probe at 175.000,175.000 is z=6.797098
22:17:48  // probe at 175.000,175.000 is z=6.794598
22:17:48  // probe accuracy results: maximum 6.804598, minimum 6.744598, range 0.060000, average 6.784848, median 6.790848, standard deviation 0.016862
 
Tap kit just came in. I didn't realize i've bought the kit without printed parts...
I guess I'm just going to have to make the piece in my resin printer and print the piece needed immediately afterward....
 
I forgot to update here. I revised my wiring (2.2 ohm resistor on 24V line) and plugged it in again. Still no response from the optical sensor. I have the 220 ohm resistors to wire up the stand-alone sensors according to the instructions so I'll try that when I have the time to focus on that. After that, I'll look at the bodged connection to the controlled with the BAT85 still in there.

One thing I've noted that's interesting on my printer throwing this error is it's now just the far left side of the bed doing it. Anywhere else and I'm fairly reliably getting about 0.001 deviation from probe accuracy test sets. Move it to X=40 and the freakout starts. Sometimes it works, sometimes it doesn't. I did check screws--the left side X gantry ones were actually a bit loose. That helped, but still seeing the issue at the far left. Move it to X=50 and it works, just not great deviation (ok, plenty good enough for the glorified hot glue gun--but I want 0.000x! 😜 ) Troubleshooting continues...
 
I'm back to printing now!
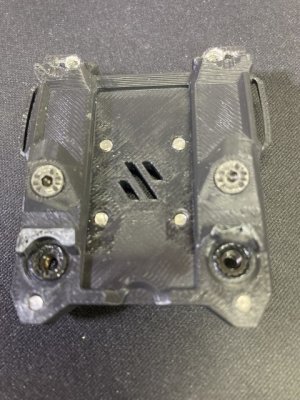
I've gotten saved by a raven as my resin print of the TAP pcb mount wouldn't accept headed inserts ( Thank You Ravens!!).
I did forget to run PROBE_CALIBRATE and broke a piece right off of my carriage as my toolhead dominated the bed...
@120decibell I know that it's been said in the docs, but maybe reiteration is in order for the klipper config setup for tap 😅
In the background, you'll also notice the crop-circles my printer created for forgetting...

mfDT1DN89k0fMqqeq3ZxIiRL4tKZ6Av7IhhMHWyAPlMYTtA7UOKeVt1f9k8ajMj_hpFqvsyDK6r7DR8Ip3ndZdjs7IjTNRvOUGRYnLdoTJyiHXeic4A_-Q3oawDjVhANMUsvaS2rbb8ejTZOVHK_P55wSuNdHaRnXu7v787jx1Us3l1yXoysWdKELy7--YsvFJr1jo7vLO5LqaO1NizkucZG4CdSMKm7sEnqcviIvmrtSkZnswsyx8d-fEFCfG7TNjg7Tw22Xofy2afa8AgJJXutzZAcl1EiS0wZxcnY56505rn03a7ao1dP7qSmQruWoVGePjS4hAHBU_PsLxRM9Z0mtgrjfdct5jkPIQMl8tIjI9khjnEBS4BO8eCLsQWRLDj6wrqQaN2_euvC1NIoLCIi8qQ70oipJvfQ7kbTDSZQz1E70ov35OkN83XaIT5Aq14zg01U5IK9WAqsf64Pg1GBlJemL3FfMdMEnw4JvC8NwefpvJVSlTo664rIJBGSmXDyngnck4ap_RRGIMIquuvmYypuxo0hXExXZVmk4-O8YfuXvI8WUN9IiaB-v9D2yXMqtfXxZggO1DonUhCLw_6OUQs_zCxM7xCtd4841BOtJMdsa3GY7cvXD4rv4pT5QoRFAi4mZVfNdS32jaLRS87a69i_dZf4yOO5vVFVyiHQEAZ8S3vM3s2gYAS6pguAJAiTXZfXY2uFYGwKMUIyQr-fI_i6MZG9j667NaOCG2W_GtimewGyVZLzhjuejttcxHf0YNbDrrkRTMioG73l6ofawQOAbA-kS457cLU_T-QNMxc16TYsqORtepdcy5QgRJcru_qRtlgPYtNF5DQ-SxqGM5ZejivpF2FP26l3xE6gSN2f-v_blMKHpX02pogodHumEPN2xy99f9UzN_RxY6WB5RZbjVRNkliw6yzRdOo2iCKvOadNm2Ml_QP0tlwDTi5-Fa1Adh2jRNQoN_ULvec=w1747-h983-no


I forgot to update here. I revised my wiring (2.2 ohm resistor on 24V line) and plugged it in again. Still no response from the optical sensor. I have the 220 ohm resistors to wire up the stand-alone sensors according to the instructions so I'll try that when I have the time to focus on that. After that, I'll look at the bodged connection to the controlled with the BAT85 still in there.

One thing I've noted that's interesting on my printer throwing this error is it's now just the far left side of the bed doing it. Anywhere else and I'm fairly reliably getting about 0.001 deviation from probe accuracy test sets. Move it to X=40 and the freakout starts. Sometimes it works, sometimes it doesn't. I did check screws--the left side X gantry ones were actually a bit loose. That helped, but still seeing the issue at the far left. Move it to X=50 and it works, just not great deviation (ok, plenty good enough for the glorified hot glue gun--but I want 0.000x! 😜 ) Troubleshooting continues...
What board are you using? I was able to set jumpers on my Oct Pro for the probe I've gotten. I had a choice of 5, 12 & 24.
The resistor type may be playing a factor in your result also...
I know what you mean. I actually tightened my front-right z-belt because samples were so off, when I was using unklicky.

I won't change the status of the thread until you're up and running.
 
Well, I'm up and running! 🎉

I got the 220 ohm resistors in and have a couple of OPB991T55Z sensors, so I carefully followed the manual and got it wired up. I'm actually impressed with my progression in soldering skill, it wasn't all that bad and the results are pretty clean. I swapped the probe voltage to 5V on my Octopus and let 'er rip. It works! The sensor immediately responded as expected! So I am now of the opinion the PCB I have is bad. The one little issue I ran into is the tab on the carriage part is a bit short, so with the sensor bolted in with both screws it was stuck at triggered. I removed one screw and tweaked one side down a bit to shift the sensor down probably by 1/2mm to 1mm and it works fine. I might tweak the model in Fusion360 and reprint later.

I was persisting in trying to get it working as I have a hartk 2-piece toolhead PCB set I wanted to re-wire the printer with; but that sends 24V to the probe connector, so at this point I'm ditching those plans unless there's a way to switch that to 5V. Research is needed.

I have been able to home and run many probe accuracy tests. I'm getting around 0.003-0.001 deviations in general. The printer now run z_tilt_adjust and bed mesh without issue, it will tap over on the left edge of the bed no problem.

On funny thing with my build is I am losing 0mm of Y. I can move the nozzle off the back of the bed; formerly to hit the Z endstop Sexbolt, to pick up and drop the Klicky, and to purge & scrub the nozzle. I can run the nozzle up to just off the front edge of the bed. So no bed travel downside for me at all.

Oh, almost forgot: I have the Linneo-built V2.1 24V board.
 
Glad you're getting somewhere! I love the linneo stuff, myself. They were out of stock.
I had to use my wire cutters and shave down part of my Tap upper because the solder joints wouldn't allow it to sit flush.
Hopefully there's a safe way to step that voltage down to 5 so you can use it with your other PCBs.
 
Top