What's new
VORON Design

Register a free account today to become a member! Once signed in, you'll be able to participate on this site by adding your own topics and posts, as well as connect with other members!

Problem printing Sealthburner revo_voron_rear_cw2 STL

Coyote

Well-known member
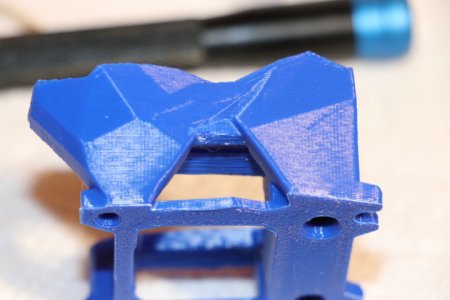
Any suggestion on how to improve quality of my stealthburner_printhead_revo_voron_rear_cw2.stl? Functionally it works but sure is ugly. This is the only printed part I seem to have this quality issue. I printing on a Prusa Mk3 using Prusaslicer and Hatchbox ABS. I have printed at various temp. The part shown here was printed at 240C but I have printed between 230-250C with same results. I have tried adaptive layers but I think it is of worse quality. The temp tower I printed for the AB I'm using seems to have the best overall print at 235C. Anyone have a suggestion of a slicer setting that might help? I have tried many. Is this just a hard part to print well? Is the transition from printing the overhang to the thin wall a problem? As I said, functionally the part works. BTW, I also tried support for just the bridge under the thin wall with no better result.IMG_1649.JPG
 
How much fan are you running if you are using it at all? With Steathburner, I usually run about 30% and ramp it for overhangs.
Those bulging little dots are a strong indicator of not enough cooling.
 
Fan set to variable seed with bridge set to 25%. But I just saw that my max fan speed is set to 15%. Changed max to 40% and set bridge speed to 30%, off otherwise
 
Also, printing @ 225C...will know if that works in about an hour...if not, will turn fan to on after first 5 layers at 30%
 
I ran a temp tower for this ABS from 250-210 C but saw no appreciable difference except a little more stringing at the higher temps. 225 seem to be a good comprise on nozzle temp...
 
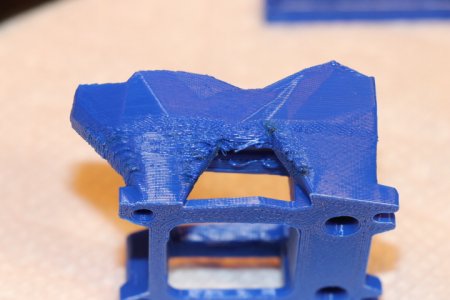
Thanks for the suggestions y'all,,,printed at 250C with cooling on (except first 5 layers) at 20% and 40% for bridges and heat soaked for 30 mins...much better results...I may tweak a bit, but I'm happy with this results

IMG_1650.JPG
 
Wow, yes, so much better. One other setting I forgot to mention in case you still see issues in the future on smaller parts in layer time. I think I have mine set to 20 seconds a layer since I mostly do ASA parts and it seems to retain heat more then other materials so I let it cool a bit longer on in between layers on small parts.
 
Good info! I have been struggling getting bridging & overhangs looking good again on my printer with about the same finish issues that @Coyote showed. I'll go review my fan settings again in detail.
 
Top