What's new
VORON Design

Register a free account today to become a member! Once signed in, you'll be able to participate on this site by adding your own topics and posts, as well as connect with other members!

Question Stealthburner Clockwork2 guidler a and b doesn't fit

leeeboo

Member
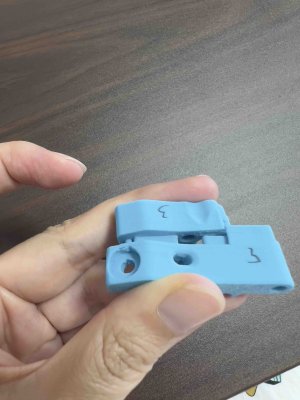
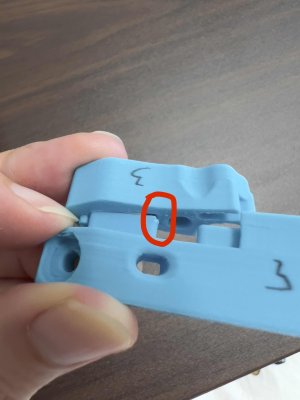
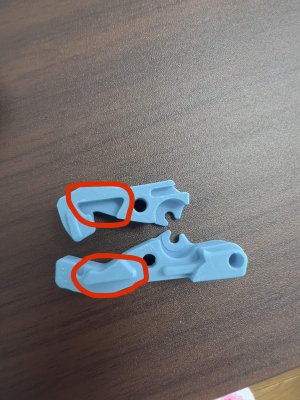
Hi guys I have a problem that confuses me. I have adjusted my printer(VORON 2.4), PA, EM, hole enlargement etc. all done, but when printing Stealthburner Clockwork2 guidler a and b, these two parts are quite difficult to assemble, it seems the discrepancy was quite large. Does anyone have any ideas what the problem was? Thank you guys so much!
 

Attachments

  • IMG_5047.jpeg
    IMG_5047.jpeg
    376.6 KB · Views: 24
  • IMG_5049.jpeg
    IMG_5049.jpeg
    341.5 KB · Views: 25
  • IMG_5050.jpeg
    IMG_5050.jpeg
    945.5 KB · Views: 23
Hi, just in case, are you printing latest files from Github repository? There had been new release pushed out of the door week or so ago. Not major changes, but just in case check if your file hasn't changed.

Are you scaling th parts in any way? I haven't had the issue when assembling mine ... I am not sure, something may be messing with outer wall. Seam placement?
 
The tolerances on the 2 guidler parts are quite tight so you do need a well tuned printer to print them correctly, so that they just snap together. Make sure you have the latest revision STLs, as mentioned above, and maybe print a Voron test cube, just to double check your dimensional accuracy.
 
Hi, just in case, are you printing latest files from Github repository? There had been new release pushed out of the door week or so ago. Not major changes, but just in case check if your file hasn't changed.

Are you scaling th parts in any way? I haven't had the issue when assembling mine ... I am not sure, something may be messing with outer wall. Seam placement?
Thank you so much for your reply! I doubled checked the file that it was the latest, and I'm not scaling the parts while printing. I tried to adjust some factors, like PA, but didn't change much. I added a little bit of the "outer XY size of compensation" which do help, -0.03 was my setting. I'm not sure this is the best solution or not...
 
The tolerances on the 2 guidler parts are quite tight so you do need a well tuned printer to print them correctly, so that they just snap together. Make sure you have the latest revision STLs, as mentioned above, and maybe print a Voron test cube, just to double check your dimensional accuracy.
Thank you so much for your reply! I doubled checked the file that it was the latest, and I printed a test cube to check the accuracy but didn't find problems. I tried to adjust some factors, like PA, but didn't change much. I added a little bit of the "outer XY size of compensation" which do help, -0.03 was my setting. I'm not sure this is the best solution or not...
 
Thank you so much for your reply! I doubled checked the file that it was the latest, and I printed a test cube to check the accuracy but didn't find problems. I tried to adjust some factors, like PA, but didn't change much. I added a little bit of the "outer XY size of compensation" which do help, -0.03 was my setting. I'm not sure this is the best solution or not...
By the pictures, it seems that you have just a little bit of over-extrusion, dialing down the extrusion multiplier just a minimal amount (from 1.00 to 0.97, for example) would probably Solve it too.
 
Mine were the same. The only parts in the build so far that didn’t play nice. I just lightly skimmed the clashing surfaces with a scalpel until they went together. It’s held together with a bolt too, so no drama.
 
As others have said, I believe this is likely due to tolerances and not having your machine perfectly dialed in.

The first time I printed this was with the Ender 3 which I dialed in absolutely perfectly and they snapped together with zero issues.
The second time was with the Stealthburner on my V1.8 (which used the part from above), but that machine was not dialed perfectly, so the resulting parts wouldn't fit together. (Side-note: The "face" also didn't sit quite flush; probably for the same reason)

I ended up dropping the flow rate on the 1.8 from 92% to 89% and the two parts fit pretty well.
 
Top