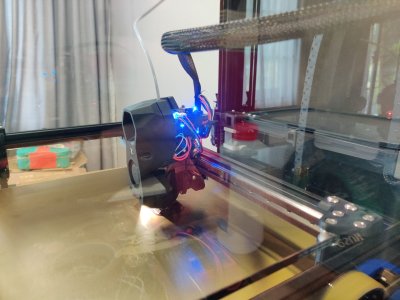
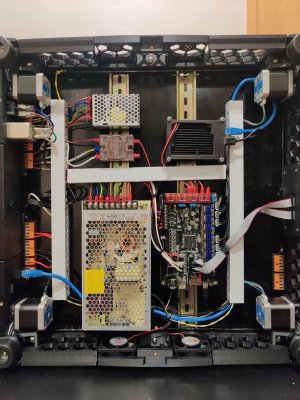
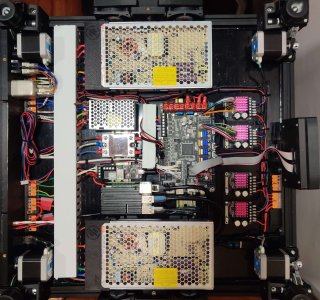
This is a build log for my Voron 2.4r2 that is already "complete", but I figured that I share my build for anyone who might be interested especially now that I am doing a major upgrade. Please note that this is my first Voron build and this is more of my opinion.
My build was going to be all black - mainly because I started with eSun ABS max filaments (due to it's fire retardant nature and supposed higher strength vs regular ABS+) and I did not want to buy other ABS colour filaments I know I would not be using otherwise. So all black it is.
Model: Voron 2.4r2 350mm
Base: Formbot - Nov 2022 (purchased from their website)
When getting a kit, the common question is between a LDO kit or Formbot (yes other vendors also offer kits, but from my research these two stand out). In summary and LDO kit costs much more than a Formbot, but for me the deciding factor was actually the fact that the Formbot kit was a "BOM in a box" (a term I picked up from the Reddit page before it went dark) which was initially meant as a negative remark, but one which I view as a positive. Mainly because this means you do not need to flip between the official Voron manual and the LDO version. Building a Voron is hard enough and knowing which page to switch manual is just added complexity. Unboxing went fine and two gripes I had was:
The whole build was interesting but (fortunately) uneventful. No short circuit, burnt parts etc. There were some missing printed parts that I was missing but the core build was done within 1.5/2 months. One thing to note is that I implemented mods from the get-go. This included:
I tuned the system per the official guide. And at the end I was getting Max acceleration of 5500mm/s2, reduced to about 3500mm/s2 for normal printing and Print speed of 250mm/s. The speed is limited due to Dragon HT hotend I was using which max out at about 31mm3/s. I purchased the Trianglelab T-volcano heater block and plan to test it with a Dragon HT and ST heat break. This should get me to 400-500mm/s print speeds. I am using Trianglelab ZS series nozzle which so far does the job. I also do no run the exhaust fan; because the "carbon filter" element supplied by Formbot is dodgy as hack. This combined with the fact that I live in a warm climate country (day time temperatures of 35C or higher) might have the cause of some melted parts such as the SB and Tap plastic parts.
I am currently in the process of making major upgrades to the printer. These includes:
If you notice most of these mods are more QOL rather than performance mods. Before year end I hope to install the following to focus more on getting better performance speeds especially with the Dragon HT+Trianglelab T-volcano which I am mostly limited to right now:
So kids this is why I do not have money to do drugs.
***I am either missing a lot of my build photos or did not bother to take much it seems.***


My build was going to be all black - mainly because I started with eSun ABS max filaments (due to it's fire retardant nature and supposed higher strength vs regular ABS+) and I did not want to buy other ABS colour filaments I know I would not be using otherwise. So all black it is.
Model: Voron 2.4r2 350mm
Base: Formbot - Nov 2022 (purchased from their website)
When getting a kit, the common question is between a LDO kit or Formbot (yes other vendors also offer kits, but from my research these two stand out). In summary and LDO kit costs much more than a Formbot, but for me the deciding factor was actually the fact that the Formbot kit was a "BOM in a box" (a term I picked up from the Reddit page before it went dark) which was initially meant as a negative remark, but one which I view as a positive. Mainly because this means you do not need to flip between the official Voron manual and the LDO version. Building a Voron is hard enough and knowing which page to switch manual is just added complexity. Unboxing went fine and two gripes I had was:
- I wish the back, deck and bottom panels were ACM rather than Acrylic
- Formbot included some nylon(?) injection molded parts like the Afterburner, exhaust/carbon filter holder and Mini12864 Display. I rather they excluded these and just reduced the cost.
The whole build was interesting but (fortunately) uneventful. No short circuit, burnt parts etc. There were some missing printed parts that I was missing but the core build was done within 1.5/2 months. One thing to note is that I implemented mods from the get-go. This included:
- Stealthburner
- CANBUS (mellow fly-SB2040)
- Umbilical + Repositioned Y endstop
- Voron Tap
- The Filter - https://www.printables.com/model/334276-the-filter-for-voron-24
- Snap latches - https://mods.vorondesign.com/detail/9Rdnf5vD2oaJLmR7BpAuQ
- Sturdy Handles - https://mods.vorondesign.com/detail/EAM1ZiQJCUzXznvOA767w
- ACM deck panel - I could not get my hands on fire resistant ACM panels and had to use regular ones. But I would recommend you get those if you can.
I tuned the system per the official guide. And at the end I was getting Max acceleration of 5500mm/s2, reduced to about 3500mm/s2 for normal printing and Print speed of 250mm/s. The speed is limited due to Dragon HT hotend I was using which max out at about 31mm3/s. I purchased the Trianglelab T-volcano heater block and plan to test it with a Dragon HT and ST heat break. This should get me to 400-500mm/s print speeds. I am using Trianglelab ZS series nozzle which so far does the job. I also do no run the exhaust fan; because the "carbon filter" element supplied by Formbot is dodgy as hack. This combined with the fact that I live in a warm climate country (day time temperatures of 35C or higher) might have the cause of some melted parts such as the SB and Tap plastic parts.
I am currently in the process of making major upgrades to the printer. These includes:
- Bedpan - https://github.com/Midnite3DP/voron-bedpan
- GE5C mod - https://mods.vorondesign.com/detail/eB5T2RNQcYI4o6cilhpXEg
- Pin mod - https://mods.vorondesign.com/detail/C8XJJ0fBGfBFKQZctjKeA
- CNC Tap by Chaotic Labs
- Hidden cable belt cover - https://mods.vorondesign.com/detail/LzEFU0RDHXUarF7y69x2Q
- Angry Cam - https://mods.vorondesign.com/detail/RYpQW53mtem8Nj1JKqiSQ
- LED lights + Corner covers - https://www.printables.com/model/84735-led-strip-holder-for-voron-24 + https://mods.vorondesign.com/detail/zBJTvWc9vSnnQoDDP0hyYw
- VEFACH - https://mods.vorondesign.com/detail/aLS5rOxzGybD4FhVzCKNQ
- Moons (17hs19-2004s) to LDO (42sth48-2504) motors for the AB
- Self deploying fire extinguisher in electronics bay
If you notice most of these mods are more QOL rather than performance mods. Before year end I hope to install the following to focus more on getting better performance speeds especially with the Dragon HT+Trianglelab T-volcano which I am mostly limited to right now:
- 48v system for AB using the Mellow TMC5160 pro
- vz-hextrudort extruder + ebb36 + xol
- Self designed VOC+particulate/hepa filter
- VOC monitor
- BTT Smart Filament Sensor v2
- Light weight aluminium gantry + XY joint + AB drive mount
- Additional fans in electronics components bay and closure of most of the skirt's opening
- AWD (unlikely but it looks cool?)
So kids this is why I do not have money to do drugs.
***I am either missing a lot of my build photos or did not bother to take much it seems.***


Last edited:


