What's new
VORON Design

Register a free account today to become a member! Once signed in, you'll be able to participate on this site by adding your own topics and posts, as well as connect with other members!

Easiest way to start using Adaptive Meshing with your machine!

kyleisah

Member
Voron Owner
Howdy folks!

My first post on the Voron Forum, and I wanted to share a project a few fellow Voron contributors and myself have been working on.

Have you ever heard of adaptive meshing? It is a method of creating a bed mesh without wasting any space in your bed mesh. Imagine a bed mesh the size of a Benchy!

In the past this has been done with complicated scripts and parameter passing from your slicer to your PRINT_START macro, but no more!

It's my pleasure to introduce KAMP! Or, Klipper Adaptive Meshing and Purging! The easiest way to utilize variable meshing and purging with your machine. :D

Have a look, try it out, and let me know how it works for you!

 
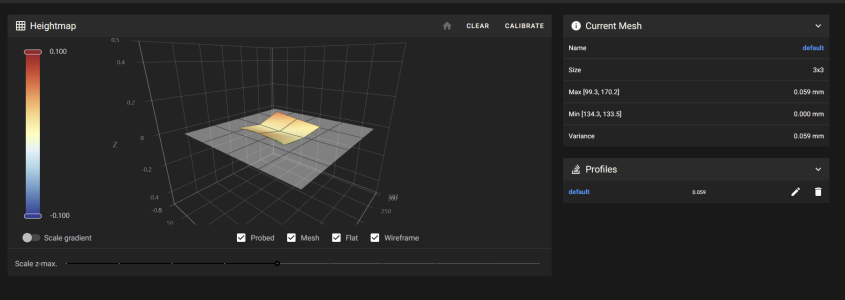
Many thanks! Just started my first print after implementing adaptive mesh and it works great! Instead of 5x5 on the whole build plate it did 3x3 on the middle, about 1/8 of the whole plate :) I like!

1669069558910.png
 
Last edited:
Fantastic! Great to hear. Was the install pretty easy? Everything made sense?
I am very new to Voron and Klipper but it was straight on :)

Maybe it could a bit clearer on the uncomment Klicky bed mesh side: "Uncomment the line [include ./klicky-bed-mesh-calibrate.cfg] in klicky-probe.cfg"

The rest was a breeze.
 
This is amazing. It makes so much sense doing it like this. I've just set it up and instructions were clear and I had no doubts when going through the install. I already had Cancel Objects setup and have stock mag probe and z probe for Z/gantry/bed management.

The purge is also cleaner than the classic line, which I was not using anyway because of the purge bucket mod... which now only wipes and doesn't purge anymore, making Z homing more reliable.

Thanks for the effort and sharing this !
 
I’ve been running this for a little while on my machines, and it really works great. Highly recommended, kyleisah and team did a great job on this!
 
Just swapped my config over to KAMP from a previous adaptive mesh. Works great, and easier to implement. I like the purge better than the involved one I cobbled together. I also like the fuzz concept in preparation for my Tap probe swap.
 
Anyone have their exclude object stop working after implementing this?

Not saying it’s the cause but it’s the only thing I’ve done to my printer recently and can’t seem to get exclude object working and it was working previously.

Could be my pre-processing stopped working, just curious if anyone else experienced the same.
 
Last edited:
Anyone have their exclude object stop working after implementing this?

Not saying it’s the cause but it’s the only thing I’ve done to my printer recently and can’t seem to get exclude object working and it was working previously.

Could be my pre-processing stopped working, just curious if anyone else experienced the same.
Not to pile on the responses but I use my own custom adaptive bed mesh script and I've never had any issues with exclude objects. But since my script is external, it doesn't run the risk of accidentally messing with Klipper in any way.
 
I had a different adaptive bed mesh and exclude objects running previously. Setting up KAMP was as easy as removing calls to the old adaptive mesh and my purge macro, then replacing with the KAMP ones. No effect on anything else.
 
I am trying to make this work. No matter what I try, I keep getting "0 object points, clamping to bed mesh [(15.0, 40.0) (230.0, 210.0)]". I did the following:

Klipper:
Added "[exclude_object]" to printer.cfg

Moonraker:
Added "enable_object_processing: True" under [file_manager] in moonraker.conf

PrusaSlicer:
Added M117 at the top of the Start G-code followed by my PRINT_START macro.
Made sure labeled objects was set under "Output Options"

Disabled klicky bed mesh calibrate macro and made sure that "BED_MESH_CALIBRATE" was called correctly in my PRINT_START gcode. No matter what I try I continue to get the above error message. Does anyone have any suggestions to try or additionaly troubleshooting steps?
 
Looks like I got it figured out. I made two additional changes since my last post. I am running a fluidd install since last year. Everything is up-to-date, I recall on a new mainsail install that the virtual_sdcard conplained that it needed to be changed to "/home/pi/printer_data/gcodes"

printer.cfg:

[virtual_sdcard]
path: /home/pi/printer_data/gcodes

I also decided to restart the printer since it was last restarted days ago. So not sure if klipper service just needed to be restarted. However, after those two changes, the adaptive bed mesh worked as intended.

Thank you for the contributions to the community.
 
I also decided to restart the printer since it was last restarted days ago. So not sure if klipper service just needed to be restarted. However, after those two changes, the adaptive bed mesh worked as intended.
Hi, I had the same Problem, restarting moonraker is the solution ( --> [exclude_object] )
 
Is there a potential solution using OctoPrint as well (for the enable_object_processing)? I Google around for that but wasn't able to find much, though pretty sure OctoPrint would have named it differently if it does support that feature.
 
I'm not sure if there's any adaptive mesh for OctoPrint, but there is an object exclusion plugin. I have that installed on my Marlin-connected OctoPrint for my Prusa. Just look for the plugin in the plugin manager.
 
Great work guys. I was able to get this working on my new trident build with TAP.
One thing I can't figure out is how to set the purge_length. 50 mm seems too long for what I need but the line_purge.cfg is 'read only'. I'm assuming this is by design and I need to set the variable_purge_length somewhere in my printer config/ print start macro but I can't figure out the proper syntax. Can anyone provide an example?
I’m not looking at it right now but I think it would be SETUP_KAMP_LINE_PURGE PURGE_LENGTH=20 or something along those lines
 
This is great. Prints are more accurate since I am not just using my general bed mesh and instead using the smaller, more confined mesh at each print now. I never saw a good reason to do a per-print mesh when you were only printing one item in the middle of the bed. Now I just get to mesh that part and it doesn't slow much down. Thanks for the hard work!
 
Top