VORON Design

You are using an out of date browser. It may not display this or other websites correctly.
You should upgrade or use an alternative browser.
You should upgrade or use an alternative browser.
Formbot
- Thread starter Takuya
- Start date
Baumeistet
New member
Hey guys, I will start here with my first question.
What did you all replaced over the time on your formbot Voron 2.4 R2?
I will start to build in 1-2 Months and also searching for interesting mods.
Would be awesome to learn from your experience.
What did you all replaced over the time on your formbot Voron 2.4 R2?
I will start to build in 1-2 Months and also searching for interesting mods.
Would be awesome to learn from your experience.
I have both a 2.4 and V0.1 Formbot kit. I was really happy with both and I have seen them improve over the last year or so. I did swap out my 2.4's motors for LDOs because I was having periodic layershifts. Also, I went with Klicky because my inductive probe melt/stopped working within the first month.
5twenty
Well-known member
Probes. I'm replacing my first 2.4 with the klicky mod. Hoping that helps with the constant baby z-stepping and offset issues.
I have 3 more Formbot kits to build so I'll report back and post build threads for them. I have completed two Formbot v0.1 kits and can honestly say I've not had any issues. They came with umbilical stuff, Moons' motors which have been good to me so far, and they have been of equal caliber to LDO kits - from all I can tell. BTW, I have a 2.4 LDO kit and Formbots for the rest, and one Fysetc (forgot I had that back there) The rails are a little suspect, but after cleaning them and greasing them they operate as well as hiwin. And they are quiet.
For such a small printer I couldn't see paying twice as much as Formbot just for LDO. I'll probably eat my words in the future, but the hardware is almost identical. The electronics are the same, so far.
I don't think you can go wrong with any of the kit builders, though I'm no expert.
For sure back and deck panels. I also changed out the spring steel sheet and pei, X, Y and E motors, belts, motor pulleys, bearings, x linear rail and some other minor stuff.Hey guys, I will start here with my first question.
What did you all replaced over the time on your formbot Voron 2.4 R2?
I will start to build in 1-2 Months and also searching for interesting mods.
Would be awesome to learn from your experience.
5twenty
Well-known member
Yes, I have some PEX sheets that are super sticky. Good for PLA if you have some lying around.For sure back and deck panels. I also changed out the spring steel sheet and pei, X, Y and E motors, belts, motor pulleys, bearings, x linear rail and some other minor stuff.
My experience with Formbot was pretty good. Replacing the deck panel with ACM, and replacing the hotend fans were the only things I think were necessary. Everything else was preference, consumables, and stuff I broke. ")
My only minor gripe is that they provide very little, if any documentation. It is essentially a BOM in a box. They had some basic documentation on wiring for 2.4r1 but still have no info on r2 which has some major changes.
My only minor gripe is that they provide very little, if any documentation. It is essentially a BOM in a box. They had some basic documentation on wiring for 2.4r1 but still have no info on r2 which has some major changes.
GrayTurkey
New member
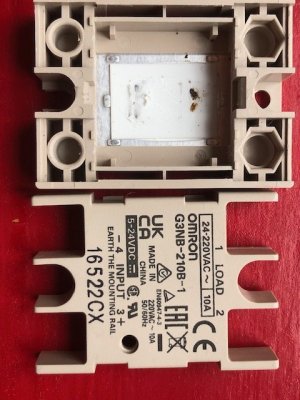
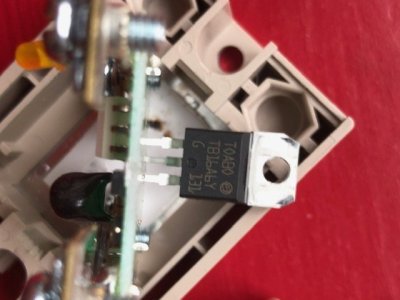
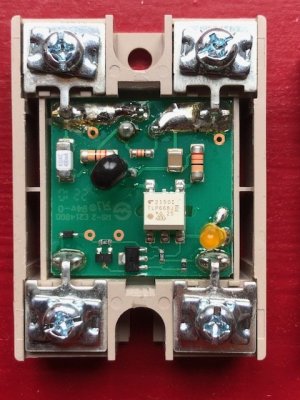
If anyone is interested, this is the SSR that formbot currently ships in their 2.4r2 kit. It is a Omron branded G3NB-210B SSR, weighs 58g (Omrons says approx 60g in their datasheet). Since I orderd a trustworthy SSR somewhere else I opened this one up to see what is inside. The Triac (TOABO TB16A6Y) was properly clamped to the metal backpanel and is rated for 16A per its datasheet. I don't have a genuine Omron SSR here to compare so I cant judge if it is genuine or not but from its build it looks okay I guess.
Attachments
DerDackel
Member
I just finished housing my 250mm Formbot Trident, which should be indicative of the quality of their 2.4 kit. Here's what I changed:
* Replaced AB motors with 1.8° LDO 42STH48-2504AC 's - the Moons' steppers included are fine, the LDOs are for more VROOOM!
* Bed Heater - The included Vivedino branded one looked tiny compared to bed size, I replaced it with a big Keenovo one I bought from Fermio.
* XY endstop PCBs - I went for a CAN board and umbilical, so I used the Y endstop relocation to the A drive mount (thanks hartk)!
* Inductive Probe - the kit came with something that looks like a genuine Omron probe, but I prefer Klicky, so I built Klicky.
* Extruder - the Bondtech gears in this kit looked fine, but I wanted to try out Orbiter v2, so there's that.
* Hotend - Is anyone using their V6 clones for anything? I feel like they're becoming the Formbot equivalent of BTT's duckies for me.
* Toolhead overall: Well, I went f or Stealthburner, so I sourced the parts required on my own.
* PEI sheet - the included one is a fine sheet of PEI, I seem to have a tradition by now where during my early calibration prints, I manage to misconfigure some form of Z offset and scrape the shape of a calibration cube into the first PEI sheet.
* Exhaust - skipped in favor of an umbilical cable gland mount, I'm waiting on some more 5015s for a Nevermore
* Electronics Bay fans - Yuck! Not even LDO manage to pack fans in their kit that don't sound like a screaming goat. I've already ordered some Noctuas.
LasseKongo
Member
I bought a Formbot 2.4r1 kit that I built as a 2.4r2. In general I was very happy with the kit.
Stuff I changed during the build:
* Noctua skirt fans, the included Sunon fans were LOUD
* Titanium backers
* Aluminum composite panels from Fermio
* Mechanical X/Y endstops instead of hall-effect.
* Sexbolt Z endstop
* Wago 221 skirt fan mod
* LDO smooth/textured sheet
Upgrade plans:
* Klicky probe or Tap probe
* Internal LED lightning
* Relay control for 24V PSU controlled from RPI
* Stealthburner
* LGX extruder
* Probably some type of CAN toolboard.
* Nevermore filter and removal of original filter.
* Replace stock V6 with Dragon high flow and CHT nozzles
* Snap-latch panel clips
* 5” touch screen
* Purge bucket and nozzle scrubber
* Filament runout sensor
* Chamber thermistor
I guess this build will keep me busy for a while...
5twenty
Well-known member
TBF, all the kit makers do this. Fysetc is the only one I've seen so far that said: "Hey, there is a difference between the 'official' manual and some parts we swapped in, so follow this when you get to such and such"My only minor gripe is that they provide very little, if any documentation. It is essentially a BOM in a box. They had some basic documentation on wiring for 2.4r1 but still have no info on r2 which has some major changes.
LDO didn't even make mention of huge detours from the 'official' manual, the wiring is an entire site that is, in my case, only mentioned when I started asking basic questions about lack of SSR and why the instructions on the official voron site have you using it when LDO doesn't include it.
While a major gripe to me, others seem to know this information like they were born with it and act like you have second head growing when you ask.
But that is what happens when there are so many forks to projects, and github is used to consolidate the information - hint, github is not really made for this type of dissemenation.
Overall though, building these little machines is quite fun. I just wish the information was edited and curated a tad bit better, and wasn't different based on what day of the week you bought your parts.
WhiteWulfe
Well-known member
My Trident (VT.679) is a 300mm Formbot kit I ordered in December 2021. So far I've changed the following...
- X and Y linear rails. My MGN12 rattled after a few hundred hours of printing, so I swapped them out with Fabreeko Honey Badger rails. Rattle went away, and some issues I was hunting down also disappeared.
- Toolhead PCB. I was able to make use of most of what they had in their kit for wiring, but did have to source more wires and connectors
- XY PCB (they only offered a hall sensor at the time, and I wanted the ease of use and reliability of switches)
- Built SSR controls as per manual, and not how Formbot sent the wiring
- Went with AB-BN 30 initially, then changed over to Stealthburner at either beta_7 or RC1 (still running Clockwork 1)
- Added two Nevermore v5 Duo's
- Changed default power to filtered outlet and large switch (my kit came with an unfiltered single fuse combination outlet)
Planned to change:
- Z rails to Fabreeko Honey Badger rails
- Redo wiring harness. I want a uniform colour (instead of six in the chains), and I greatly prefer the tidier r1 wiring
- Sleeve exposed wires with MDPC-X sleeving
- Move both Nevermore v5 Duo's to under the bed
- Swap to IGUS cable chains
- Logan's Inverted Electronics Mod (this isn't necessarily a Formbot thing, and you can do it stock with their kits)
- Change to Clockwork 2 or LGX Lite (still debating between the two - My Clockwork 1 does things fine, but I like the higher gear ratio, easier maintenance aspect, and aesthetics of Clockwork 2)
- Swap panels to Mandala Roseworks panels because they're proper spec in both material as well as thickness (and the textured ABS panels look sooooo good)
- Swap to black steel fittings from 3dLabTech (black matches my build, plus the 12.9 screws are stronger)
- Build plate to Fabreeko Honey Badger textured plate
Maybe changing...
- Those 9.5mm 3dLabTech build plates are tempting, doubly so in conjunction with an edge to edge heater from Fabreeko
- Lightweight Labware Gantry backers (quite possibly splash anodized)
- Lightweight Labware Kinematic Mount (more than likely splash anodized)
Last edited:
Breaker1066
New member
My experience is with a 2.4r1 kit ordered at the end of 2021:
- Frame, bed, motion parts all good. Belts could have been a bit longer but appear to be genuine GT2. Spring steel sheet was single-sided textured PEI. I *think* it was advertised as dual-sided, so that was disappointing.
- I suspect one of the Moons Z motors has a holding torque problem so my gantry always sags on the rear left (B) corner. It's always easy to spot it lifting during the first round of QGL. One of the A/B motors has a loose connector that doesn't hold the cable very tightly (even after replacing the connector on the cable side), but I haven't had one fall off yet. Overall I'd rate these motors as kind of sketchy but get the job done. After recently building a Trident with LDO motors, I ordered an LDO 2.4 kit for a planned rebuild of this machine.
- Inductive probe was some generic garbage that didn't fit in the carriage properly. I had to order a real Omron, and will soon be replacing the whole thing with Tap.
- I had an issue with erratic bed heating once the temps started getting above 80C. After replacing the thermal fuse and some of the wiring, the problem went away. So I'm not sure if I can blame the fuse or some issue with my own wiring.
- Aside from that, electronics are all good so far. The SSR appears to be an Omron and hasn't caused any problems.
- Wiring is mostly good enough quality PTFE, though was not set up for a toolhead PCB, so I ended up cutting up and redoing most of it, augmented by a Linneo wiring kit.
- I ordered my kit with a Dragon-ST. I received that in a separate shipment, but when I got the main kit, there was a V6 clone in the box as well. Nice to have a spare.
- Swapped out the bottom and rear panels with ACM from PrintedSolid since I was concerned about warping. I used the clear panels for the rest of the enclosure, but they're about 0.5mm too thin and rattle around a bit with the stock panel clips. I think at the time you were only supposed to use 1mm tape on them, so they sit too close to the gantry and my Y drag chain rubs on that side, messing up the acrylic. When I rebuild I'll either replace them, or else add a layer of 3mm tape over the existing 1mm. That should bulk them up enough to fit snugly and have adequate clearance.
- At the time of my build, everyone was switching to MGN12 rails, so I bought one, printed the X carriage from the Trident, and went with that. So now I have two spare MGN9 rails.
lukics
Member
I ordered my kit today, a 350x350, with dragon high flow.
As it seems not to be a stealth burner configuration I had to order a 5015 Fan and a NEMA 14 pancake stepper.
Additionally, I bought a 5" screen on amazon for Klipper Screen, well as BIGTREETECH EBB36 CAN V1.2 Board together with Raspberry Pi Expansion Board RS485 on Ali.
Looking forward and hoping it's gonna be fun.
5twenty
Well-known member
Mine are all still going. I noticed one of the vendors in Colorado jacked their prices up to make an extra 100 or so from each kit. Strange.
Keep up the good work and weed out those bad vendors. They don't help with the image.
And there are tons of pitfalls you need to keep in mind when planning the build. It's not so bad on the 2.4, but if you are planning on building any tiny printers, planning ahead is paramount. I'm redoing a ton of v0.1s because I want to add lights and cameras.
I have some screens I had planned to add, but I print so much headless that I wouldn't see any difference. Not to mention the act of adding a card reader if I did want to print direct from the printer. But that's no fun.
My first Voron printer was a Formbot kit. I bought it because it was inexpensive vs. self-sourcing, had mostly decent components, and because I wasn’t afraid to ditch certain parts and substitute my own. When I bought mine, the SSR that they included was a random, cheap unit that I wasn’t comfortable using. They have since switched to genuine Omron SSRs. Good for them! The Moons motors that they include are still my favorites, even though I now use LDO motors more frequently in my printers just because of their availability. The aluminum frame extrusion profile and roll-in nut sizes were mismatched, which caused a lot of headaches since you couldn’t easily add in nuts after frame assembly. That was really odd. Not sure if that’s still the case, but it was a royal PITA. The bed also was made from rolled aluminum, so it sometimes warped very slightly while heating. They have changed that to a cast material, which is obviously what’s recommended in the BOM. The bed would be fine after a heat soak, so I’m not even too mad at that even though I did swap it out for a cast bed from Lightweight Labware.
But all-in-all, the printer has been phenomenal, and is still going strong. I’ve changed wear components, but not much else other than the stuff mentioned above. So, would I recommend a Formbot kit to a new builder? It depends. If you are looking for a Lego-style experience where you snap everything together and just follow the manual, then I would NOT recommend these kits. Get an LDO kit instead. They have everything in the box that you need, and everything works together nicely. They are also 50% more expensive than the Formbot kit last time I checked. If, however, you are adept at mechanical and electrical trouble shooting, know what to look for when something goes wrong, aren’t afraid to swap out components that may be of dubious quality (like the bad VHB tape that made its way into kits earlier this year), then the Formbot offers good value. In the Discord help tickets, we see a ton of minor issues with Formbot kits that are related to materials/hardware issues, especially with new builders. To their credit, the Formbot kits have Been constantly improving in terms of quality of components. There are still occasional issues, but there are many thousands of Vorons based on Formbot kits that have been printing spectacularly for years.
Even with a kit, a Voron is a complex machine to build. If you go into a Formbot kit build with that attitude and a willingness to troubleshoot, you will be fine. If you want a greater chance of a trouble-free build, the LDO kit is exceptional. They question becomes how much that ~$500 difference in kit cost is worth in terms of future upgrades and your ease of build. Only you can answer that question.
msaeger
Well-known member
Anyone found something for the formbot 2.4 kit that explains which harness is for what exactly? I am uncertain which on they expect you to use for the part cooling fan and the hot end cooling fan. I am thinking the ones labeled fan0 and fan1 but they also have one labeled fan2 which doesn't seem long enough.
LoadMaster7
Well-known member
Parts cooling is fan0, fan1 is the hotend heatsink fan. Fan2 is the electronics compartment fans. Page 239 for hotend fans and 261 for fan2 connection. Make sure polarity is correct too.Anyone found something for the formbot 2.4 kit that explains which harness is for what exactly? I am uncertain which on they expect you to use for the part cooling fan and the hot end cooling fan. I am thinking the ones labeled fan0 and fan1 but they also have one labeled fan2 which doesn't seem long enough.
msaeger
Well-known member
Thanks!Parts cooling is fan0, fan1 is the hotend heatsink fan. Fan2 is the electronics compartment fans. Page 239 for hotend fans and 261 for fan2 connection. Make sure polarity is correct too.
Similar threads
- Replies
- 2
- Views
- 456
- Replies
- 11
- Views
- 2K