What's new
VORON Design

Register a free account today to become a member! Once signed in, you'll be able to participate on this site by adding your own topics and posts, as well as connect with other members!

My Modified LDO 300 kit build log - updated all the time

GadgetAngel

Well-known member
When I get done with documenting all my macro for my LDO 300 kit I will publish them to a repo under on my Github page at https://github.com/GadgetAngel/Voron2.4_My_Build_Log.


I will also list all my macros with documentation. I do this type of documentation so that if I need to fix the printer later will not need to guess where all the wires go.

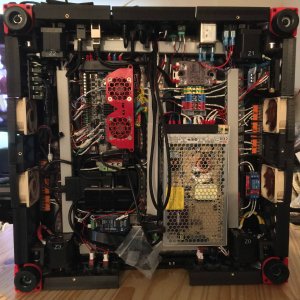
Here is a picture of the bottom electronic case for the LDO 300 kit build:
LDO300kit_Elec_Case.jpg


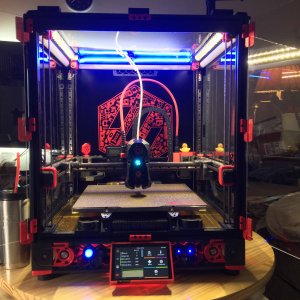
Here is the printer (building is half the job, doing the software - macros is the other half of the job):
LDO 300 kit.jpg

Happy 3D printing!
 
Last edited:
After I posted this I noticed that my drawings need to be updated to show the current state of my LDO build.

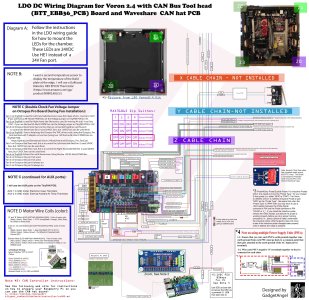
So here is my new set of drawing on 11/22/2022:

DC wiring diagram (CAN Bus toolhead with Octopus Pro board):1669115169417.jpeg

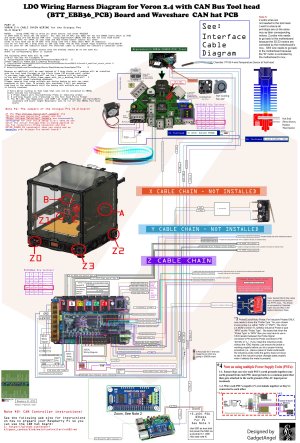
Wiring Harness Diagram:1669115254956.jpeg

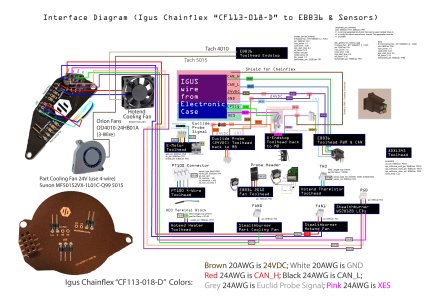
Interface Cable Diagram (for toolhead board):
Interface Cable Diagram.69.jpg


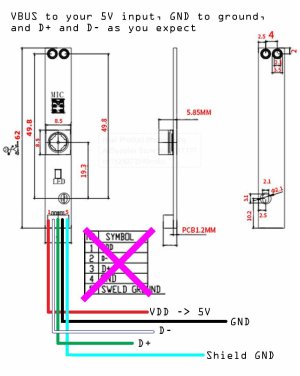
OV5648 USB Camera Module wiring:1669115792553.jpeg


24VDC White lights switch diagram:
1669116259016.jpeg

Continued on next entry
 

Attachments

  • 1669116154665.jpeg
    1669116154665.jpeg
    283.1 KB · Views: 144
  • 1669116123029.jpeg
    818.3 KB · Views: 13
  • Instructions for Software RESET of RP2040 chip.txt
    11.3 KB · Views: 7
  • 1669115584257.jpeg
    883.5 KB · Views: 8
  • 1669115515473.jpeg
    726.3 KB · Views: 10
Last edited:
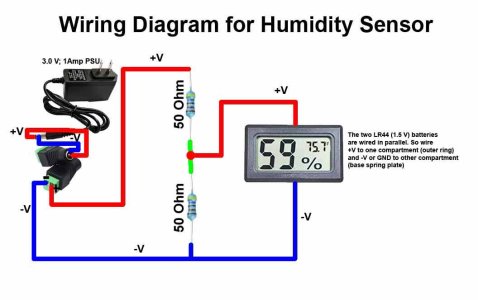
Here is a diagram that shows how to get rid of the batteries for a humidity sensor:
1669116507703.jpeg
================================================================================================================================

Once I finish up with calibrating the printer I will post more pictures to show off some mods I have made
 
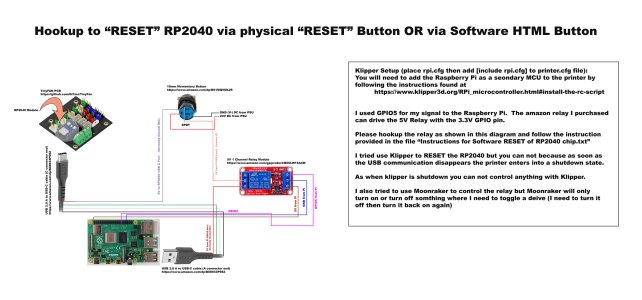
How to RESET the TinyFAN PCB (wiring diagram):

You will need this text file also it is an attached file called "Instructions for Software RESET of RP2040 chip.txt"

and the following two diagrams:

1669117622230.jpeg

1669117657716.jpeg
 

Attachments

  • Instructions for Software RESET of RP2040 chip.txt
    11.3 KB · Views: 5
Sorry about that but I am learning what the limits are for pictures on this forum.

The picture can not be larger than 1MB and the file can not be wider than 3059px
 
Once I finish up with calibrating the printer I will post more pictures to show off some mods I have installed and ones I have made. I will list the mods I used on this build with URL links to other peoples mods I have used for this build.

See ya around!
 
When I get done with documenting all my macro for my LDO 300 kit I will publish them to a repo under on my Github page at https://github.com/GadgetAngel/Voron2.4_My_Build_Log.

But for now here is wiring diagrams that I have created for my current LDO kit build:

DC wiring diagram (CAN Bus toolhead with Octopus Pro board):


View attachment 276

Wiring Harness Diagaram:
View attachment 277
Interface Cable Diagram (for toolhead board):

View attachment 278

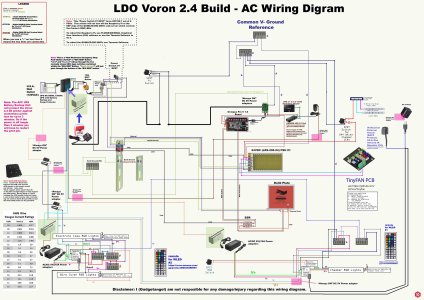
AC wiring Diagram:
View attachment 279

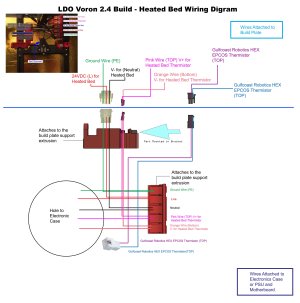
My bed pan Mod wiring:
View attachment 280

How to RESET the TinyFAN PCB (wiring diagram):
View attachment 281

USB camera wiring:
View attachment 282
24VDC White lights switch diagram:
View attachment 283

I will also list all my macros with documentation. I do this type of documentation so that if I need to fix the printer later will not need to guess where all the wires go. Here is a picture of the bottom electronic case for the LDO 300 kit build:
View attachment 285


Here is the printer (building is half the job, doing the software - macros is the other half of the job):
View attachment 286

Happy 3D printing!
Thanks for share! Looked so great!
 
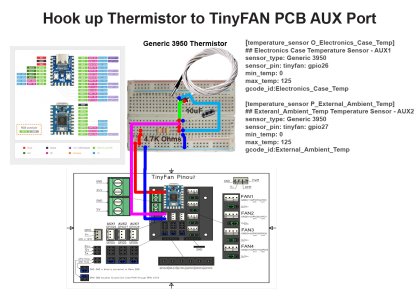
When I added some new thermistors to my build recently I had to attach two of them to the TinyFAN PCB (which I use to control my 12V hardware PWM fans).

The TinyFAN PCB can be found at: https://github.com/Gi7mo/TinyFan

If you want to use the TinyFAN PCB to read thermistors you will need to add a small circuit so that the TinyFAN PCB can read the thermistor. The following diagram is how I connected up a thermistor to two of the AUX ports on the TinyFAN PCB:

Hookup Thermistor to TinyFAN PCB.jpg
There is only one problem, [after you reboot the Raspberry pi (shutdown and reboot),] you will have to wait 6 minutes before the RP2040 on the TinyFAN PCB starts to send data back to Klipper via the USB connection.
 
Here is a list of MODs I am presently using:

1. LDO 300 kit - frame and panel and most electronics - the wiring harness was done by hand. I did not use LDO's wires.
2. Whoppingporchard Kinematic bed Mounts MOD (https://github.com/tanaes/whopping_Voron_mods/tree/main/kinematic_bed)
3. Ellis Bed Fan MOD - which help control the chamber temperature (https://github.com/VoronDesign/VoronUsers/tree/master/printer_mods/Ellis/Bed_Fans)
4. kejar31 CB-C2 MOD (https://github.com/kejar31/VoronMods/tree/main/CB-C2) - I used IGUS Chainflex "CF113-018-D" for my umbilical cable (GND to shield) [URL: https://www.igus.com/product/1120?artNr=CF113-001-D] the two extra wires where used
for the Euclid Probe Signal and the X-endstop Signal (both shielded) to run them back to the motherbaord so that the
endstop signals would be on the same mcu as their corresponding motor signals.
5. I used IGUS Chaninflex "CF113-007-D" on all my Z motors (GND to shield) - URL:https://dfh.fm/products/igus-chainflex%C2%AE-cf113-007-d?_pos=3&_sid=3370d111f&_ss=r
6. I used PTFE 24AWG wire for the "A" and "B" motors - unshielded cable
7. I used a braided shield around the Z-endstop "sexbolt" wire (GND to shield) - I have the "self calibrating Z offset" plugin for Klipper
8. I used a braided shield around the Extruder motor (GND to shield)
9. I swapped out the Omron D2F-5L Microswitchs on the Euclid Probe and the Z-endstop (sexbolt) with Kailh GM 4.0 Micro Switch (https://www.amazon.com/dp/B08K9FSSLH)
10. RockNRoll MOD (https://github.com/VoronDesign/VoronUsers/tree/master/printer_mods/RockNLol/RockNRoll)
11. nionio6915 Euclid Probe MOD (https://github.com/nionio6915/Euclid_Probe)
parts used: https://github.com/nionio6915/Euclid_Probe/blob/main/stls/Voron/Clockwork2_Euclid_MGN12X_LEFT_Carriage_Ver2.stl
https://github.com/nionio6915/Euclid_Probe/blob/main/stls/Voron/Clockwork2_Euclid_MGN12X_RIGHT_Carriage_Ver2.stl
https://github.com/nionio6915/Euclid_Probe/blob/main/stls/Voron/VoronGantryMountRev2_Short.stl
12. I use the Klick Probe macro to control my Euclid Probe (https://github.com/jlas1/Klicky-Probe/tree/main/Klipper_macros)
13. edwardyeeks Decontaminator_Purge_Bucket_&_Nozzle_Scrubber MOD (https://github.com/VoronDesign/VoronUsers/tree/master/orphaned_mods/printer_mods/edwardyeeks/Decontaminator_Purge_Bucket_%26_Nozzle_Scrubber)
14. Purge_Bucket_for_WP_Kinetic_Mount Mod (https://github.com/Dfdye/Voron_Mods/tree/main/Purge_Bucket_for_WP_Kinetic_Mount/STLs)
15. hernsl bottom_panel_mag_clip MOD (https://github.com/VoronDesign/VoronUsers/tree/master/printer_mods/hernsl/bottom_panel_mag_clip)
16. I use two PT100 4-wire Temperature sensors (https://www.printyplease.uk/PT100?search=PT100)
17. alanho BTT_PITFT50_v2_Mount Mod (https://github.com/VoronDesign/VoronUsers/tree/master/printer_mods/alanho/BTT_PITFT50_v2_Mount)
18. CannedBass PITFT50_45_degree_mount MOD (https://github.com/VoronDesign/VoronUsers/tree/master/printer_mods/CannedBass/PITFT50_45_degree_mount)
19. Whoppingporchard Ti Bracker MOD (https://github.com/tanaes/whopping_Voron_mods/tree/main/extrusion_backers)
20. nevermore3d Nevermore_Micro V5 MOD (https://github.com/nevermore3d/Nevermore_Micro#instructions-for-v5)
21. HyperToxic33 EBB-Fan-Control MOD (https://github.com/HyperToxic33/EBB-Fan-Control)
22. Jeoje Molex_MLX_Microfit_Bed_Connector_Mount MOD (https://github.com/VoronDesign/VoronUsers/tree/master/printer_mods/jeoje/Molex_MLX_Microfit_Bed_Connector_Mount)
23. eddie LED_Bar_Clip (https://github.com/VoronDesign/VoronUsers/tree/master/printer_mods/eddie/LED_Bar_Clip)
24. Switcher spacer for button mounted skirt (https://www.printables.com/model/147203-voron-24-skirt-rocker-switch-sleeve-fitting)
25. LoCoCNC wire_grommets MOD (https://github.com/VoronDesign/VoronUsers/tree/master/printer_mods/LoCoCNC/wire_grommets)
25. 5015 Clear Fan Rear Housing by jake (https://www.printables.com/model/273994-5015-clear-fan-rear-housing) for HartK "Two Part Stealthburner Toolhead Board LED Edition" (https://dfh.fm/products/two-part-stealthburner-toolhead-board-fan-led-edition?variant=42865429741790)
26. Stealthburner (https://github.com/VoronDesign/Voron-Stealthburner)

List continues on next frame.
 
Continuation of MODs list:

27. hartk1213 Voron2.4_Y_Endstop_Relocation MOD (https://github.com/VoronDesign/VoronUsers/tree/master/printer_mods/hartk1213/Voron2.4_Y_Endstop_Relocation)
28. hartk1213 Voron2.4_SexBolt_ZEndstop MOD (https://github.com/VoronDesign/VoronUsers/tree/master/printer_mods/hartk1213/Voron2.4_SexBolt_ZEndstop)
29. hartk1213 Voron2.4_16mm_button_skirt(https://github.com/hartk1213/MISC/tree/main/Voron%20Mods/Voron%202/2.4/Voron2.4_16mm_button_skirt)
30. hartk1213 Voron2.4_Lower_Z_chain_cover_with_leds (https://github.com/hartk1213/MISC/tree/main/Voron%20Mods/Voron%202/2.4/Voron2.4_Lower_Z_chain_cover_with_leds) - modified to fit my printer
31. hartk1213 Voron2.4_Spinner (https://github.com/hartk1213/MISC/tree/main/Voron%20Mods/Voron%202/2.4/Voron2.4_Spinner)
32. hartk1213 Voron2.4_umbilical_strain_relief MOD - with modifications (https://github.com/hartk1213/MISC/blob/main/Voron%20Mods/Archived/Voron2.4_umbilical_strain_relief(OLD)/STL/A_Drive/%5Ba%5D_pigtail_cable_cover.stl)
33. richardjm snap-latch-2020 MOD for all my panel clips [used 3.5mm latches for top and used 5.5mm latches for Back, Left side and Right Side](https://github.com/VoronDesign/VoronUsers/tree/master/printer_mods/richardjm/snap-latch-2020)
34. Empusas BTT_Filament_Motion_Sensor_Mount MOD (https://github.com/VoronDesign/VoronUsers/tree/master/printer_mods/Empusas/BTT_Filament_Motion_Sensor_Mount)
35. StvPtrsn z_belt_cover_b_camera belt cover and a mirror image of this file also.(https://github.com/VoronDesign/VoronUsers/blob/master/printer_mods/StvPtrsn/Parts_Jigs_and_Mods/Mods/2/z_belt_cover_b_camera.stl)
36. Whoppingporchard Z_belt_cover_cable-route_L MOD - just one part (https://github.com/tanaes/whopping_Voron_mods/blob/main/Z_belt_cable_cover/STL/Z_belt_cover_cable-route_L.stl)
37. LDO's z_belt_cover_a_led MOD - just one part (https://github.com/MotorDynamicsLab/LDOVoron2/blob/main/STLs/z_belt_cover_a_led.stl)
38. Boingomw Wago_mount MOD - modified to fit my bed pan mod (https://github.com/VoronDesign/VoronUsers/blob/master/printer_mods/Boingomw/Wago_mount/stl/2020-Wago_221-412_tray-5x2.stl)
39. Switch wire Spoolholder with my mod (https://github.com/VoronDesign/Voron-Switchwire/tree/master/STL)
40. hartk1213 Modified PanzerObserver from Slidr MOD (https://github.com/hartk1213/MISC/tree/main/Voron%20Mods/Non%20Printer%20Voron%20Stuff/Voron_Camera)
41. Ramalama2 Octopus_Pro_FanCase MOD (https://github.com/Ramalama2/Voron-2-Mods/tree/main/Octopus_Pro_FanCase)
42. Whoppingporchard Rainbow_Barf_Logo_LED MOD (https://github.com/tanaes/whopping_Voron_mods/tree/main/LEDs/Rainbow_Barf_Logo_LED)
43. Arksine G-Code Shell Command Extension plugin (https://github.com/th33xitus/kiauh/blob/master/docs/gcode_shell_command.md)
44. Bought two Quin-LED-UNO for my printer build (https://quinled.info/quinled-dig-uno/) with QuinLED-ESP32-AE+ installed (https://quinled.info/quinled-esp32-ae-touch-ir-microphone-micro-sdcard-3x-led-channel/) so I can run Aircoookie's WLED (https://github.com/Aircoookie/WLED) or Sound Reactive WLED(https://github.com/THATDONFC/WLED-Reactive)
resource links: https://kno.wled.ge/basics/tutorials/ and https://github.com/maz0r/wled-setup/blob/main/scripts/presets.json and https://moonraker.readthedocs.io/en/latest/configuration/#wled
45. richardjm Quarter round led mount with integrated cable run MOD (https://github.com/VoronDesign/VoronUsers/tree/master/printer_mods/richardjm/led-mounts)
46. Gi7mo TinyFan PCB (https://github.com/Gi7mo/TinyFan). It controls 7 12V hardware PWM fans and two thermistors
47. use deck_support_3mm clips (https://github.com/VoronDesign/Voron-2/blob/Voron2.4/STLs/Panel_Mounting/deck_support_3mm_x8.stl)
48. KevinAkaSam VEFACH MOD (https://github.com/VoronDesign/VoronUsers/tree/master/printer_mods/KevinAkaSam/VEFACH) because the Nevermore Micro's activated carbon will not filter Ultra-Fine Particulates (UFP). This is what the HEPA filter does see (https://github.com/nevermore3d/Nevermore_Micro#final-thoughts-on-usage)
49. v6cl Lift handles MOD (https://github.com/v6cl/My-Voron2.4-Customs/tree/main/InteriorStuff/LiftHandle)
50. samwiseg0 LRS Screw Terminal Cover MOD (https://github.com/VoronDesign/VoronUsers/tree/master/printer_mods/samwiseg0/lrs_screw_terminal_cover)
51. Galvanic PTFE Bowden Tube Guide and Canbus Wire Support MOD (https://github.com/VoronDesign/VoronUsers/tree/master/printer_mods/Galvanic/Bowden_Tube_Guide)
52. evandepol NeoPixel Progress / Status Bar (https://www.reddit.com/r/VORONDesign/comments/ql1ia5/neopixel_progress_status_bar/)
53. rkolbi SAMBA Setup - GCODE File Network Share Setup (https://github.com/rkolbi/voron2.4/tree/main/MY_V24-350#samba-setup---gcode-file-network-share-setup)
54. maz0r klipper_canbus guide (https://github.com/maz0r/klipper_canbus)
55. rpi-clone to Backup and Restore your Raspberry Pi (https://github.com/billw2/rpi-clone). I have a solid-state disk drive for my mount drive on my raspberry pi 4B so I use rpi-clone to backup the SSD. URL: https://pysselilivet.blogspot.com/2017/11/rpi-clone-raspberry-boot-disk

Continued on next frame
 
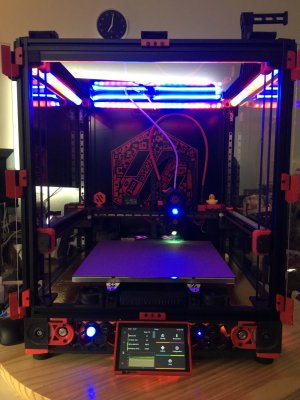
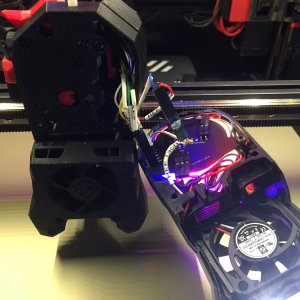
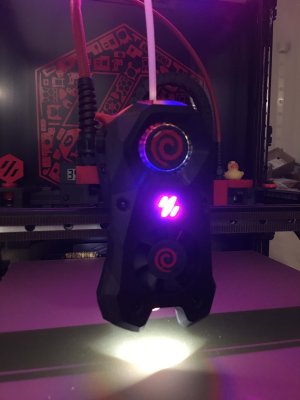
Here are two pictures which show some of the RGB lights attached to this printer.

Voron_LDO300kit_with_RGB_lights.jpg


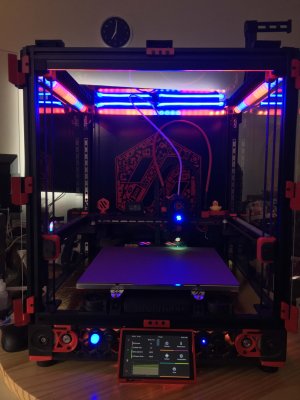
This picture is a little bit darker:

Voron_LDO300kit_with_RGB_lights_darker.jpg


There are three strings of RGBW lights (not including the SB nozzle lights, Whoppingporchard's Rainbow_Barf_Logo_LED, or the RGB leds on Hartk's "Two Part Stealthburner Toolhead Board LED Edition") that are controlled by two WLED webservers.

#1 string is the RGB Chamber lights. This string is 92 RGBW LEDs that circle the whole chamber.
#2 string is the Wire cover leds that are part of the bed_pan mod. This string is 24 RGBW LEDs
#3 string is the Electronics Case (kinda gives it a lower rider look). This sting is 102 RGBW LEDs

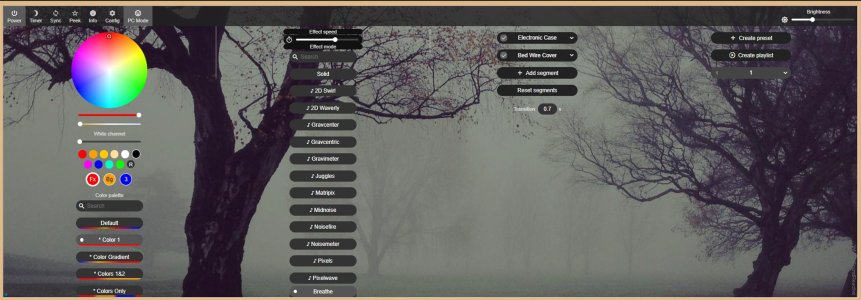
The WLED server is the "sound-reactive branch" of WLED which allows the LEDs to respond to music

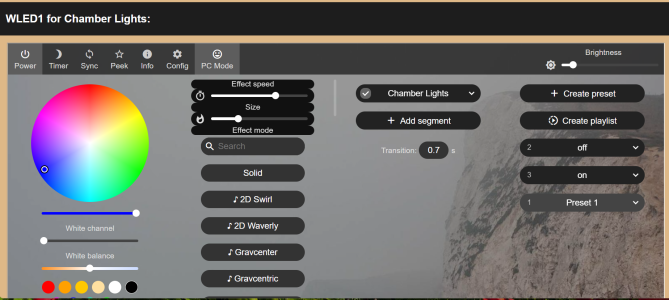
Here is a picture of the WLED interface and I can control presets via moonraker.


WLED interface.jpg


I also have a webserver on a separate raspberry pi that runs NGIX, PHP7.4-fpm and a mosquito broker for all my 3D printers.

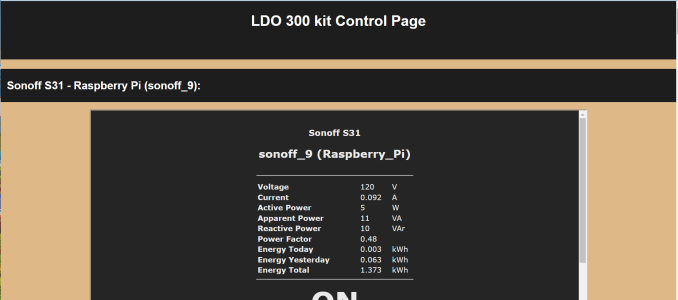
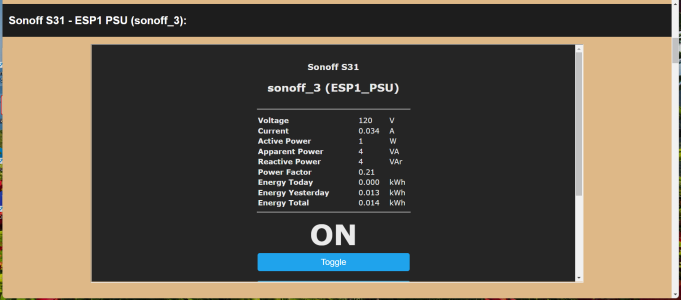
By having a separate webserver I can control all my Tasmato power devices without having the (Klipper) Raspberry Pi for the printer up and running. Here is a picture of my main control page for my LDO 300 kit printer:

1669638484988.png

1669638526631.png

1669638585776.png

1669638609752.png

I have 10 devices on one web page (the webpage is too long to take a picture of the whole thing) that helps me control my LDO 300 Kit printer
 
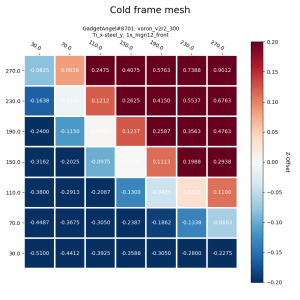
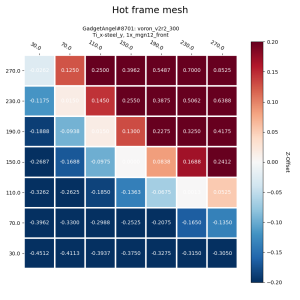
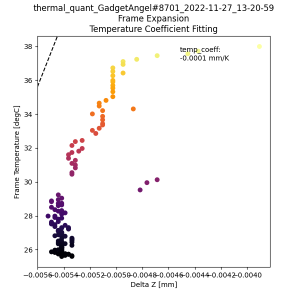
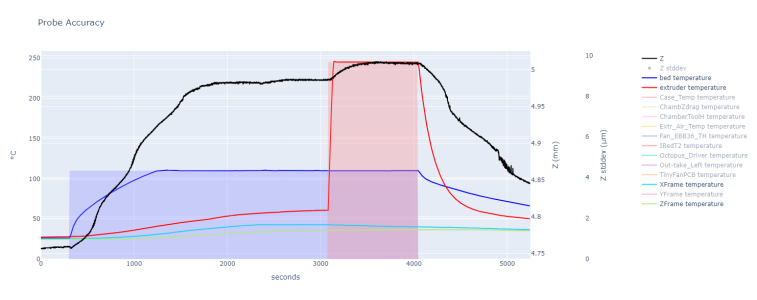
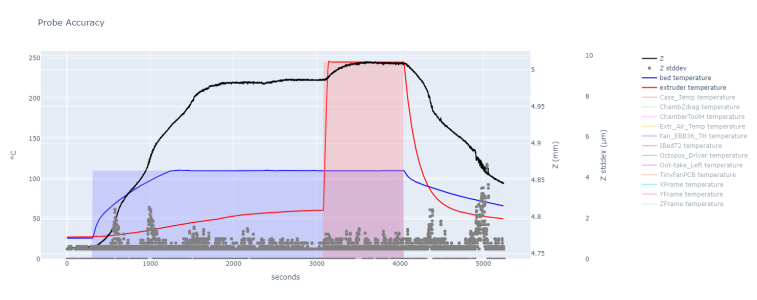
Here is the output from my probe accuracy tests (https://github.com/KiloQubit/probe_accuracy) done today (11/28/2022 at 10:30 AM EST)

I swapped out my Omron D2F-5L Microswitchs on my Euclid probe pcb and on my Z-endstop sexbolt pcb with "Kailh GM 4.0 Micro Switchs" (https://www.amazon.com/dp/B08K9FSSLH)
I have found that the Kailh GM 4.0 Micro Switch have a better standard deviation result than the Omron D2F-5L Microswitch!

What I found interesting about these tests is that I get more temperature change on my X-Axis frame (mine is measuring the extrusion on Bottom back (right below the bottom of the back panel)) temperature sensor than I do from the Z-Axis (upper extrusion - back right corner when facing the front of the printer) frame temperature extrusion:

#1 This first graph show the Z-Axis temperature sensor and the X-Axis temperature sensor:

newplot_showing_Z-frametemp_and_X-frametemp.png


#2 This graph show the Zstdev :

newplot_showing_Zstdev.png


Conclusion: I need to heat soak my bed with nozzle for at least 30 minutes so all the parts of the printer get stabilized at printing temperature. The
 

Attachments

  • FirstRun_newplot_showing_Zstdev.png
    FirstRun_newplot_showing_Zstdev.png
    94.1 KB · Views: 57
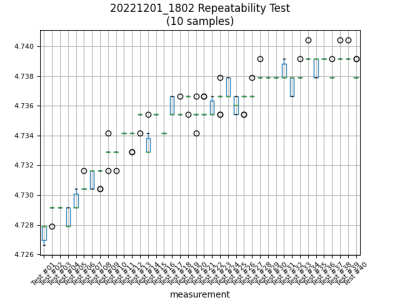
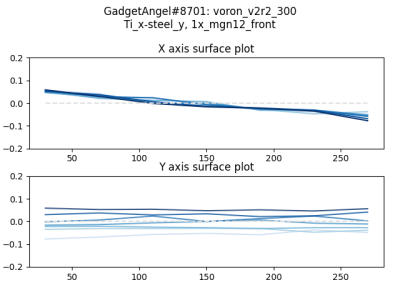
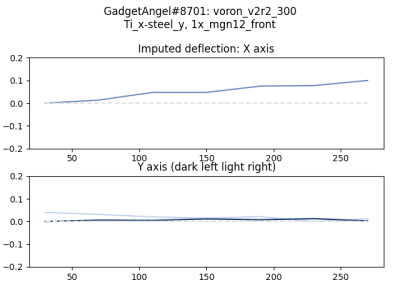
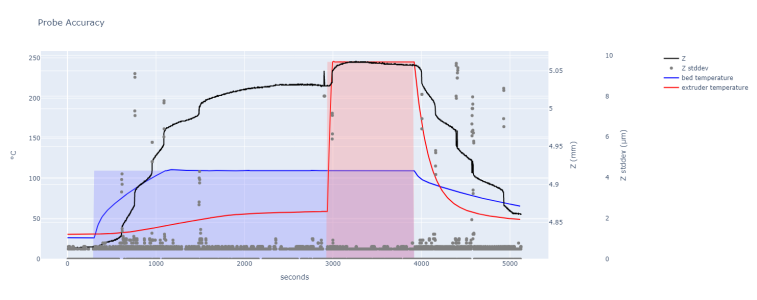
on 12/1/2022 I ran a probe accuracy test suite (https://github.com/sporkus/probe_accuracy_tests). Here are the results:
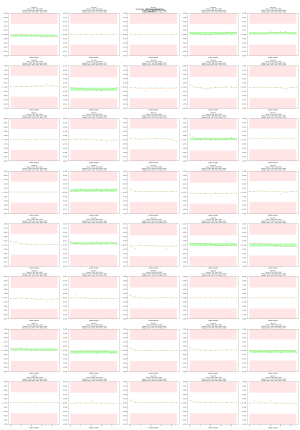
20221201_1802_repeatability_test.png

20221201_1802_repeatability_test(box).png


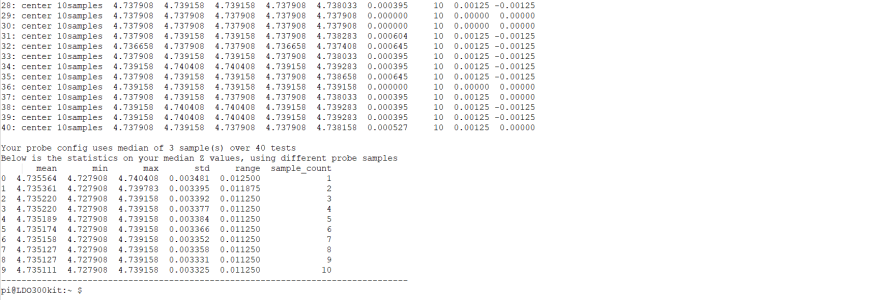
here is the output from the terminal window on the raspberry Pi:
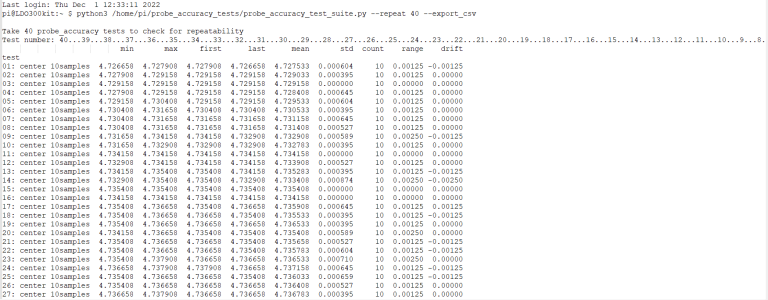
1670028403753.png
1670028441166.png


Here is some of the output sent to the Mainsail console:

output from console:

6:09 PM echo: 35/40 repeatability ; this also get sent to the UI console output
6:09 PM probe: open
6:09 PM probe: open
6:09 PM PROBE_ACCURACY at X:150.000 Y:153.000 Z:15.000 (samples=10 retract=1.500 speed=10.0 lift_speed=10.0)
6:09 PM probe at 150.000,153.000 is z=4.739158
6:09 PM probe at 150.000,153.000 is z=4.737908
6:09 PM probe at 150.000,153.000 is z=4.739158
6:09 PM probe at 150.000,153.000 is z=4.737908
6:09 PM probe at 150.000,153.000 is z=4.739158
6:09 PM probe at 150.000,153.000 is z=4.737908
6:09 PM probe at 150.000,153.000 is z=4.739158
6:09 PM probe at 150.000,153.000 is z=4.737908
6:09 PM probe accuracy results: maximum 4.739158, minimum 4.737908, range 0.001250, average 4.738658, median 4.739158, standard deviation 0.000612
6:09 PM probe: open
6:09 PM echo: 36/40 repeatability ; this also get sent to the UI console output
6:09 PM probe: open
6:09 PM probe: open
6:09 PM PROBE_ACCURACY at X:150.000 Y:153.000 Z:15.000 (samples=10 retract=1.500 speed=10.0 lift_speed=10.0)
6:09 PM probe at 150.000,153.000 is z=4.739158
6:09 PM probe accuracy results: maximum 4.739158, minimum 4.739158, range 0.000000, average 4.739158, median 4.739158, standard deviation 0.000000
6:09 PM probe: open
6:09 PM echo: 37/40 repeatability ; this also get sent to the UI console output
6:09 PM probe: open
6:09 PM probe: open
6:09 PM PROBE_ACCURACY at X:150.000 Y:153.000 Z:15.000 (samples=10 retract=1.500 speed=10.0 lift_speed=10.0)
6:09 PM probe at 150.000,153.000 is z=4.737908
6:09 PM probe at 150.000,153.000 is z=4.739158
6:09 PM probe at 150.000,153.000 is z=4.737908
6:09 PM probe accuracy results: maximum 4.739158, minimum 4.737908, range 0.001250, average 4.738033, median 4.737908, standard deviation 0.000375
6:09 PM probe: open
6:09 PM echo: 38/40 repeatability ; this also get sent to the UI console output
6:09 PM probe: open
6:09 PM probe: open
6:09 PM PROBE_ACCURACY at X:150.000 Y:153.000 Z:15.000 (samples=10 retract=1.500 speed=10.0 lift_speed=10.0)
6:09 PM probe at 150.000,153.000 is z=4.740408
6:09 PM probe at 150.000,153.000 is z=4.739158
6:10 PM probe at 150.000,153.000 is z=4.739158
6:10 PM probe accuracy results: maximum 4.740408, minimum 4.739158, range 0.001250, average 4.739283, median 4.739158, standard deviation 0.000375
6:10 PM probe: open
6:10 PM echo: 39/40 repeatability ; this also get sent to the UI console output
6:10 PM probe: open
6:10 PM probe: open
6:10 PM PROBE_ACCURACY at X:150.000 Y:153.000 Z:15.000 (samples=10 retract=1.500 speed=10.0 lift_speed=10.0)
6:10 PM probe at 150.000,153.000 is z=4.740408
6:10 PM probe at 150.000,153.000 is z=4.739158
6:10 PM probe accuracy results: maximum 4.740408, minimum 4.739158, range 0.001250, average 4.739283, median 4.739158, standard deviation 0.000375
6:10 PM probe: open
6:10 PM echo: 40/40 repeatability ; this also get sent to the UI console output
6:10 PM probe: open
6:10 PM probe: open
6:10 PM PROBE_ACCURACY at X:150.000 Y:153.000 Z:15.000 (samples=10 retract=1.500 speed=10.0 lift_speed=10.0)
6:10 PM probe at 150.000,153.000 is z=4.737908
6:10 PM probe at 150.000,153.000 is z=4.739158
6:10 PM probe at 150.000,153.000 is z=4.737908
6:10 PM probe at 150.000,153.000 is z=4.739158
6:10 PM probe at 150.000,153.000 is z=4.737908
6:10 PM probe accuracy results: maximum 4.739158, minimum 4.737908, range 0.001250, average 4.738158, median 4.737908, standard deviation 0.000500
6:10 PM probe: open
6:10 PM probe: TRIGGERED
 
Spent all day yesterday trying to get my OV5648 USB camera working with "Crowsnest" (https://github.com/mainsail-crew/crowsnest).

It should have been an easy job but I forgot that I installed MJPG-streamer with KIAUH software.

But if anyone else out there is switching over to crowsnest from MJPG-streamer please do yourself a favor and use KIAUH software to UNINSTALL MJPG-streamer BEFORE you install
crowsnest!!

Crowsnest uses ustreamer software () to display the video (https://github.com/pikvm/ustreamer). Since I left MJPG-streamer installed, MJPG-streamer got in the way of ustreamer. Even tho I set ustreamer to run on 8081 port of the raspberry pi and MJPG-streamer was on 8080 port no matter what I did ustreamer could not open the input channel to the USB camera.

The USB camera was on /dev/video0 device and I could configure ustreamer to use 0.0.0.0:8081 and told ustreamer to use the /dev/v4l/by-id/xxxxxxxxxxxxxxx-indx1 number but for some reason
the USB camera channel input was defaulting to 0 which was tied to /dev/video0.

If you need to find out what ports are used on the raspberry pi, use the following command:
Code:
 sudo netstat -lptn

If you need to see the devices on the USB bus, use the following command:
Code:
 lsusb

If you need to find the USB video v4l device ID:
Code:
ls /dev/v4l/by-id

To see which v4l video device is tied to which /dev device:
Code:
ls -l /dev/v4l/by-path

Here is a link for v4l2-ctl commands that are useful to find out what options are available for your camera:

I had to increase the error messages going to the log file for crowsnest to debug my issue. So by looking at the crowsnest.log file and using the following command I determined that MJPG-streamer was getting in the way of ustreamer and MJPG-streamer needed to be uninstalled (I used KIAUH to uninstall it):
Code:
sudo systemctl status crowsnest.service

After I uninstalled MJPG-streamer and put the camera back on port 8080, because MJPG-streamer was no longer using that port. Everything worked then.

Here is my crowsnest config file:
Code:
#### crowsnest.conf
#### This is a typical default config.
#### Also used as default in mainsail / MainsailOS
#### See:
#### https://github.com/mainsail-crew/crowsnest/blob/master/README.md
#### for details to configure to your needs.
##
## sudo systemctl stop crowsnest.service
## cd ~/crowsnest
## make buildclean
## make build
## sudo systemctl start crowsnest.service
##


#####################################################################
####                                                            #####
####      Information about ports and according URL's           #####
####                                                            #####
#####################################################################
####                                                            #####
####    Port 8080 equals /webcam/?action=[stream/snapshot]      #####
####    Port 8081 equals /webcam2/?action=[stream/snapshot]     #####
####    Port 8082 equals /webcam3/?action=[stream/snapshot]     #####
####    Port 8083 equals /webcam4/?action=[stream/snapshot]     #####
####                                                            #####
#####################################################################


[crowsnest]
log_path: ~/printer_data/logs/crowsnest.log
log_level: debug                       # Valid Options are quiet/verbose/debug
delete_log: true                       # Deletes log on every restart, if set to true
## no_proxy: true                       # If you want to run crowsnest without any proxy set up, you enable this line. This forces ustreamer to listen on all available network interfaces.

[cam OV5648_USB]
mode: mjpg                              # rtsp/mjpg
port: 8080                              # Port
device: /dev/v4l/by-id/usb-Sonix_Technology_Co.__Ltd._USB_2.0_1080P_Camera_SN0001-video-index0      #/dev/video1 #/dev/video0  #/dev/v4l/by-id/usb-Sonix_Technology_Co.__Ltd._USB_2.0_1080P_Camera_SN0001-video-index0  # See Log for available ...
resolution: 1600x1200                   #640x480  #1600x1200  #2048x1536 #1920x1080 # widthxheight format
max_fps: 15                             # If Hardware Supports this it will be forced, ohterwise ignored/coerced.
custom_flags: --host=0.0.0.0 --encoder=OMX          # You can run the Stream Services with custom flags. # --host=0.0.0.0 --slowdown
v4l2ctl: focus_auto=0,focus_absolute=180,power_line_frequency=1,sharpness=4     # Add v4l2-ctl parameters to setup your camera, see Log what your cam is capable of.

The v42lctl commands are used to turn off autofocus so the camera stays at a fixed focal length.

I had these v42lctl commands in my /etc/rc.local file so they would be run evetime by raspberry pi rebooted but I did not like having them there because the /etc/rc.local file does not get backup to github.

So I like the crowsnest way of incorporating the v4l2ctl commands into their config file.
 
Top