What's new
VORON Design

Register a free account today to become a member! Once signed in, you'll be able to participate on this site by adding your own topics and posts, as well as connect with other members!

V0.2 - Formbot Kit Build

BallisticTech

Active member
V0.2 - Formbot Kit Build
Part 1 - Unboxing and cPIF Parts
Unboxed the Kit on my live stream last night - https://youtube.com/live/qOcGWsB79Wo
1685502390176.png

Full Review

**NOTE** - My Github Repo with a bunch of resources for the Formbot V0 Kit: https://github.com/SrgntBallistic/Formbot-V0
Since there's a general lack of documentation for this kit I've tried to compile everything I can that will help others have an easy time building the kit.

I hope to update the build log with subsequent stream VoDs, videos, and text updates on how it went if it proves to be of interest to others.

Full disclosure the kit was provided by Formbot for making content. I paid for shipping

I'll be building the kit as "stock" as possible and will not any issues I have in the process. I've bought a full extra hardware kit from Sparta3D so if any hardware is missing I can keep going. Same for fans and other things I've noted can have issues in other folks builds.

Fairly happy with the kit contents so far(not having built one before):
-$349 Starting Price
-Kirigami Bed Frame (Not full kit, no RGB LED, pcbs or wagos)
-BTT Pi V1.2 (Only V0 kit I know of with a default Pi alternative included...?)
-BTT SKR Pic
-CHC V6 Hotend (Upgradeable to Dragon/HF)
-Double Sided PEI Sheet
-Crimped Wiring Looms
-Moons Motors
-Stainless Steel Rails
-MIC6 Cast Aluminum Build Plate
-Polycarbonate Panels
-Gates Belts
-Vivedino 60W Silicone Bed Heater
-Stainless Steel Hardware
-Umbilical Board + Harness
-Makerbeam XL Extrusion (These are not Makerbeam XL extrusions as noted in the Formbot listing. They are more like LDO style profile)
-Meanwell 150W PSU

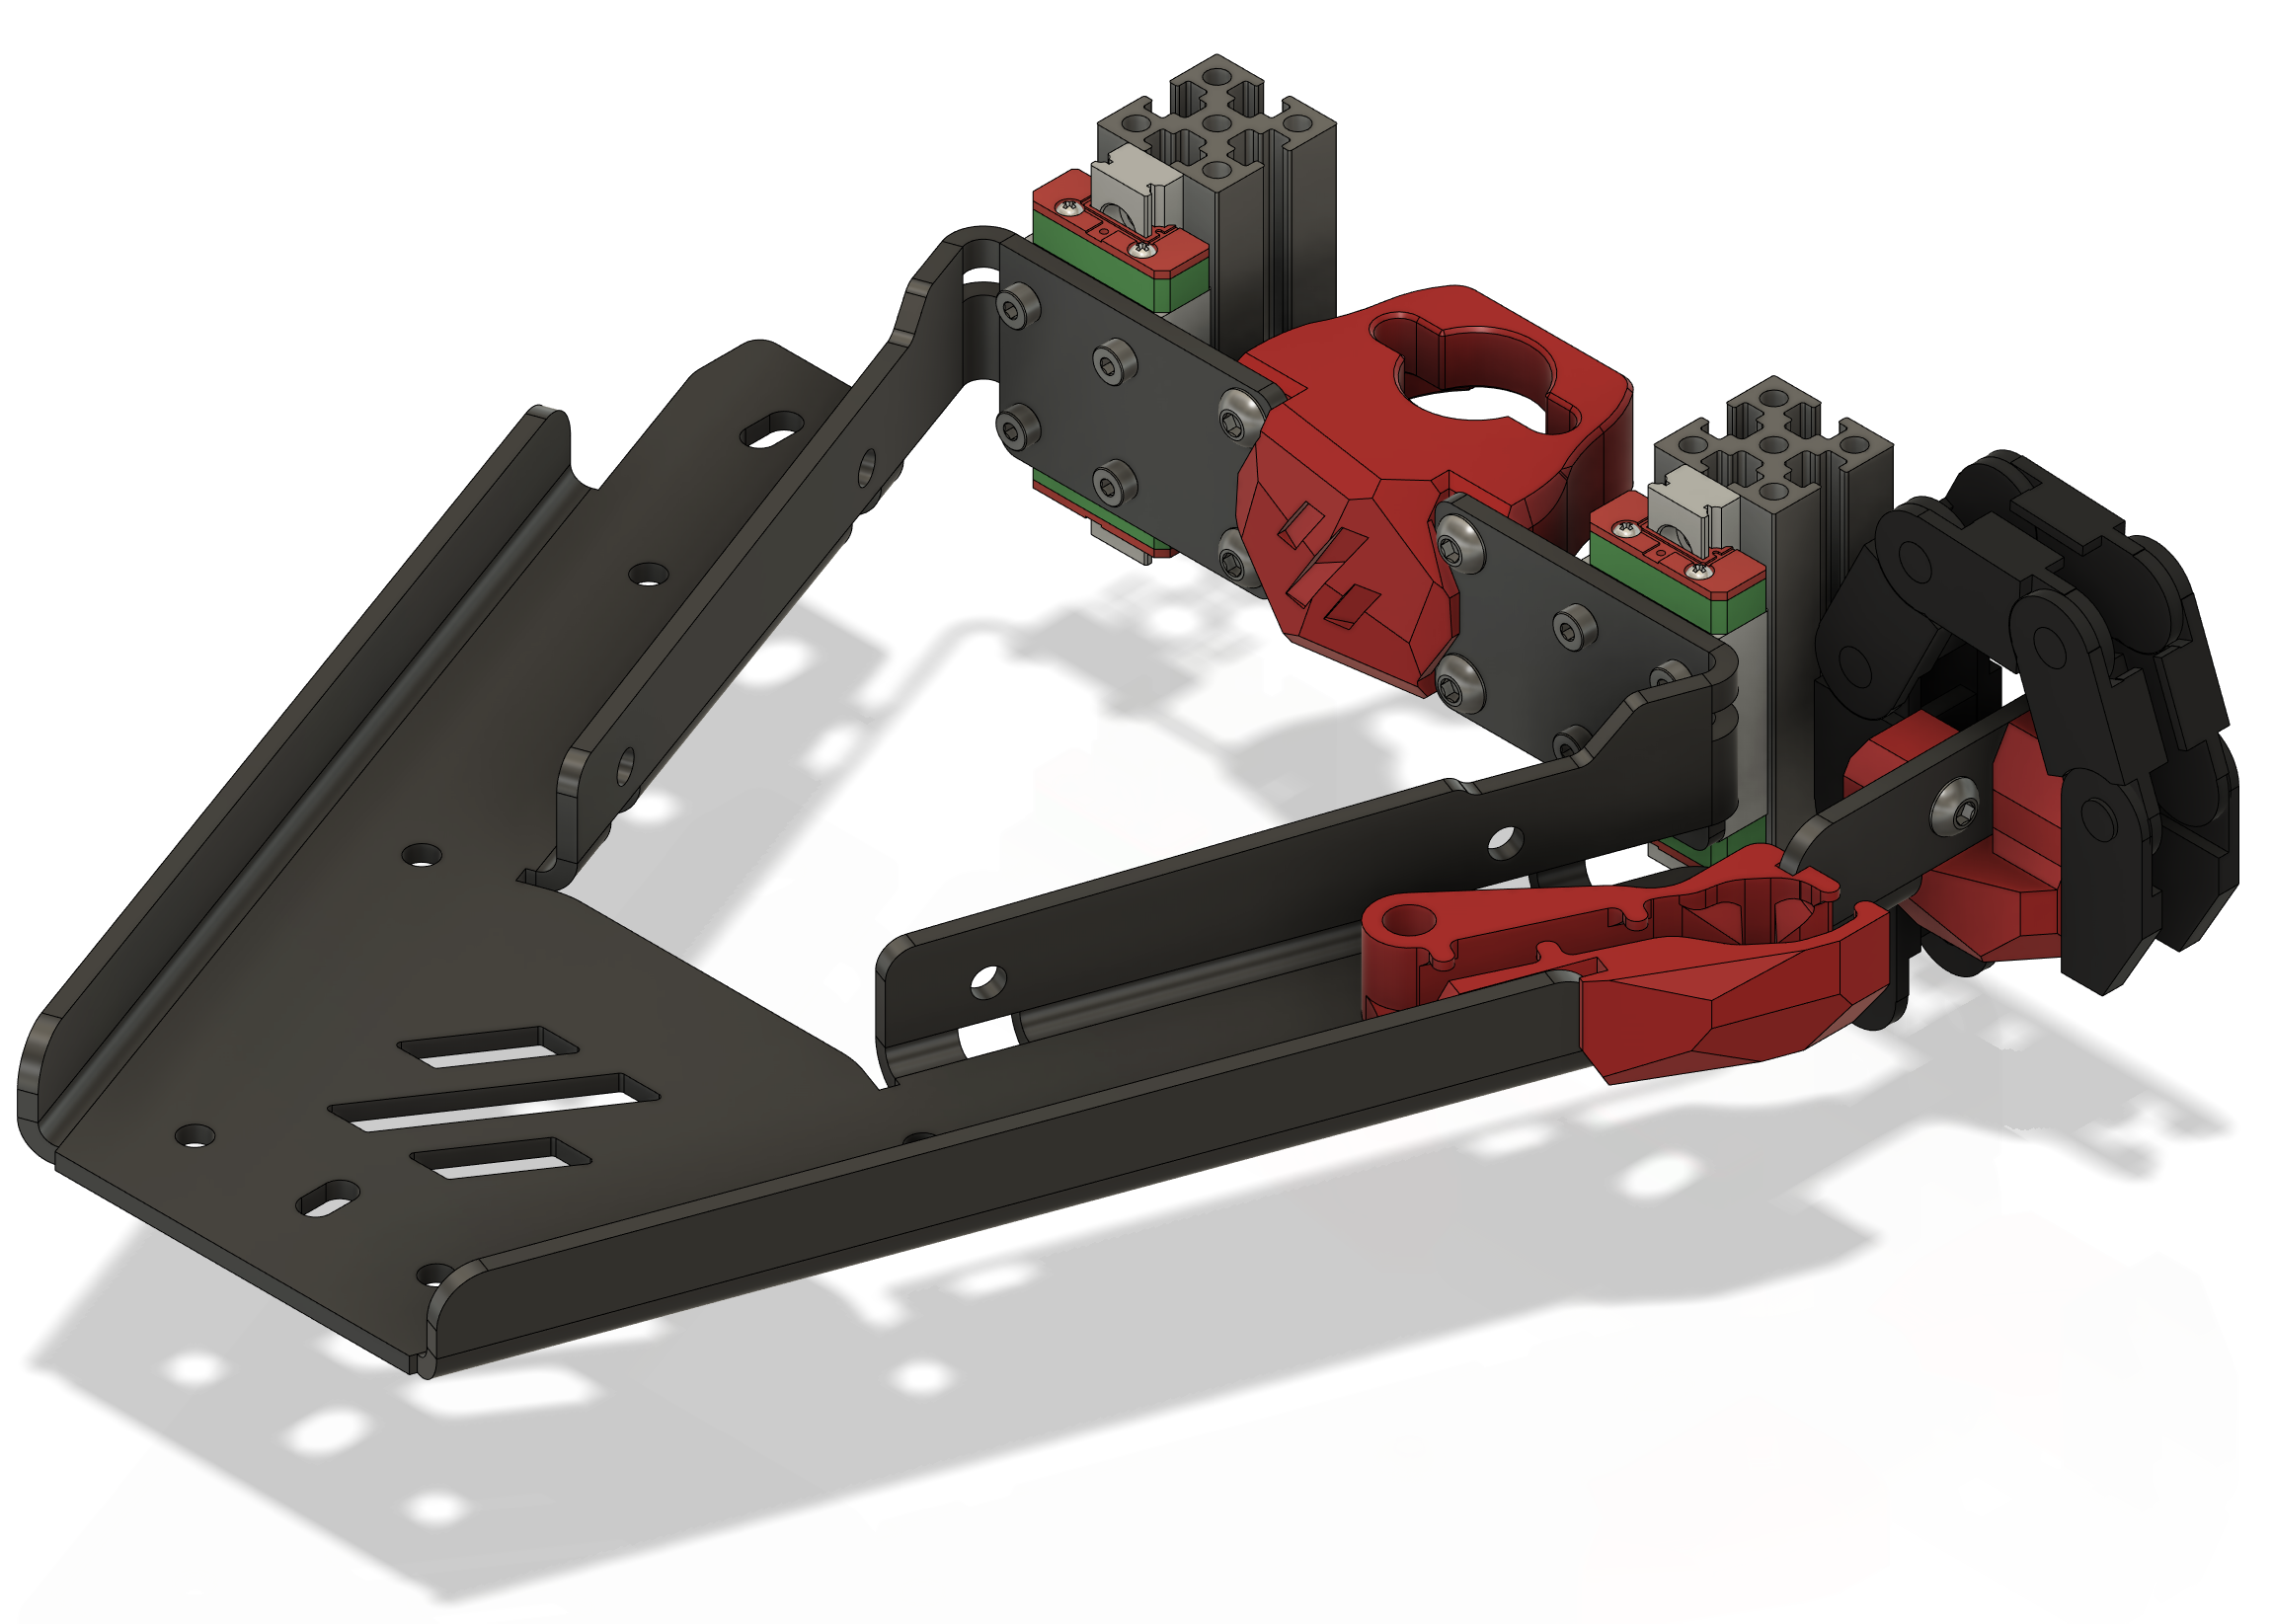
cPIF Parts from Fabreeko came and are looking pretty nice. Thanks Will
image.png
image.png
1685502318567.png

If you have any specific questions about the kit LMK

Unboxed kit organized
image.png
image.png


I'll probably print up some small parts organizers or dividers for this parts bin so I don't have to fish hardware out of the bags.

I got a nice remnant from a friends kitchen renovation for building the frame
image.png


I think in Part 2 I'll cover prepping for the build. More organization, Frame Extrusion Identification, Rail Cleaning & Lubing, and Printed Part Cleanup.
Cheers
 
Last edited:

More Organization & Preparation

Stream: https://youtube.com/live/DwD1Kb6cqqU
1685976863013.jpeg


In the stream I walked through:
  • Kit parts/features
    • Unboxing thoughts and impressions
  • Tools
    • LTT Screwdriver
    • Lubricant and syringe
  • Parts check
    • Kirigami Bed
    • Umbilical PCBs
  • Organize screws
    • Modbot organizer
    • Extra Hardware???
  • Extrusions
    • Identify and put together
  • Printed parts
    • Check/file/sand mating faces
  • Organize parts
    • Printed parts in bins
  • Rails
    • Clean
    • Lubricate

LTT Screwdriver​

I picked up an LTT Screwdriver. I've been eying one for quite a while.
1700775237886.png

Note: In retrospect I recommend picking up a set of RC Style Hex drivers with sharp edges for tightening/untightening the frame and rails! Bits and ball end drivers can strip the heads of the M3 and M2 screws.

Lubricant & Syringe​

For lubricating the linear rails I've gone with some Super Lube PTFE grease which has an NGL1 rating.
1700775257764.png
For applying the lubricant I reused a little syringe that came in a car windshield crack repair kit I bought a while back. Yay for being a pack rat lol.

Parts Check​

From the unboxing I've found that pretty much everything that's supposed to be in the kit is present. In terms of the hardware all the packs of fasteners are present. But I'm not sure about the quantities just yet.

There are differences between the base Voron V0.2 BoM/Manual and what comes in the kit. There's Zero documentation for the Formbot kit so I've found I have to use a combination of the Voron Manual, GitHubs for the 2 Mods, and LDO documentation.

Kirigami Bed​

This kit includes the Kirigami bed frame. But this is NOT the full "Kit"
1700775294751.png
stealth_beta.png
Kirigami_assy-6.jpg


You will need make sure you have printed parts for the Kirigami bed.

Be sure to check out the Mod's GitHub for a list of the STLs.

You can buy an LDO Kirigami wiring kit from DFH as I have done.

Links:

Umbilical Mod​

1700778424412.png
The umbilical mod is a mod from the Voron team that breaks out all the wiring connections from the tool head into a single wiring harness via a small PCB on the tool head, and then a larger PCB on the back of the machine. The PCBs and harness that come with the kit look nice enough. The mod will require a number of printed parts that aren't in the base V0.2 printed parts guide.

Umbilical Examples:
1685940739807.png1685940604263.png
pxl_20230220_175420608.webp


Links:

 
Last edited:

Hardware Organization​

I decided to go ahead and print ModBot's Voron V0 Hardware Organizer. I printed it out of MatterHackers Build Series Orange PLA and MatterHackers Silky Silver PLA. The organizer seems way better than fishing hardware out of bags
1700775015105.png1685977169189.png1685977189912.png1685977206658.png

There were 3 bags of hardware that weren't listed on the Voron BoM or the Formbot listing BoM they were:
M2x4 SHCS - Mounting the Kirigami Bed to rails
M2.5x8 SHCS - These seem to be for mounting the generic V6 CHC hotend (and any other Phaetus Dragon style hard mount hotends)
M3x6 FHCS - I'm still not quite sure what these are for...

1700775073768.png

I've also printed Steve Builds' hex organizer to use as a bit of a staging area for hardware and parts I'm using in a particular step
1685977381902.png

Extrusions​

The Extrusions profiles are Makerbeam XL. They seem to have been anodized/powder-coated after being cut, drilled and tapped meaning they're pretty much black all the way around which looks really nice.
1685977418957.png

All of the extrusions have their ends tapped. I measured and compared all of the extrusions and they all seemed to come out as between 199.997 and 200.003. So +- 3 thousands of a mm (3 microns) according to my calipers.

 
Last edited:

Printed Parts​

Next I went through and sorted all the printed parts based on the general part of the printer and where they're used in the kit.
  • Frame/legs/rails
  • Jigs/Fixtures/Misc
  • Bed/Kirigami/Z
  • Mini SB
  • Motion/Motors/XY
  • Electronics/Cable Management
1700774841153.png

Organizing Parts​

Similar to the printed parts I've organized the non-printed parts into bins based on assembly order and part of the printer. I'm keeping stuff I don't really need immediately off to the side on another little table.

I'm going for kinda FOR (First Order Retrievability) here. I want to know where everything is, be able to see it and grab it easily whenever I need it. That is opposed to having things in nested boxes/bags that I have to dig through to get the stuff I need.
1700774885559.png

Cleaning & Lubricating Rails​

This part honestly had me a bit nervous. I was worried about how important it was to have carriages that lightly and smoothly just flew across the rails.
I used a little Plano small tackle box to soak/clean the rails in 91% IPA. I then manually dried them with shop paper towels that don't leave fuzz on things and set them out to dry. I used the syringe I loaded up with PTFE grease to reapply the grease to the carriage bearings. I pressed the syringe against the back of the rail on one of the holes and pushed the grease out until it visibly started to come out of the gap between the rail and carriage.
1700783750602.png
Everything seemed to work out well. The carriages DON'T fly across the rail with Zero resistance. But I can feel that all of the bearings have grease on them and should be limiting the metal-on-metal contact. They move smoothly without any binding.


Sanding Mating Surfaces
Something I noted Steve_Builds did with many of his (very well printed) parts was sanding/filing down any mating surfaces. Even if prints have very good top layers there can still be slight extrusion inconsistencies in the top layer which causes mating surfaces to not, well mate, very well.

Sanding the A/B Motor assembles, and pieces of the Mini SB that need pretty tightly mated interfaces was specifically important.
1700783927357.png
 
Last edited:

Full Review​


I've added this to my initial post. I really enjoyed building this kit. Hopefully ppl find the Review, Build Streams, and GitHub helpful to build this kit.
 

Stream #3 Frame Part 1​


I really thought I would get much further with this part of the build. But moving through the manual and reading every instruction meant the process went a bit slower than I thought it would. This is my first frame build using blind joints. While they're fairly simple and having a nice flat surface helps. I found it a bit tougher than I imagined. But don't rush things. I did accidently initially put the Z rails onto the wrong extrusions. I had to back track and use the right ones.

I followed a technique/setup I saw on Crys's Livingroom Workshop's stream building his LDO V0 Kit. He clamped a straight edge to the edge of his work area so that it was a nice reference to hold elements against.
1700784183245.png
In addition I found a combination of 1-2-3 Blocks and the red right angle squares helpful for joining frame extrusions together squarely.

Z Frame​

The nut holders were nice. A set if nut blocks from somewhere like KB3D for $9-10 could save you a bit of time here. The rail alignment tools of course came in quite handy

I also printed a set of alignment tools that Adam from Vector3D designed and made available on GitHub. The make it so that instead of having to dial in your calipers for the specific spacing called out in the manual, you can instead use the printed jig and know that the spacing is exactly, 33m, 35mm, 37mm, etc... He also has a pair for getting the right spacing of the A/B Motor pulleys

Tools Link: https://github.com/AdamV3D/V3D-Voron-Mods/tree/main/v0/Assembly Jigs/STL

1700785002140.png
1700786767089.png

These rail spacers I've seen are quite popular and they help you get a good initial spacing between the two vertical Z rail extrusions. But honestly by the time you complete this part of the frame I found that I had tightened, loosened, nudged and realigned them so many times it didn't seem all that helpful.
1700785149043.png

Kirigami Bed Frame​

The Kirigami bed frame is overall pretty great. The one Formbot provides seems quite rigid and the flanges that mount to the carriages actually seemed quite co-planer right out of the box. I only had to minorly tweak them a bit. Compared to other frames I've seen on the V0 Questions Discord channel it initially seemed quite good.
1700785548869.png

It's really important that these flanges are as coplanar as possible. Checkout the Kirigami Manual github for more on how to make sure the frame is square. It also points out all the correct printed parts you need. My cPIF parts came with both Kirigami printed parts and the stock V0 extrusion bed parts.

1700785678055.png

And here's where the first 2 issues with the Formbot V0 bed showed up. I ran into these problems, and others on the Kirigami Github have noted them. On Discord ppl have said they ran into them, while others have said they haven't at all.

Basically the thickness of the Formbot frame is quite thick. It should be 2mm +/- .2mm. This caused some of my printed parts (particularly the new stealth parts to not fit onto the frame.
1700785780889.png
In particular the "Stealth" Chain Mount Block and "Nut Block" didn't fit because of the thickness of the frame. I don't think the print quality was an issue. Everything else in the build went will in terms of the printed parts. BUT, perhaps folks that didn't have issues with the frame had a lower extrusion/flow rate. Not to say they were under extruded. But as you know in FDM prints .2mm can mean the difference between a part fitting as intended, fitting too loosely/tight, or not fitting at all.
1700785890293.png

Some folks on the Kirigami GitHub frame noted that they contacted Formbot, who provided them with their own remixes of the printed parts. But didn't have success with them. I initially tried filing out some of the material that seemed to be causing interference. This worked ok for the chain mount. But the Nut Block ended up being something I had a lot more trouble with.

1700786192131.png

A quick solution to this is using the older "Non-Stealth" version of the nut block. It doesn't wrap around the flanges of the frame and won't push them out of being coplaner. A Stealth Nut Block that is too tight will push out the flanges and likely slightly bow the fame.

1700786451503.png
(Cont'd in next post)
 

Kirigami Bed Issues Cont'd​

I ended up using the non-stealth version of the Nut Block after initially trying to file a way a bunch of material to get the stealth version to fit. From what I can tell the differences in the parts are purely aesthetic.

The stealth Chain Mount initially worked after I shaved away some material but it ended up breaking later so I reprinted it with a lower extrusion multiplier and the second part fit easier after some adjustment.

1700787141034.png

After getting all that assembled I found that when I finally attached the bed frame to the Z Carriages the axis just didn't move quite as easily as I expected. There was no real binding. But when I set the fame up on it's end the bed wouldn't just fall from it's own weight. That isn't strictly speaking necessary. But I wanted it to.

I believe what was happening here was just that even with the non-stealth nut, the carriages were just slightly over constrained. The frame was ever so slightly torquing them out of perfect alignment with the rails. I finally diagnosed this to have to do with the fame holes used to mount the nut block and carriages. They were very tight when I put the screws through them. To the point that it was difficult to get the screws through the holes.

These holes and screws need a bit of wiggle room to allow the rail carriages and flanges to self align such that the carriages aren't pushed up against the rails in a bad way. I solved this buy slightly filing out the wholes of some of the paint.

After doing this and switching to the non-stealth block the bed fell under it's own weight and seemed to move better.
 

Attachments

  • 1700788886789.png
    1700788886789.png
    510.3 KB · Views: 5
Top