What's new
VORON Design

Register a free account today to become a member! Once signed in, you'll be able to participate on this site by adding your own topics and posts, as well as connect with other members!

My Modified LDO 300 kit build log - updated all the time

I have been working on the DUMP_DICTIONARY macro lately. I wanted an easy way of displaying all the macros that have been renamed on the printer.

So I made changes to the DUMP_DICTIONARY macro to include all the g-code macros with the attribute .rename_existing. I also wanted to include the [homing_ovrride] and [idle_timeout] macros to the list because they are macro's that do not appear in the printer.configfile branch.

I especially wanted to ensure that the RENAMED MACRO list would include which AXES on the printer were being overridden during the homing procedure.

I discovered during my journey that the printer.homing_override.axes (at least for my PRINTER OBJECT tree) comes after printer.homing_override.gcode.

I want to print out which axes is being overridden when I output the fact that homing_override has a g-code macro attached to it.

To solve the problem I had to save the command in namespace and print the command out at the end if homing_override.axes existed. If I was doing both printer.configfile.config and printer.configfile.settings branches then when the code hit the second branch it will already have the homing_override.axes info and just print out the command.

I have already attached the newest copy of DUMP_DICTIONARY.zip to the thread above this one. I only want to keep one current copy of the code.

Here is the command to execute to see a list of RENAMED MACROS for you printer:
Code:
DUMP_DICTIONARY RENAME=1 GCODE=0 STOP_CFG=2

or

DUMP_DICTIONARY RENAME=1 STOP_CFG=2

The above two commands are equivalent.

You should see the following output:
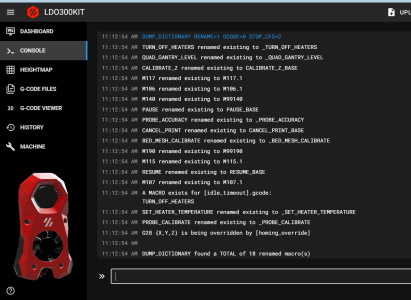
1672589600145.png

Notice: the "G28 {X,Y,Z} is being overridden by [homing_override] " line.

On my printer all my axes are being overridden. But the items in between the two curly braces will changed based on your printer's setup.

Notice: the "A MACRO exists for [idle_timeout].gcode" line.

I decided to include the contents of the g-code macro for only the IDLE_TIMEOUT because to me it just makes sense to include it.

That's all for today.

Happy 3D printing!
 
Just saying, beautiful printer!


I am continuing the previous thread here since I can not have more than so many characters and I ran out of room!

Now I am not an expert at HTML or AJAX or jQuery or JavaScript or even Python. But I know enough.

You will need to go in and change the text to what you want it to say. So for example where you see <title>
You may want to change the text between the two tags <title> and </title>.

There are plenty of help on the web for understanding HTML files.

You will need to change the following line from "index.html ":
Code:
  window.open('http://192.168.1.172/LDO300Kit/ldo300kit.html', '_blank');
You will need to supply the window.open with the correct IP address for your MosquitoBroker and the correct directory name.

You will need to change the following lines from the file "ldo300kit.html ":
Code:
            mainsail_btn_Window = window.open('http://192.168.1.154:7991', '_blank');
            fluidd_btn_Window = window.open('http://192.168.1.154:80', '_blank');
You will need to change the IP address and port number to match your Klipper install.

When I originally installed my Klipper via KIAUH software I choose Fluidd for my UI but I prefer Mainsail now and that is why Mainsail is on port 7991.

When you install KIAUH tells you the IP address and port number for the UI or you can look at the NGINX files on your system at /etc/nginx/sites-available/default and /etc/nginx/sites-available/*.conf files. In the nginx files the port is given.


I have given you the important files for setting up the web server to allow CORS policy access, but you will need to changes the rules on IP address for it to work on your network.

Go back and take a look at the following files:

On the LDO300kit, look at /etc/nginx/sites-available/resetrp2040.local.conf file and on MosquitoBroker look at /etc/nginx/sites-available/data.conf file.

Both these files contain the following:
NGINX:
map $http_origin $cors_origin_header {
            default "";
            "~(^|^http:\/\/)(localhost$|localhost:[0-9]{1,4}$)" "$http_origin";
            "~^http://192.168.1.172$" "$http_origin"; # http://192.168.1.172
            "http://192.168.1.172/LDO300Kit/" "$http_origin";
            "http://192.168.1.172/" "$http_origin";
}

map $http_origin $cors_cred {
            default "";
            "~(^|^http:\/\/)(localhost$|localhost:[0-9]{1,4}$)" "true";
            "~^http://192.168.1.172$" "true"; # http://192.168.1.172
            "http://192.168.1.172/LDO300Kit/" "true";
            "http://192.168.1.172" "true";
}
These section will need to be adjusted for IP addresses.

My LDO 300 Kit printer is on IP address 192.168.1.154. But when my MosquitBroker Raspberry Pi (which is on IP address 192.168.1.172) tries to access files on the LDO 300 kit's (LDO300Kit) Raspberry Pi, I end up getting blocked due to CORS.

So I had to dig around to find a solution (google search on Raspberry Pi, PHP, NGINX CORS issue) and using the map function one can use the IP address to grant access.

Keep in mind that the other section of these two files that pertains to CORS is as following:

NGINX:
   add_header Access-Control-Allow-Origin $cors_origin_header always;
   add_header Access-Control-Allow-Credentials $cors_cred;
   add_header "Access-Control-Allow-Methods" "GET, POST, OPTIONS, DELETE, HEAD";
   add_header "Access-Control-Allow-Headers" "Authorization, Origin, X-Requested-With, Content-Type, Accept";
    if ($request_method = 'OPTIONS' ) {
      return 204 no-content;
    }

Right now the HTML pages should not experience or run into a CORS issue because you are only controlling a relay via PHP and the IP address change should be enough to fix the issue.

Later on when we start doing MQTT programming and reading our password out of another directory (that is what data.conf is for) we will need to pay more attention to how to setup the headers for the FETCH object.

We will also be getting into using Eclipse Paho JavaScript Client to communicate with the printer via moonraker API.

I am tired now and have been writing for quite awhile. I will come back to all this in another installment.

But if you want to see the current state of my HTML files just go over to https://github.com/GadgetAngel/Klipperbackup_Mosquito_Broker .

This GitHub repo contains all my HTML files but it does not contain the NGINX setup files,

Happy Printing!

To continue go back to here: https://forum.vorondesign.com/threa...-log-updated-all-the-time.66/page-2#post-1946
 
Last edited:
Have you ever wanted to add your own jinja2 custom filter to your Klipper macros?

Well I have!
I have always was wondering how one would go about adding a custom jinja2 filter to Klipper. I have been want a JINJA2 Template Engine filter that would take a string and convert the string into a python dictionary object. Of course the string would have to be in the one of the following forms:
Code:
"{'x': 150.0, 'y': 20.0, 'z': 50.0, 'f': 4000}"
'{"x": 150.0, "y": 20.0, "z": 50.0, "f": 4000.0}'
"{'x': 150, 'y': 20, 'z': 50, 'f': 4000}"
'{"x": 150, "y": 20, "z": 50, "f": 4000}'

Well I came across a Github Repo yesterday that helped buy did not give me the custom filter option. I could write my own python code and use two curly bracket in which I would put my python code call sandwich in the middle, but I could not get JINJA2 to allow me to use the call inside a JINJA2 statement block

So the following code will error out::
Code:
{% set position = {str_to_dict(params.DIC)} %}

In the above example "str_to_dict()" is the call to my python function. You have to put your function call in between two curly brackets for it to work. But the above code errors out because the { } are part of the JINJA2 template language

Since the params.DIC is a string, I finally tried the next block of code which did work:
Code:
{% set position = params.DIC %}
G0 X{str_to_dict(position)}.x Y{str_to_dict(position)}.y Z{str_to_dict(position)}.z F{str_to_dict(position)}.f

I just do not like relying on the fact that Python did the precedence correctly. Meaning Python evaluated from left to right instead of right to left. I evaluated {str_to_dict()} before it applied the dot notation.

So I kept looking for my answer. After thinking about it for a while, I decided to look at the code that was developed to get the extend_macro working (which is what I used in the above case)

The original work was done by @droans at https://github.com/droans/klipper_extras/tree/v0.2/extended_macro

I examined the code and had to look a couple of things up about Python and keep looking at the articles I have been reading about JINJA2 custom filters. I figured if I could just create a custom filter I could get ride of the {} braces problem.

I found this article on how to create a JINJA2 custom filter but the author ends up implementing it with JINJA for Ansible. The article is located at https://ttl255.com/jinja2-tutorial-part-4-template-filters/

But what the above article did show me was how to register a custom JINJA2 filter with JINJA2 in python code.

Now all I needed was to see if I could find JINJA2 source code in Klipper to test the setup out. After looking through the Klipper documentation on DEBUG klipper I could tell that a virtual python environment has been setup for Klipper on the raspberry pi.

I entered the virtual environment by entering in the following commands:
Code:
cd ~/klipper
~/klippy-env/bin/python


these commands took me to a interactive python prompt

I then started to enter in the following commands:
Code:
import jinja2
from string_to_dict_filter import string_to_dict
env = jinja2.Environment()
env.filters["strtodict"] = string_to_dict
tmpl_string = """{{ "{'x': 250, 'y': 50, 'z': 70, 'f': 4000.0}"|strtodict   }}"""
tmpl = env.from_string(tmpl_string)
print(tmpl.render())


The file "string_to_dict_filter.py" contained by python function called "string_to_dict"

I had written this to get the extend_macro addon to work. So I decide to see if I could use the same function as a custom JINJA2 filter.

I was happy to see that this did work! I could use the python code I had written for extend_macro as a custom JINJA2 filter.


So now I had to figure out a way to run the above in Klipper. I first thought was to use a BASH shell script to run the commands I ran in the interactive env. So I proceeded with that idea. But that did not work because the moment the shell script exited so did the JINJA2 environment which defined the new custom filter!

So I went back to the python code that @droans did for the extend_macro Klipper add-on. From digging deeper into his code it looks like he is trying to access the JINJA2 global namespace so that he can share variables between macro calls.

So basically the python function call I developed was being placed in the global namespace for all my Klipper macros (which are all JINJA2 templates).

I found a section of his code that dealt with the JINJA2 environment and decided that all I needed was to register my python function as a JINJA2 filter.

The following code from the above code block does exactly that (it registers the python faction as a JINJA2 filter):
Code:
env = jinja2.Environment()
env.filters["strtodict"] = string_to_dict

So I added the
Code:
from string_to_dict_filter import string_to_dict
to the top of the "extended_macro.py" code and then added the
Code:
env.filters["strtodict"] = string_to_dict
line at the bottom of @droans' function definition "class ExtendedPrinterGCodeMacro(PrinterGCodeMacro, object): "

and rebooted the machine to see if the "strtodict" would still error out or did I really register it as a custom filter. I am happy to report that it registered the function as a new JINJA2 filter.

So now I could re-write my code as follows:
Code:
{% set position = params.DIC|strtodict  %}
G0 X{position.x} Y{position.y} Z{position.z} F{position.f}

Success. Now I just needed to dig farther into @droans' code to use his variables so I can get ride of the
Code:
from string_to_dict_filter import string_to_dict
at the top of his file

After looking around a bit more I found that he already had variables for the function name and the name being used inside the Klipper macro.

So all I needed to do was add it to his FOR LOOP and use his variable and the job was done. He already did most of the heavy lifting by creating the way to establish a connection between the external python code file (function name) to a name you use inside the Klipper macros>

So I created my version of his extended_macro add on with additional information on the write and put it up on my Github repo.

You will find instructions on how to install extended_macro addon and my example files in the directory called "example2" at the following URL:
https://github.com/GadgetAngel/extended_macro
 
In a previous post I talked about learning how to read and write to and from a dictionary structure or a python dictionary object so I could use large _USER_VARIABLE and _GLOBAL_VARS global variable spaces for my Klipper macros.

I still need to clean up my global areas but I did manage to get it to work for python dictionary objects. Let's see how to get this done.

To read/write from a global variable with only one value is easy. One uses the following code:
Code:
To READ:
{% set global = printer['gcode_macro _GLOBAL_VARS'] %}
{% set bucket_pos = global.bucket_pos %}

To Write back into global.bucket_pos:
SET_GCODE_VARIABLE MACRO=_GLOBAL_VARS VARIABLE=bucket_pos VALUE={ (range(2) | random) }

To read/write from a global variable which is set up to be a python dictionary object, one uses the following technique:
Code:
To READ:
{% set global = printer['gcode_macro _GLOBAL_VARS'] %}
{% set bar_effect = global.current_led_state.bar_leds %}
SET_LED_EFFECT EFFECT={bar_effect}

To write back to the member called global.current_led_state.bar_leds:
  First how to  read from current_led_state:
      {% set global = printer['gcode_macro _GLOBAL_VARS'] %}
      {% set current_led_state = global.current_led_state %}

But the [gcode_macro _GLOBAL_VARS] has the definition for current_led_state as follows:
1673507262171.png

1673507297670.png

1673507321368.png
1673507361531.png

So when we did the read as follows:
Code:
To read current_led_state;
    {% set global = printer['gcode_macro _GLOBAL_VARS'] %}
     {% set current_led_state = global.current_led_state %}

The variable current_led_state would still be a python dictionary object.

So to read the current_led_state.bar_leds would give you back a string which is the name of the LED_effect that the bar_leds are currently running.

You can also write the statement as current_led_state["bar_leds"] if you do not like the dot notation.

Here is how you write back a string back into current_led_state.bar_leds:
Code:
To WRITE to current_led_state.bar_leds:
    {% set global = printer['gcode_macro _GLOBAL_VARS'] %}
    {% set current_led_state = global.current_led_state %}

     {% set _dummy = current_led_state.update({'bar_leds':'sb_bar_busy'}) %}
     SET_GCODE_VARIABLE MACRO=_GLOBAL_VARS VARIABLE=current_led_state VALUE="{current_led_state}"

You need to use the python method update() to update a dictionary object and you need to ensure that you have the format {'key': 'string'}

If the dictionary object is deeper than three levels then just use the dot notation with the update method to gain access to the appropriate level.

Let's say current_led_state had one additional outer level, lets call it LEDS. So it looks like the following:
Code:
  {% set LEDS_dic = {
                                         'current_led_state' : 
                                                                                  {
                                                                                     'fan_leds'     : global_current_state_fan_leds,
                                                                                     'logo_leds'    : global_current_state_logo_leds,
                                                                                     'bar_leds'     : global_current_state_bar_leds,
                                                                                     'nozzle_leds'  : global_current_state_nozzle_leds
                                                                                 }
                                  }
  %}
SET_GCODE_VARIABLE MACRO=_GLOBAL_VARS VARIABLE=LEDS                 VALUE="{LEDS_dic}"

To read/write to this LEDS dictionary object, you would need to do the following:
Code:
To READ:
    {% set global = printer['gcode_macro _GLOBAL_VARS'] %}
    {% set bar_leds = global.LEDS.current_led_state.bar_leds %}

To write back or update the bar_leds value:
    {% set global = printer['gcode_macro _GLOBAL_VARS'] %}
    {% set LEDS= global.LEDS %}

     {% set _dummy = LEDS.current_led_state.update({'bar_leds':'sb_bar_busy'}) %}
     SET_GCODE_VARIABLE MACRO=_GLOBAL_VARS VARIABLE=LEDS   VALUE="{LEDS}"

Notice that you need to ensure that the VALUE parameter of the SET_GCODE_VARIABLE is using a python literal!

So pay close attention to when I used a single quote and when I used a double quote. If you end up using two double quotes Klipper will display a error message!

Well that is all for now.

Happy 3D printing!
 
Top