What's new
VORON Design

Register a free account today to become a member! Once signed in, you'll be able to participate on this site by adding your own topics and posts, as well as connect with other members!

Voron 0.2r1 from the Formbot kit

Me: Part of why I’m building a zero is because it’s cute and smol and I can take it outside to print in the summertime.

Them: aww, you can take it on walks…

Me: BRB, takin’ my Voron for a walk.

People will ask to pet my Voron.

Them: Is it friendly? Will it bite?

Me: It’s not just friendly. It’s OPEN SOURCE.

tips fedora

The SKR Pico​

Based on my new SKR Pico, there seems to be a bad batch of them?

The one that came with my kit had two problems. First, one set of the screw terminals is unusable and the rest of the connectors are not that much better. Second, the heatsink is stuck on using some sort of blue stuff that’s not very sticky. So I decided that I’d fix the heatsink which turned into a bit of a debacle because I put on thermal glue on before realizing that there was an M2 threaded hole that you could just put a M2×6mm screw in to bolt the heatsink down.

The replacement one had seemingly better connectors as well as arriving with the heatsink screwed down. Hence, bad batch.

Configuration re-factor​

jontek2 was nice enough to post a Trident config and then also LDO wrote their own guide for organizing the klipper config, which I then made an ansible version.

There’s a bunch of settings that get temporarily stored in the printer.cfg file so what you really want to do is not have Ansible touch that file. Conveniently, there’s a bunch of ways to configure klipper using includes so we can work with this. This means we can get really close to a situation where any arbitrary set of printers are generated from a single ansible role and it does the right thing.

The layout on the pi side looks like this:

  • configs/skr-pico.cfg - Main board config
  • configs/klipperExpander.cfg - Klipper expander board config
  • configs/V0Display.cfg - V0 display config
  • macros/local-macro.cfg - The macros provided, will play with this down the road
  • mainsail.cfg - The mainsail config file
  • sensorless-homing.cfg - Just the important sensorless homing parts
  • printer.cfg - The very skeletal config file.
And then this means that my printer.cfg file looks like this:

Code:
[include mainsail.cfg]
[include macros/*.cfg]
[include configs/*.cfg]
[include sensorless-homing.cfg]

However, the relevant bits of my main.yml in the Ansible role look like this:

Code:
- name: Create klipper directories
file:
path: "{{ item }}"
state: directory
owner: klipper
group: klipper
mode: 0755
with_items:
- /opt/klipper
- /opt/klipper/config
- /opt/klipper/config/configs
- /opt/klipper/config/macros
- /opt/klipper/run
- /opt/klipper/logs
- /opt/klipper/gcodes
- /opt/klipper/moonraker-db

- name: Add configs for the zero
copy:
owner: "klipper"
group: klipper
src: "{{ item.src }}"
dest: "{{ item.dest }}"
mode: 0644
with_items: # notice how the file names are mapped differently
- { src: "bigtreetech-skr-pico-v1.0-zero.cfg",dest: "/opt/klipper/config/configs/skr-pico.cfg"}
- { src: "V0Display-zero.cfg",dest: "/opt/klipper/config/configs/V0Display-zero.cfg"}
- { src: "klipperExpander-zero.cfg",dest: "/opt/klipper/config/configs/klipperExpander.cfg"}

- name: Add macros
copy:
owner: "klipper"
group: klipper
src: "{{ item.src }}"
dest: "{{ item.dest }}"
mode: 0644
with_items:
- { src: "local-macro.cfg",dest: "/opt/klipper/config/macros/local-macro.cfg"}

- name: Add sensorless-homing.cfg
copy:
src: "sensorless-homing.cfg"
dest: /opt/klipper/config/sensorless-homing.cfg
owner: "klipper"
group: klipper
mode: 0644

- name: Add mainsail.cfg
copy:
src: "mainsail.cfg"
dest: /opt/klipper/config/mainsail.cfg
owner: "klipper"
group: klipper
mode: 0644

- name: Add printer.cfg
copy:
src: "printer.cfg"
dest: /opt/klipper/config/printer.cfg
owner: "klipper"
group: klipper
force: false #force set to false means it will only try to create this file if it doesn't exist
mode: 0644

You will notice that some of the file names are different, such that if I had a second printer that was not-quite-the-same, the config files can co-exist.

Except there’s a bug which is that if I set a value in an included file, the SAVE_CONFIG command won’t be able to properly save the config. Ugh.

I’ve got part of the better start macro implemented and I’ll keep tweaking that.

Those darn corners​

The last thing you are doing to a printer is buttoning it up. That’s your last impression. And you want to know what my last impression of the stock build is? The corners.

I think there’s a system such that if someone had written down some stuff in the manual, I’d be able to pick up a random pile of corners and figure out what goes where. And the designers could have put some pips or dots or arrows or something such that you wouldn’t see them once everything’s assembled but it would at least make it easy to know which one goes where. This is, of course, completely unique to the Voron Zero, if I look at the STLs for the Trident, you don’t have a long list of completely unique clips. And I was eventually able to figure out the pattern, but I don’t think I can describe it.

The part that makes this annoying is that I’m looking to do the BoxZero conversion and presumably the ZeroPanels but I wanted to at least build it as-stock.
 

Wrapping things up​

PXL_20240505_203225899.jpg
  • I don’t know what it is, but the standard Voron DIN clips seem to be real easy to break, at least so far. Before I’d got the Voron, I’d printed them to mount my OctoPrint Pi to control my Ender 3v2 on a DIN rail and they didn’t feel very durable printed in PETG. One of the ABS-GF ones that came with the printed parts broke. And then the PETG ones I printed also broke.
  • I realized real fast how hard it was to move the printer without proper handles, so I printed out the Stealth Handles.
  • I got an OV3660 camera and printed a simple mount so I could keep an eye on the prints. It’s probably going to die at some point because as the chamber gets hot, it starts to color-shift and the people on the discord assure me that eventually it’ll color-shift all of the time. The best road to not throwing out cameras every so often is probably to have it look in through the side. I need to rig up a proper mount, which I haven’t gotten to yet.
  • JST-XH connectors seem to be a lot less trouble to crimp than Dupont connectors. The wires for a 104NT-4 thermistor I got a long time ago were too thin to crimp but I got a FYSETC one off of Amazon and that one was much less trouble.
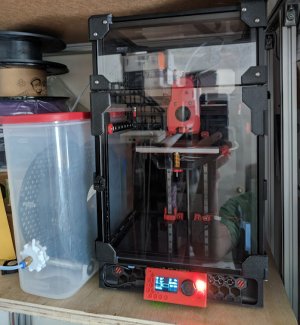
  • The intended final placement has the filament box to the left of the printer in a drybox. The URBI mod is generally probably a good idea but I ended up making my own replacement for the left-side top-hat panel that can be printed in pieces because I didn’t want to be reaching around the back.
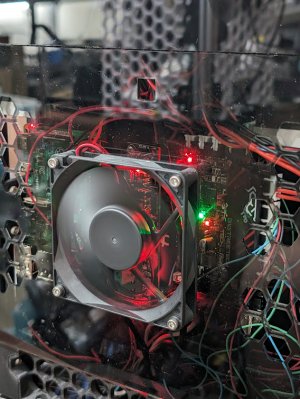
  • I’ve always gone through my PC’s and replaced fans so that I can have a quiet but still well cooled case. I spotted a replacement rear panel for the electronics bay designed for an 80×80×10 fan and it was laser cut and so I showed it to a friend and told her I was going to send it off to get laser cut and she suggested that she instead cut it next time she was teaching a class at the makerspace. We had a bit of nervousness about cutting the size right and all but she cut it right. I went through the DigiKey catalog looking for 24v quiet fans and picked out the OD8015-24MB by Orion because there’s no reason why a 15mm thick fan wouldn’t work. It turns out that the fan is way too powerful at 100% so I turned it down to 50%.
  • Before I could put the new panel on, I had to make sure that the fan wouldn’t try to eat the Klipper Expander. The problem is that if I used the standard DIN-rail-mount bracket provided in the Expander’s github with the standard DIN clip, then it would be too tall. I ended up designing my own real quick, which I still need to work on.
  • After I got things more calibrated (see Tuning below) I switched over to using the Low-Profile DIN rail bracket for Pi and SKR Pico set so that I’d have a bit more space for everything.
  • I used an OpenSCAD Customizable Cable Duct to generate some cable ducts to fit my needs. I didn’t quite want to commit to anything in particular so I’ve got a 80mm × 18mm × 15mm duct that fits on the back of a large-sized Command Adhesive mount to organize the cables above the DIN rail and then a 80mm × 15mm × 15mm duct with M3 screws that bolts down in between the bottom and the electronics chamber. The only problem right now is routing the A & B stepper motor wires.
  • For the back, I ended up using a pair of Quick locks and then Annex style 1515 panel clips to hold the bottom in place.

Tuning​

I was feeling bad because I had this vision that I’d get a Voron and get really good prints. And, obviously, that requires a proper tune, but everything felt kinda … well… Ender-esque? I guess one of the things that I was seeing as “good prints” is for me to download another Voron owner’s print-in-place design and have it just work straight out of the printer and that wasn’t the case.

Generally you want to go through the Ellis’ Print Tuning Guide with a new Voron to get everything set up.

There’s a thing in the world of piano playing… One school of thought says that you should strive to play Hanon exercises which are these very organized technical exercises that don’t sound like much but carefully work out all of the required finger movements… but at the same time, there’s a second school of thought that says that people should play real musical pieces or at least the hard parts out of them because it’s both rewarding and because it’s a lot easier to realize that you just screwed up because it’ll sound wrong.

So, I went in and did the first layer squish, extrusion multiplier, and pressure advance calibration using his SuperSlicer profiles as the starting point… but things weren’t quite right still?

And then I tried printing the Low Profile DIN Rail Bracket which should just work as a print-in-place part but it very clearly wasn’t, at which point I was able to zero in to a better z-offset and extrusion multiplier because I wasn’t quite seeing the things that the Ellis guide was talking about but it was kinda obvious there. Which then meant that I had to go back and re-tune the pressure advance.

And then the prints started looking really quite good.

ZeroFilter​

I installed the ZeroFilter. I used the ZeroFilter side mount on bottom extrusion with screws because the manual had suggested that I’d be mounting a Nevermore or other such filter on that extrusion so I had extra pre-loaded screws there and then I used the 1515 JST-HX snap-in mount to manage cables.

On the DoomCube discord someone shared a modified version of the cartridge with the grills a bit bigger so that they’d print better, so I used that one instead. Otherwise, I used the GDSTime 4010 24v fan in the core and wired it to one of the MOSFETs on the Klipper Expander.

And the hard part … was getting the magnets all set up right.

Either way, I noticed that after I’d done some printing even with the door open, when I pulled it off the shelf to do some maintenance/upgrades and popped the top-hat up, I’d get a whiff of VOC’s and that’s with plain old PETG. I noticed about the same thing with the SN54 air quality meter that’s hooked into Home Assistant that sits in the corner — it’s hard to tell because, for example, if I come back into the room after making pizza dough, I’m going to be covered in flour microparticles that will also trigger the particulate meter. But now that I’ve got it somewhat buttoned up such that PETG is printing at an elevated-but-not-too-hot temperature with the door closed, I do not smell anything and the sensor seems to be spiking a bit less.

Further efforts​

  • I still haven’t used the accelerometer to really get it motion compensated and the max speeds determined.
  • Also, I probably want to re-organize my profiles. I’m using the Ellis profiles but they are kinda designed to be workable on any random slicer and I’d rather have it be SuperSlicer-friendly with the separated print / filament / printer settings.
  • It’s going to take some work to turn it into a toasty marshmallow. The chamber does not get that hot, mostly because the cooling air for the electronics is making it in. I’ve got some insulation and foam tape and extra fans… and I’m probably going to have to do some engineering.
  • I really need to print Driftrotor’s Kirigami Bed Brace + Fan if for no other reason than I asked very nicely for him to make a version for my configuration.
  • I found some long Titanium screws for the bed on Aliexpress because I couldn’t find one long enough at McMaster Carr, so that’ll be fun to swap out when I add the Kirigami bed brace and fan.
  • Likewise, I have all of the bits necessary to the Filtered Tophat Exhaust, I just need to install it.
  • I need to actually start using the ASA filament I’ve got in the printer. I did some tests with the bed at the suggested temperature for ASA and it did seem like it was able to pre-heat to an appropriate temperature, but I don’t think the printer as it’s configured right now is fully “safe” for ASA without moving it off of the shelf.
  • I also need to add some interior lights. I keep debating with myself if I want to add some RGBW NeoPixel strips or a 24v high-CRI white LED strip. I’ve got both options handy.
 

Conclusion​

I have a not-especially-stock-but-still-pretty-darn-stock Voron 0.2R1 printer with serial number V0.3592 so we’re now solidly into the “extra credit mods” section of a buildlog. Prints are coming out fairly well now and the air quality meter is happier.

The biggest annoyance at the moment is that I was in the middle of printing a relatively large thing that won’t fit on the Zero’s bed when my Ender 3v2 started acting up and kicked off the Voron replacement program. I’m now happy with my new Voron Zero but I still need to actually fully replace the Ender.

Some thoughts about the whole process:

  • At least for my Zero with the Formbot parts and everything, the tools were missing and, as such, it would suck to have a Voron as your first 3D printer without having access to another printer. I am not sure how realistic this complaint is, mind you. When I got my Ender, the Voron wasn’t really quite yet a thing. If I were starting into 3D printing more recently, there might have been the temptation to want to get a Voron kit and just get started in 3D printing that way, with a “real” printer. You used to be be able to save money by buying a somewhat expensive Prusa i3 kit instead of the even more expensive Prusa i3, so a Voron kit would be like this. Except that reasonably-priced printers are such that I don’t know if it makes sense in the same way? Either way the Trident with complete parts via cPIF does come with the tools.
  • I didn’t make that many mistakes, actually? The whole thing about inserting nuts ahead of time is a thing, but it didn’t really cause me that much trauma. Understand that for whatever reason when it gets to assembling things that have screws and a manual, my brain somehow switches into fully-obsessive mode where I go through the manual with a fairly high degree of precision even though I am ordinarily not a strict detail-oriented person.
  • Sensorless homing is kind of a pain in the butt and I still need to mess with the settings some more. I can’t quite use all 120mm × 120mm of the build plate.
  • The only part that seriously failed was the SKR Pico and that’s the board that also comes with the LDO kit. Given that I’m an obsessive tinkerer and everything, I’m not regretting getting the cheaper Formbot kit. Most of what I’m obsessing over and replacing or tweaking is things that I’d have to tweak on the LDO kit as well. The only thing that really really need replacement out of the kit was those silly little M3 shim washers. There were adequate screws and nuts, the only reason why I felt a little short on M2×6 SHCS screws and M3×10 BHCS screws and M3 nuts was because I was tooling around with mods right away.
  • Formbot was able to send me a replacement part for my printer, so no horror stories there.
  • The Formbot printed parts seem mostly fine? I guess I’ll wait till something actually breaks?
  • It seems to be holding the bed position at least reasonably well? I’ve still left it with just the 0.4mm nozzle on there even though I’ve got a nice assortment because I don’t want to deal with re-leveling it.
PXL_20240512_222221908.jpg
 
Can you post a pic of the wiring for your hot end fan? Both from the umbilical and to where it connects to the SKr pico please
 
Looks good.

I've printed a ton of parts for the zero, and other printers on the zero. A lot. Granted, I won't be printing any skirts on it, but there is a lot that I can fit on there.
 
Top