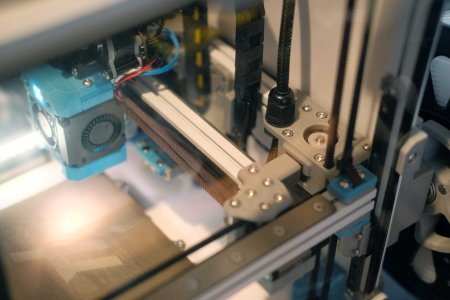
As things currently sit in the rear of my chamber, the cable gland and cable chain are pretty much flush, so there's no more optimizing there. In the attached photo, you can see the chain, gland and bigger Y switch actuator. Klicky dock also seems okay at the moment (no false pickups during travels, no collisions). But if I were able to reclaim more space, I would need to shorten both the new Klicky extension and the Y switch actuator. Getting it to half its current extended length would give me back full Y. But it would have to be through connectors and wire management.For a short time I was thinking about soldering directly to the ebb and removing the onboard connectors, but I would like to keep the microfit connector from umbilical, so thats the limit and beside the dupont stuff, nothing sticks out further.
bending the dupont connector ports downwards got me a few mm.
perhaps I have to look into a closed chain too :/
did you check if one of those servo-arm klicky setups would fit to clear the klicky dock space?
bawrharwharw, acceptable problem to have - time for the next printer
VORON Design

You are using an out of date browser. It may not display this or other websites correctly.
You should upgrade or use an alternative browser.
You should upgrade or use an alternative browser.
120mm Micron Build Log
- Thread starter Le0n
- Start date
schloppknat
New member
That clears it up, thank you for the picture!
Sorry for the delayed answer, my posts take very long to be released as long as iam a new forum member apparently so at some point i just gave up and missed the notification
EDIT: Seems like I can post directly now
Sorry for the delayed answer, my posts take very long to be released as long as iam a new forum member apparently so at some point i just gave up and missed the notification
EDIT: Seems like I can post directly now
No worries! Taming those EBB36 wires and reclaiming more Y is still on my radar, but I'm just letting it be for now. Just threw on ZeroPanels for quick panel removal, which is nice. Chamber seal seems sufficient, which is great.That clears it up, thank you for the picture!
Sorry for the delayed answer, my posts take very long to be released as long as iam a new forum member apparently so at some point i just gave up and missed the notification
EDIT: Seems like I can post directly now
Thank you, @robrob! I was really pushing for print quality and my Trident did a great job with these. I even checked the seam placement on each part and moved/painted them to make them as hidden as possible! Fusion Filaments makes some amazingly forgiving ABS too. Anything matte with sparkles does a great job at blending layer lines.late to the party, but holy smokes, the quality of your printed parts is stunning
ashers_workshop
New member
Wow! I just came across this. Even though I'm already almost done with my Micron+ 180mm this was so helpful. Wish I found it sooner. If you see this, would you mind sharing the mount you made for the CAN EBB36 to the mini stealburner? I know you shared one earlier, but the hole alignment doesn't seem to match with the mini afterburner/stealburnerThanks for the kind words, @vinnycordeiro @hartk @Daniel@West3D @Rhastlyn!
I always regretted not taking photos during my Trident build, so I made sure to have the camera ready when I started the Micron. But what was supposed to be just a few photos/notes for my own records ended up snowballing into a full build log. Originally posted here: https://leanghoun.github.io/docs/micron/build-log.
The build is a bit non-stock with some tweaks and adjustments to CAD parts, so it's not exactly a build guide, but hoping it might useful to others. : )
Glad you found the write up helpful! Right, I had to make a new mount for my EBB36 because the holes needed to line up with how the VZ Hextrudort positions the extruder motor at an angle. If you are sticking with miniSB, the motor mounts to the same existing two side screws, and you should be able to use any of the more common mounts.Wow! I just came across this. Even though I'm already almost done with my Micron+ 180mm this was so helpful. Wish I found it sooner. If you see this, would you mind sharing the mount you made for the CAN EBB36 to the mini stealburner? I know you shared one earlier, but the hole alignment doesn't seem to match with the mini afterburner/stealburner
Give one of these a try:
- https://github.com/KayosMaker/CANbo..._sherpa_mini_mounting_plate_strain_relief.stl (made for Sherpa Mini, but should work for you; though lacks bottom two screws that provide extra support)
- https://www.printables.com/model/406467-voron-02-btt-ebb36-toolhead-mount-with-strain-reli (by eye, I like this one more for the extra stiffness)
This is the mount I used on my V0 Mini-StealthBurner EBB36 board (mine came with the MAX31865 chip for reading a PT sensor - not all brackets have clearance for that, this one does):
 www.printables.com
8/10, would recommend - only thing I dislike is that the original design picks up on two additional mounting points on the X carriage mount, and this one does not. That said, I don't push that hard and it's been fine so far. If it becomes a concern, I may throw a design of my own together to add that extra bracing
Printables
www.printables.com
8/10, would recommend - only thing I dislike is that the original design picks up on two additional mounting points on the X carriage mount, and this one does not. That said, I don't push that hard and it's been fine so far. If it becomes a concern, I may throw a design of my own together to add that extra bracing
Thanks! Fujifilm XT-4 with the 35mm f/2 “nifty fifty”. I like this focal length for the natural field of view that it gives photos and it’s my goto for almost everything. Plus a film simulation that is mostly true to life (slight desaturation, slight warm shift).Lovely camera work. Fantastic Bokeh. What camera/lense?
My usual internal debate is whether to get more camera stuff or printer stuff. Lol.
It's been awhile! Planning on some upgrades to my Micron. Tentatively, Anthead paired with ReVolcano on a new MGN9H rail to accommodate Boop. Though, ZeroClick has been set-and-forget for so long that it feels wrong to rip it out. Started printing it's own upgrades and the print quality is still there. Good work, little buddy!
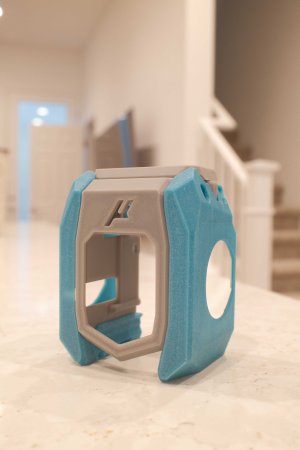
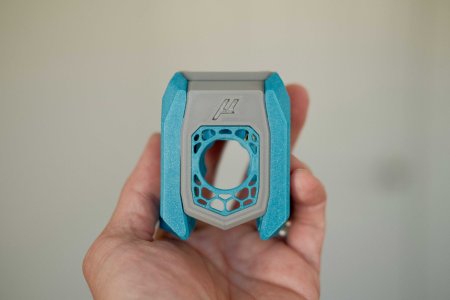
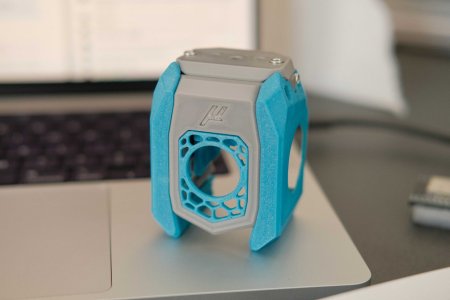
Edit: Full plastic mock up with knocked out grill. Speed holes.
Edit: Full plastic mock up with knocked out grill. Speed holes.
Attachments
Last edited: