What's new
VORON Design

Register a free account today to become a member! Once signed in, you'll be able to participate on this site by adding your own topics and posts, as well as connect with other members!

LDO Voron 2.4 Build with All Metal Parts

I have started to play with macros but that's for later, first I need to fix a few issues...
1: Stealthburner LEDs not working: Wrong pin or electrical problem.
2: No filament extruded for one to three seconds at start of prints: Adding a purge line might help?
3: Too many prints coming loose at the start and during a print: Do I have the Z offset wrong?
4: Have to set txqueuelen manually (its not being read from can0 file)... (may have found a fix for this, testing... yes the fix works!)
 
Last edited:
Consider using the KAMP script. https://github.com/kyleisah/Klipper-Adaptive-Meshing-Purging
Adaptive meshing is one of the best functions we have access too and saves lots of time, even if you run a Beacon probe.

It has some built in purge lines. One is a Voron logo which I don't like since it does three little lines but the single line is great.
The other thing you can do is add a nozzle brush and purge bucket.

As far as the first layer goes, run a flat print that is pretty large so it will lay a nice layer down and use the fine tuning to set the layer height just right. Click save when you have it dieled in and then do a save_config in the counsel when you are done to save it permeant.
 
It has some built in purge lines.
That looks like a perfect solution...

Almost there... it does the bed mesh around the print object but the extruder and bed temps remained at room temp...

Then I added code as follows...
Code:
[gcode_macro PRINT_START]          #   Use PRINT_START for the slicer starting script - please customise for your slicer of choice
gcode:
    {% set target_extruder = params.EXTRUDER|int %}
    {% set target_bed = params.BED|int %}

    G32                            ; home all axes
    G1 Z20 F3000                   ; move nozzle away from bed
    BED_MESH_CALIBRATE
    # set nozzle temp ?
    M109 S{target_extruder}
    M190 S{target_bed}
    LINE_PURGE
Looked good initially including a nice purge line but print lifted after a few layers..., will try again...
Tried a few more even the cube but everything is lifting... time to try a new filament...

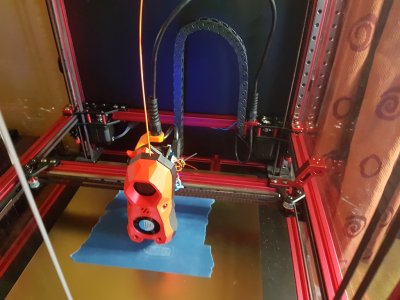
Resorted to blue painters tape, the Benchy is 50% complete and still sticking but failed with MCU 'EBBCan' shutdown: Missed scheduling of next digital out event...
 
Last edited:
I can't tell you how much I hate CAN devices. Well I should not say that, they are nice when they work. I have had zero issues since using the LDO Nitehawk.

As far as bed adhesion, what bed are you using, PEI on spring steel?
I used to have minor issues with PEI and it worked most of the time but I have switched to Wham-Bam's PEX and XTR (I think that is what they are called) and have not had a single issue with any material I have tried so far. It is expensive though, I think I paid over $200 USD for the set. I have not tested any Nylons of PC on it yet. Maybe I will try them next week.
 
It's the standard LDO kit version (spring steel with texture on one side and smooth on the other), with both LDO and Voron logos on it, probably the nicest I've seen so far (I have a few).

As to CanBus, there are almost certainly intermittent communication issues, it's happened several times, but this might be down to not having the supports added yet (waiting for printed parts). I ordered the Nitehawk six weeks ago but it still hasn't arrived (was out of stock for ages).

Well back to the grind stone, lets see what else can go wrong, did I mention Murphy is a friend of mine...
 
Well back to the grind stone, lets see what else can go wrong, did I mention Murphy is a friend of mine...
Well what is on your list of things to finish up?

If you want to start tuning your motors, you can do that or use the Auto tune script which works decent.
 
Still have to fix the led in the stealthburner...
Put on doors and back panel, after I add a chain for canbus cable...
Tuning motors and pulleys ...
Check all fasteners add some grease to rails...

Then document everything ;)
 
What type of filament are you using?

I print exclusively PETG, and have been kinda so-so on the LDO build plate. I find that prints stick *too well* to it, and wish it had less texture so that print release was easier. The Prusa textured plates are basically perfect in this regard, but the LDO plate is substantially more coarse. I had one print that even flexing couldn't remove, I ended up needing to heat up the bed to screaming hot to get it removed!
 
I print exclusively PETG
That's good news, I have mostly PETG spools left as I stopped using PETG because it tended to warp and lift (every print except one, if I remember correctly).

I've tried a lot of PLA and PETG over the last few years ranging in price from $13 to $100. Recently I settled on Das Filament as it produces good quality prints at a good price.

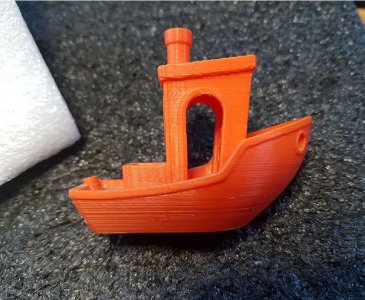
I'm guessing everyone has their favorite print and mine is a flawless, absolutely perfect, prize winning, Benchy (printed with $13 filament I bought on AliExpress). It has become the standard from which I judge all others but it went MIA.

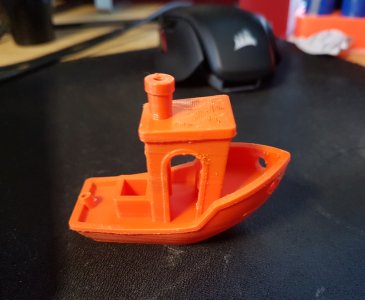
Speaking of Benchy, I've just finished my first Voron Benchy (using painters tape) and it's not perfect. Filament is definitely past its sell by date (humidity killed it)...
I've been waiting on a dry box for weeks now, its first job will be to dry the expensive PETG filament I bought more than two years ago, a perfect test awaits...

PS, where do I get a serial number?
 

Attachments

  • benchyvoron.jpg
    benchyvoron.jpg
    447.5 KB · Views: 6
  • benchycr10.jpg
    benchycr10.jpg
    641.2 KB · Views: 6
Last edited:
From the Voron Discord server, https://discord.com/channels/460117602945990666/869236720271507456/872457486530142249

How do I get a serial for my printer?
You need to have:Completed cable management above the deck plateTool head doors attached and closed for the unified tool head (< V2.2 and < V1.6) or clean cable management for Afterburner (add another ziptie or two)Electronics bays should be covered to prevent shock hazards or foreign objects from shorting out componentsA video of a print in progress showing the complete printer, including these details, submitted to RedditYour video must show all of the above as well as a view of the complete printer, or you will be asked to provide those items before receiving a serial.As of Jan 10, 2023: Your serial request or transfer videos and photos MUST contain a piece of paper with your reddit username and the date HANDWRITTEN and CLEARLY VISIBLE and the characters must be LEGIBLE. To ensure no one is thieving your content, maybe go the extra mile and crumple up your paper a bit and flatten it back out before filming.
Posting guidelines
Proper flair is required or your post will likely not be processed.Include your Discord username. This will let us know who to grant Discord roles to. Please put this in the post title if possible!Reddit's automod filter sometimes likes to flag new accounts posting videos. If you've posted a request and it's not visible, this is likely the issue. Please open an admin ticket so we can help you.If you are asked to clean up wiring or something similar before receiving a serial, you do not need to resubmit your entire request unless specifically asked to do so. Replying with a comment satisfying the requirements is generally sufficient.
Upgrades
(i.e. 2.2 to 2.4)Do not receive a new serial
Conversions
(i.e. V1 -> VL)Do receive a new serialVT is the next iteration of V1 and not a conversion
Sales
Do not receive a new serial. The person receiving the serial should post to Reddit (meeting all current serial requirements) and also clearly state that it is a purchase/transfer/etc. in a comment on the post.
 
Certainly comprehensive... I'm not quite there yet, need to add remaining back panels doors etc., and chain for umbilical cable.
Thanks NoGuru

Update, all panels except back are installed, even added the handles and a temporary CANBus clamp thingy in PLA. Tomorrow, will add the bottom cover, leaving only the Z chain thingy...
 
Last edited:
NiteHawk SB Toolboard Kit

Just received this email... "Your order from Tuesday, 20. February 2024 is on its way and should arrive by Tuesday, 16 April!"
That took a while, now do I switch or keep gong with EBB SB2209 CAN (RP2040), probably.

I suspect, I found the reason why the Stealthburner LEDs are not working, when trouble shooting with a multimeter the SN74LV1G17 (Schmitt-Trigger Buffer) became dislodged (I barely touched it with the probe). I managed to solder it back but, it being so tiny, and my (not so good) eyesight, means I may not have done a great job, as it's still not working.

Might try again another time but it's easier to buy another PCB so I ordered two.
 
Last edited:
I have used a lot of CAN devices and if it's working fine for you no need to swap it out, but when CAN breaks (not if) then I would make the swap.
 
but when CAN breaks (not if)
It looks like there may have been a batch of SB000 boards with issues, mine certainly had an issue with a component falling off...

In every scenario where several parts interconnected, you can expect failures especially allowing for inertia in a rapidly moving system.
I've had to re-crimp one connector 3 times... they are so tiny they will eventually fail if not crimped perfect...

Murphy's 2nd law... Failure rate of connectors is directly proportional to there size of crimped connections, and inversely proportional to one's eyesight (or the other way round)...:)
 
Last edited:
Status Update: 13 April 2024

I printed some missing parts in PLA (will replace with ASA later), to conclude build...

z_chain-installed.jpg
Quick pic of Z chain...
It's alive, test video from my old phone
 
Last edited:
Nitethawk-SB Toolboard just arrived and it contains everything you need but... now I have one EBB SB2209 (RP2240), one EBB36 CAN V1.1 and one NiteHawk USB board set.
I need to build another printer fast...

Fair Dues to LDO, they have taken to Voron in a big way and we all benefit, buying these parts separately would be much more expensive not to mention, time consuming...
 
Last edited:
EBB SB2209 CAN (RP2040) RGB Leds woes...

After completing the build, I noticed the toolhead leds didn't work and after examining the code, the wiring, the connections, I found the LED driver buffer (SN74LVC1G17) was loose on the EBB SB000 (fan/rgb board), it fell off when I touched it. I assumed it was a solder issue but in hindsight, it might have been damaged/blown...

Replacement board arrived (I bought two to be safe) and when I replaced the board with the new one and powered up the printer, I noticed a very slight smell of component demise, something had gone west... I examined the fan/rgb board to find that the very same LED driver component was blistered, that was possibly two in a row...

One might suspect a short or at least crossed or incorrect connections but I had none, so the only possible explanation is, I managed to connect the two boards with the connector misaligned, what else could it be?

Unfortunately I didn't check the connectors alignment before separating the boards, but even so, is it possible to connect the stealthburner to the toolhead when the connectors are not aligned correctly, there's very little wiggle room but I guess it must be possible...

The most likely cause:
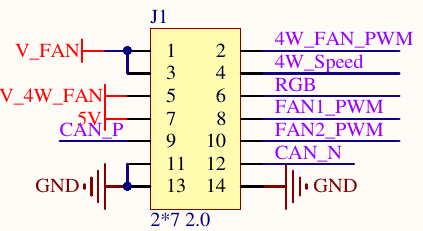
If it was misalignment, I have to assume the 24V CAN_P (pin 9) was connected to the 5V (pin 7), it could happen if the connector was aligned one position up...

alignmentissue.png
 
Last edited:
Would you mind posting photos of the PCBs - the one that burned, and the one that the component fell off of?
 
Top