VORON Design

You are using an out of date browser. It may not display this or other websites correctly.
You should upgrade or use an alternative browser.
You should upgrade or use an alternative browser.
Outsider's Formbot 2.4r2 350 kit build
- Thread starter Outsider
- Start date
WhiteWulfe
Well-known member
Any particular plans for the printer? What colour scheme are you contemplating?
Outsider
Active member
As much as I wanted to deviate from the norm, I went with eSun’s fire engine red and (matt) black. I love red and black together.Any particular plans for the printer? What colour scheme are you contemplating?
I’ve had a very cheap Prusa clone for many years and learned a lot from it. However, it has stopped me from undertaking many projects due to reliability and, to some degree, size. After the last failures, enough is enough.
I’m hoping to take advantage of the truly amazing design (clearly a lot of work has been put in to it) and try to catch up on some of the things I’ve not be able to do (custom electronics enclosures, robot parts, gearboxes etc as well as household stuff).
I’m not expecting perfection, but looking forward to greater quality and reliability.
WhiteWulfe
Well-known member
Absolutely nothing wrong with that - my builds are black and orange, and I'm more than happy with them being that way. Black and red goes really well together, after all!As much as I wanted to deviate from the norm, I went with eSun’s fire engine red and (matt) black. I love red and black together.
Outsider
Active member
The kit arrived on Wednesday but I only had chance for a quick look through to check for any obvious problems. All seemed well. Everything was well packed.
I took photos of most parts (for my records) and found three little fellas in various places.
.jpg")
Formbot did a fantastic job with the extrusions, all cut perfectly to length and then anodized.
.jpg")
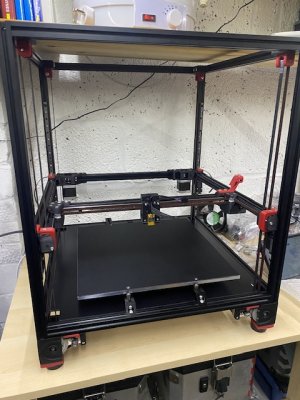
Tonight (Friday), I started on the frame assembly.
.jpg")
Although I've been printing my ABS parts at work for the best part of two weeks, I think the printed parts will be the bottleneck. The kit package arrived quicker than I expected (in about 4 days, from China to UK) and I still have a lot of parts to print.
I'll try to clean and grease the rails over the weekend and continue assembly as much as possible. Though I'm in no rush, I want to enjoy the process.
I took photos of most parts (for my records) and found three little fellas in various places.
Formbot did a fantastic job with the extrusions, all cut perfectly to length and then anodized.
Tonight (Friday), I started on the frame assembly.
Although I've been printing my ABS parts at work for the best part of two weeks, I think the printed parts will be the bottleneck. The kit package arrived quicker than I expected (in about 4 days, from China to UK) and I still have a lot of parts to print.
I'll try to clean and grease the rails over the weekend and continue assembly as much as possible. Though I'm in no rush, I want to enjoy the process.
Outsider
Active member
I cleaned and greased all rails and mounted those for the Z axis.
I started assembly of the Z drives and quickly realised I haven’t yet printed all the necessary parts (thought I’d done all the Z drive parts), so they’re next on the list.
I also found my kit was short on one GT2 20T pulley and grub screw. Luckily I had one spare in my stock of what my wife calls “junk”.
Outsider
Active member
Got some of the other parts printed today. Annoyingly, most of them warped but I think I can get away with it (and hopefully reprint when up and running).
.jpg")
.jpg")
First time using heat-set inserts, which are amazingly satisfying to fit. Really impressed by the simplicity too so I will definitely incorporate them into my designs in future.
Need to print some accent parts tomorrow. I've made a list, which I should've done from the beginning.
First time using heat-set inserts, which are amazingly satisfying to fit. Really impressed by the simplicity too so I will definitely incorporate them into my designs in future.
Need to print some accent parts tomorrow. I've made a list, which I should've done from the beginning.
WhiteWulfe
Well-known member
Am I seeing this correctly? Formbot 80T wheels are... Satin finish, with lightening holes within them? Intriguing.
Outsider
Active member
Yep, that’s right. Though I can’t say if it’s standard or just a stock availability thing.Am I seeing this correctly? Formbot 80T wheels are... Satin finish, with lightening holes within them? Intriguing.
WhiteWulfe
Well-known member
Looks like it may be a normal thing, given the build threads over the past year. This is intriguing, to say the least.Yep, that’s right. Though I can’t say if it’s standard or just a stock availability thing.
Outsider
Active member
Tuesday, I got the Z drives finished and fitted the Z tensioners but had to move a shelf above the bench up a bit as I hadn't allowed enough height. This printer is massive!  .
.
Yesterday, I degreased the bed and stuck down the magnetic sheet and heater pad. I couldn't decide how I wanted to make the connections for the bed heater and thermal fuse.
Tonight I finally decided how I wanted to do it but got carried away, forgetting to take a photo before installing the huge bed into the frame.
.jpg")
.jpg")
.jpg")
I then started on A/B drives until I ran out of printed parts. Will print as much as possible tomorrow.
And my wife has already asked me to print something for her, when I get it working.
.Yesterday, I degreased the bed and stuck down the magnetic sheet and heater pad. I couldn't decide how I wanted to make the connections for the bed heater and thermal fuse.
Tonight I finally decided how I wanted to do it but got carried away, forgetting to take a photo before installing the huge bed into the frame.
I then started on A/B drives until I ran out of printed parts. Will print as much as possible tomorrow.
And my wife has already asked me to print something for her, when I get it working.
Outsider
Active member
Numpty!
Last night I finished off assembling the gantry and had started trying to feed the Z belts. That’s when I realised my mistake; my 9mm Z belt wasn’t going to run around the 6mm pulleys I’d inadvertently fitted to all the Z drives, meaning my earlier GT2 pulley shortage was down to the wrong parts being used!
To make matters worse, I rushed to buy replacements for the “missing” parts. What a tit!
And I had double-checked the “check your work” sections in the manual
Outsider
Active member
Had a bit of a hold-up last week but did manage to get the Stealthburner assembled without issue.
I am in awe of the Voron team, the design is masterful! I can only assume that a lot of thought and careful iteration has gone into each element. Hat's-off to you, Voron Design team. Impressive work!
.jpg")
I'd managed to get a lot of little parts printed so I could start on the electronics bay. As of tonight, I got this far:
.jpg")
I'm doing some of the assembly out of step with the manual, just with what I have ready and where it doesn't seem to matter. Hopefully it won't bite me.
I am in awe of the Voron team, the design is masterful! I can only assume that a lot of thought and careful iteration has gone into each element. Hat's-off to you, Voron Design team. Impressive work!
I'd managed to get a lot of little parts printed so I could start on the electronics bay. As of tonight, I got this far:
I'm doing some of the assembly out of step with the manual, just with what I have ready and where it doesn't seem to matter. Hopefully it won't bite me.
Outsider
Active member
I don't know where the time has gone! I work on assembly for a bit in weekday evenings, if I can stay awake, but often finish later than planned and then don't have time to update this log. Haven't got near it at weekends, especially recently.
The day after my last entry I got started on the wiring (seems so long ago now).
.jpg")
Then some more the next day. I'd forgotten how messy I'd left it. I will tidy it up when I have all cables in place and know the final lengths and where everything goes.
.jpg")
I stupidly opted to fit the cable chains and then feed the wires through. I don't think I'd do that again. It didn't break me, but it did start to get tedious.
.jpg")
The manual says to zip-tie the B motor wires to the extrusion, but found that the belts would rub ever so slightly on the ties or I misunderstood what it meant. My solution was to use some spiral-wrap on the wires and snap-fit the lot into the underside channel. Hope it doesn't give me grief in the future.
.jpg")
I'm hoping to plug everything into the control board tonight. I have a small length of cable conduit that I might be able to use to tidy up in the electronics bay. I typically like to keep things accessible for inspection and maintenance/mods. Every time I've ever made stuff super tidy, I've regretted it the moment I have to check or change something. Safe and good-enough, I think, shall be applied here.
The day after my last entry I got started on the wiring (seems so long ago now).
Then some more the next day. I'd forgotten how messy I'd left it. I will tidy it up when I have all cables in place and know the final lengths and where everything goes.
I stupidly opted to fit the cable chains and then feed the wires through. I don't think I'd do that again. It didn't break me, but it did start to get tedious.
The manual says to zip-tie the B motor wires to the extrusion, but found that the belts would rub ever so slightly on the ties or I misunderstood what it meant. My solution was to use some spiral-wrap on the wires and snap-fit the lot into the underside channel. Hope it doesn't give me grief in the future.
I'm hoping to plug everything into the control board tonight. I have a small length of cable conduit that I might be able to use to tidy up in the electronics bay. I typically like to keep things accessible for inspection and maintenance/mods. Every time I've ever made stuff super tidy, I've regretted it the moment I have to check or change something. Safe and good-enough, I think, shall be applied here.
I know at least with the Trident there's printed zip tie mounts you attach to the extrusions. That's how my gantry wires get down to the deck. Your spiral solution works as well--I have some wiring tucked behind some extrusion slot covers that accomplishes the same thing. It's a nice, neat solution.


WhiteWulfe
Well-known member
I didn't with my kit. I think they're in my bits box now...
Similar threads
- Replies
- 2
- Views
- 716