Based on some encouragement in another thread Here ...
I'm going ahead with this build ..
So to sum it up:
I ordered a Tronxy x5sa kit (mostly for the frame, and whatever potentially workable components I can salvage) ..
I also already ordered some extra parts from Ali (idlers/pulleys/bearings)
And some gates belts / rails (just 3 for now, the XY set) (from a local supplier which should make sure those are in good shape) ..
And some Din rails from digikey
And now I'm waiting for it all to arrive")
The plan:
I don't plan to actually assemble the original machine .. I have my switchwire to print ABS parts as needed.
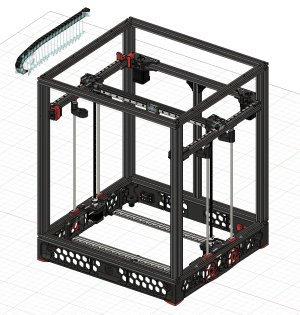
This will end up some kind of a 1.8/Trident/v0 hybrid.
Since I want this to be a gradual conversion ..
It will start as an open frame build
I'll want to put a Trident style Skirt at the bottom with DIN rails so its got a nice roomy electronics bay
XY Gantry
* I like how the V0 has a funky Hat system .. allowing to maximize vertical build volume .. I'll be trying to replicate that eventually ..
* I think initially I'll start with trying to do a potentially flimsy XY build where there isn't the "second level" where the XY ganty lives, I'll mount it right at the top of the frame .. this may work .. or it may prove unstable ..
* I do want to get the cross-frame bits working eventually though .. so I'll be picking up the right extrusions once I've had a chance to properly examine what I'm working with
* The idea is that in the end, I'll have it mounted a little bit below the top of the frame similar how the v0 does it, and I'll have some kind of a Hat structure on top to fully enclose it ..
* For the X side of it .. I'll want to go closer to the Trident design (v1.8 seems to use 2 rails on the X) .. but I will have to make the Y attachment v1.8 style since I can't put the rails below the extrusion (for now) .. since the linear rods for the Z are in the way .. so it needs to be a top of the extrusion mounted version .. which conveniently v1.8 has the same limitations so those pieces from that should work
Z:
* I'll re-use the original Z mount initially, I'll just have to design an attachment for it so I can mount the motors v1.8 style.
* I do want to eventually grab some additional linear rails and switch to a full Trident style 3 point mount, it seems much superior with the spherical bearings
* the original bed mount sticks out the sides of the frame .. so it'll keep me from enclosing the thing until I replace it .. so I may in look at designing some V1.8 inspired bed mount solution .. I'll have to see ..
* if not .. I'll just keep it open until I switch it to Trident style 3 mount mount ..
I'll try to log things here as much as possible so maybe I can publish a conversion repository when this is done
---
Milestones:
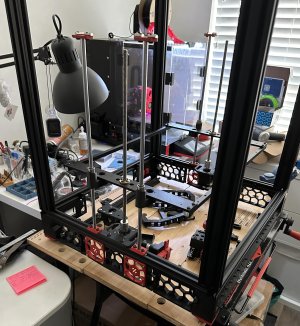
1. Get the parts
2. Start getting some of the ABS parts printing, while starting to figure out the frame (main catch there is that the XY back is a shorter extrusion all connected with ABS parts, so I'll need to get that piece cut to size .. well I'll just get a new piece, since I'll need the original back piece eventually)
3. Get it all assembled and moving (open v1.8 style)
4. If this has not happened yet, move the XY gantry down to a sub-level, I may have to cut the linear rods cleanly somehow
5. (optionally) design a new Z bed mount so its flush with the sides of the frame
6. (any time after this point) start looking at sourcing the correctly cut ABS panels -- but also I may end up using translucent coroplast as a temporary solution
7. (also any time after this) design the Hat .. I want to look into how I could potentially print much of it, so I don't have to get a bunch of extrusions .. its not structural .. and I will panel the hat with corpoplast on the cheap
8. (at this point I should have an enclosed 1.8 style machine maybe)
9. Start sourcing parts for full trident Z system and put that together
(and I'll probably learn lots along the way and need to do extra things)
I'm going ahead with this build ..
So to sum it up:
I ordered a Tronxy x5sa kit (mostly for the frame, and whatever potentially workable components I can salvage) ..
I also already ordered some extra parts from Ali (idlers/pulleys/bearings)
And some gates belts / rails (just 3 for now, the XY set) (from a local supplier which should make sure those are in good shape) ..
And some Din rails from digikey
And now I'm waiting for it all to arrive
The plan:
I don't plan to actually assemble the original machine .. I have my switchwire to print ABS parts as needed.
This will end up some kind of a 1.8/Trident/v0 hybrid.
Since I want this to be a gradual conversion ..
It will start as an open frame build
I'll want to put a Trident style Skirt at the bottom with DIN rails so its got a nice roomy electronics bay
XY Gantry
* I like how the V0 has a funky Hat system .. allowing to maximize vertical build volume .. I'll be trying to replicate that eventually ..
* I think initially I'll start with trying to do a potentially flimsy XY build where there isn't the "second level" where the XY ganty lives, I'll mount it right at the top of the frame .. this may work .. or it may prove unstable ..
* I do want to get the cross-frame bits working eventually though .. so I'll be picking up the right extrusions once I've had a chance to properly examine what I'm working with
* The idea is that in the end, I'll have it mounted a little bit below the top of the frame similar how the v0 does it, and I'll have some kind of a Hat structure on top to fully enclose it ..
* For the X side of it .. I'll want to go closer to the Trident design (v1.8 seems to use 2 rails on the X) .. but I will have to make the Y attachment v1.8 style since I can't put the rails below the extrusion (for now) .. since the linear rods for the Z are in the way .. so it needs to be a top of the extrusion mounted version .. which conveniently v1.8 has the same limitations so those pieces from that should work
Z:
* I'll re-use the original Z mount initially, I'll just have to design an attachment for it so I can mount the motors v1.8 style.
* I do want to eventually grab some additional linear rails and switch to a full Trident style 3 point mount, it seems much superior with the spherical bearings
* the original bed mount sticks out the sides of the frame .. so it'll keep me from enclosing the thing until I replace it .. so I may in look at designing some V1.8 inspired bed mount solution .. I'll have to see ..
* if not .. I'll just keep it open until I switch it to Trident style 3 mount mount ..
I'll try to log things here as much as possible so maybe I can publish a conversion repository when this is done
---
Milestones:
1. Get the parts
2. Start getting some of the ABS parts printing, while starting to figure out the frame (main catch there is that the XY back is a shorter extrusion all connected with ABS parts, so I'll need to get that piece cut to size .. well I'll just get a new piece, since I'll need the original back piece eventually)
3. Get it all assembled and moving (open v1.8 style)
4. If this has not happened yet, move the XY gantry down to a sub-level, I may have to cut the linear rods cleanly somehow
5. (optionally) design a new Z bed mount so its flush with the sides of the frame
6. (any time after this point) start looking at sourcing the correctly cut ABS panels -- but also I may end up using translucent coroplast as a temporary solution
7. (also any time after this) design the Hat .. I want to look into how I could potentially print much of it, so I don't have to get a bunch of extrusions .. its not structural .. and I will panel the hat with corpoplast on the cheap
8. (at this point I should have an enclosed 1.8 style machine maybe)
9. Start sourcing parts for full trident Z system and put that together
(and I'll probably learn lots along the way and need to do extra things)
Last edited:


")