What's new
VORON Design

Register a free account today to become a member! Once signed in, you'll be able to participate on this site by adding your own topics and posts, as well as connect with other members!

Voron 2.4 r2 350 Formbot Kit with stealthburner, revo and tap

Well.. DUH! 🤪

I get how I can QGL, calibrate z-height, pressure advance, input shaping and cooling ABS without cooling ABS... but how do I improve the most important parameter: the WAF*

:unsure:

*Wife Acceptance Factor
I got lucky and married an enabler, but our living room is also either a sanctuary or a shrine to tech, so that's probably also why I'm allowed so many printers.

I've heard printing things for them can be helpful for spousal acceptance though!
 
I've now been on my Voron journey for over a year, and it's still fun! Somwhere along the way i got my startup and shutdown script to work with orca slicer and got my heatsoak-process down (still manual, but maybe a script in the future..). Meanwhile I'm not quite happy with my vertical artefacts (tree-grain pattern) and I had to vacate my workshop temporalily so somwhere IN_A_NICE_BOX_IN_A_GOOD_PLACE (TM) is my acceleration sensor therefore I'm currently running without input shaper and ringing is still a major factor (especially with the faster Orca-slicer profile).

What i really like is Tap.. if I clean the nozzle, the first layer is just perfect!

Sooo.. after över 240 hours of printing, it is time for a major overhaul.

Appart from general maintenance (checking belts, greasing rails, look over the cabling etc.) I have 3 uppgrades ahead:

1. Canbus: I simply don't trust my wiring, sure if you lay them down perfectly and the supplier delivers good wires, then it should be allright... Now for me..I see 2 problems right there... Because of this I orederd the BTT-RP2040 kit (larger crimps may just keep it to ONE swear-jar) and I hope that i can get it to work.

2. Sensorless homing: why bother with recabling the sensors when i go the can-route.. maybe it will be a slightly slower homing on X/Y and it could be some millimeters off on the relative position, but i think I can live with that (until I can't and then put back the sensors...) (OK.. I may have to get another swear-jar anyway...)

3. CW2 with helical gears. I bought some helical gears before Orbiter 2 was announced, so thats my take on the woodgrain issue (that one is already finished, quite easy build).

4. replace tap with cnc-tap

I'll thake that in tow steps, first I go sensorless so I still have a working printer, and once that is running comfortably, I'll replace my CW2 with a new one with helical gear and CAN-board and the tap all in one go.

Wish me luck!

edit: Yea.. once I got my canboard running, it has an acceleration sensor onboard, should make it easy
 
OK! first hurdle taken: sensorless homing works (after some hickups)!

The next steps are going to be veeery intreresting.

First I have to tear down the hotend and old TAP mount. Then I have to mount the CNC Tap and the new clockwork, then I install the Canbus board, which includes facing my worst enemy: THE CRIMPER...
Then I have to get a got mount solution and finally do the wiring and the software installation...

To help me in the installation, i use some belt clamps and a wire-guide
 
The next step looks like something of a chess move against a pro, where you touch your first rook and he just exclaims check-mate in 20 moves...
You just now it will be the end result, but you have NO CLUE how to get there..
Of course there are great guides like Esotericals Canbus Guide. Really good* and got me there in the end.

First out with the old:
- unmounting the stealthburner toolhead
- unmounting "classic" tap
- unmounting wiring/drag-chains
- bonus maintenance: unracking

In with the new
- mounting cnc-tap2
- crimping connectors for canboard
- mounting canboard
- mounting new CW2 and finishing stealthburner toolhead
- mounting u2c board

Flashing and configuring canubs
- finding u2c
- flashing toolhead board
- configuring klipper
- checking basic functions of toolhead

Wiring and finalizing canbus connection
- mounting all wires
- turning on printer
- ...
- profit

So far so good... on paper.

Most of the steps worked well with the following observations and hickups:

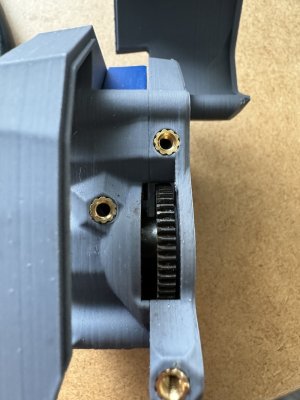
- While unmounting the CW2 the cause of my terrible woodgrain was obvious: the gear was worn down on one side, so the meshing was too much. On top of the hotend-holder there was black plastic dust.. source found 😱

IMG_1549.jpg

- Crimping! using the wrong tool or trying to crimp cheap wires made for an ...interesting... experience, and some wires were too short after putting on a new connector. In the end it worked but there are possible failure points in the future.

- The wires that were removed looked good, no sign of wear.

- the sollution for mounting the canbus wire seemed too much freestyle. There is no "best practice", mounting the wire to a 1mm pianowire worked for me (the manual said 0.8 but the store was out of it, and i guessed it should be allright..

- While Esotericals guide worked well overall there was an error that was not accounted for... I was SURE!! ABSOLUTELY SURE!!! that I had put a jumper on the 120 ohm resistor on the toolhead board (the one on the u2c was well visible) so when I failed to find the UUID i went down a rabbithole of flashing, reflashing, checking, rechecking, installing, uninstalling... yea... in the end i put a multimeter to the high/low lines and got 120 ohm... I was TOO sure! so.. a jumper later the uuid popped upp
maybe esoterical should ammend his checkpoint with this check for DUMB people 🤦‍♂️

- When powering up, the z-endstop worked well, however x- and y- axis refused to move.. I thought the axis had increased in resistance since I had to re-tension the belts, so I lowered the sensitivy.. no dice.. well.. after lifting the head from the screen I immediatly saw that i had unplugged the A/B steppers to make the unracking easier.. so.. plug it back and undo the cfg-edit..

- OH and while unracking i noticed that I had missed two screws holding the x-axis to one of the y-axis bearing. Fixed that!

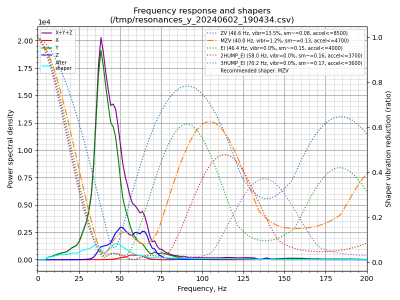
- everything else was a breeze.. especially the input shaping was easy-peasy... the results though.. X-axis seems good.. y-axis is ok-ish.. but there is some problem(s) which I haven't found yet.. I guess there is some tweeking in my future..
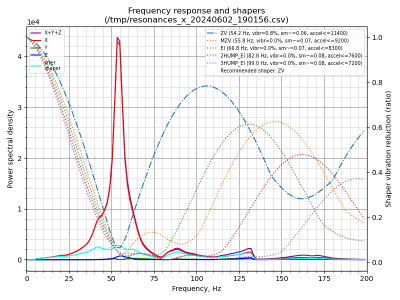
shaper_calibrate_x.png
Looking good....

shaper_calibrate_y.png
Looking... less good...


*unless you are kinda an idiot... read on...
 
Great story! I've got an LDO Voron 2.4 coming soon. Seeing these build logs is encouraging and hopefully will prevent me from making too many mistakes.
 
Great story! I've got an LDO Voron 2.4 coming soon. Seeing these build logs is encouraging and hopefully will prevent me from making too many mistakes.
Building a Voron will give you an opportunity to make totally different and fun mistakes🤪

Enjoy and good luck on your journey!
 
Top