The next step looks like something of a chess move against a pro, where you touch your first rook and he just exclaims check-mate in 20 moves...
You just now it will be the end result, but you have NO CLUE how to get there..
Of course there are great guides like Esotericals Canbus Guide. Really good* and got me there in the end.
First out with the old:
- unmounting the stealthburner toolhead
- unmounting "classic" tap
- unmounting wiring/drag-chains
- bonus maintenance: unracking
In with the new
- mounting cnc-tap2
- crimping connectors for canboard
- mounting canboard
- mounting new CW2 and finishing stealthburner toolhead
- mounting u2c board
Flashing and configuring canubs
- finding u2c
- flashing toolhead board
- configuring klipper
- checking basic functions of toolhead
Wiring and finalizing canbus connection
- mounting all wires
- turning on printer
- ...
- profit
So far so good... on paper.
Most of the steps worked well with the following observations and hickups:
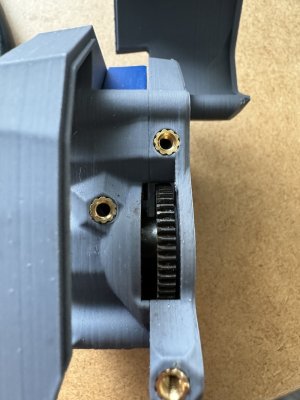
- While unmounting the CW2 the cause of my terrible woodgrain was obvious: the gear was worn down on one side, so the meshing was too much. On top of the hotend-holder there was black plastic dust.. source found


- Crimping! using the wrong tool or trying to crimp cheap wires made for an ...interesting... experience, and some wires were too short after putting on a new connector. In the end it worked but there are possible failure points in the future.
- The wires that were removed looked good, no sign of wear.
- the sollution for mounting the canbus wire seemed too much freestyle. There is no "best practice", mounting the wire to a 1mm pianowire worked for me (the manual said 0.8 but the store was out of it, and i guessed it should be allright..
- While Esotericals guide worked well overall there was an error that was not accounted for... I was SURE!! ABSOLUTELY SURE!!! that I had put a jumper on the 120 ohm resistor on the toolhead board (the one on the u2c was well visible) so when I failed to find the UUID i went down a rabbithole of flashing, reflashing, checking, rechecking, installing, uninstalling... yea... in the end i put a multimeter to the high/low lines and got 120 ohm... I was TOO sure! so.. a jumper later the uuid popped upp
maybe esoterical should ammend his checkpoint with this check for DUMB people

- When powering up, the z-endstop worked well, however x- and y- axis refused to move.. I thought the axis had increased in resistance since I had to re-tension the belts, so I lowered the sensitivy.. no dice.. well.. after lifting the head from the screen I immediatly saw that i had unplugged the A/B steppers to make the unracking easier.. so.. plug it back and undo the cfg-edit..
- OH and while unracking i noticed that I had missed two screws holding the x-axis to one of the y-axis bearing. Fixed that!
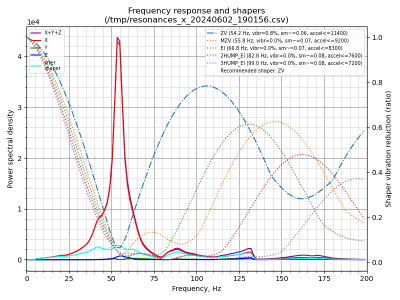
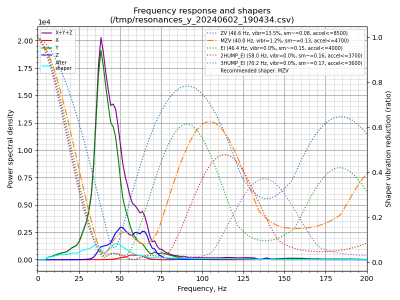
- everything else was a breeze.. especially the input shaping was easy-peasy... the results though.. X-axis seems good.. y-axis is ok-ish.. but there is some problem(s) which I haven't found yet.. I guess there is some tweeking in my future..

Looking good....

Looking... less good...
*unless you are kinda an idiot... read on...


