What's new
VORON Design

Register a free account today to become a member! Once signed in, you'll be able to participate on this site by adding your own topics and posts, as well as connect with other members!

YACN* Builds an LDO Voron 2.4r2 300

Cena

Active member
* Yet Another Clueless Noob

I bought this kit back in August, and I’m just now getting around to building it.

Why? I don’t have a great answer - I wanted a 3D printer, stumbled across Voron and RatRig, and, being the kind of person who is an unrepentant lover of maximalism, complexity, and learning from first principles, fell in love with the idea of building one of these things. I ended up going with Voron because at the time, I couldn’t find as complete a kit for RatRig, and the community seemed smaller.

The type of clueless noob I am: very little prior electronics knowledge, zero 3D printing experience or knowledge. However, I still want to make things as complicated as possible, so have spent an inordinate amount of time since August researching mods, CAN, TAP, Beacon, etc. I’ve finally convinced myself to follow the wisdom of others in building basically stock to start. That said:

Mods:
- clicky clack door
- Orbiter 2 runout sensor
- Knowmi (cuz it seems fun)
-Nitehawk

On the fence about, but it’s not too late:

- TAP vs Beacon
- inverted electronics

Note to self: NO (for now).

Anyway, I just started putting the frame together. @jonhi has a wonderful build log here that reminded me that LDO has its own build notes for its kits, so I took a look and found the very first note about installing the T-nuts first. Of course.

Actually,
the T-nuts went into the completed frame just fine, thankfully .

However, now I’m at a hard stop because I just realized…..I bought printed parts for the wrong damn printer!!! After endless rooting around for the z-axis assembly and cussing out the hapless PIF-er, I finally looked at my actual order and the parts are for a V0.2. Did I mention clueless anywhere?

IMG_3395.jpeg

I’ll get started with the pulley assembly for now.

Day One Lesson: check your stuff when you get it, not 7 months later.
 
Last edited:
Also, big props to Hector and TheLegendShammy at Fabreeko’s Discord for their kind and patient help.
 
You are going to have plenty of questions and I look forward to watching the build. Sucks about the PIF parts.

Is this a Trident or 2.4 build?

TAP is great and so is Beacon, (I have ran just about everything). I like them both but I run Beacon to save a few grams.
 
Just a tiny update and hint for other CNs.

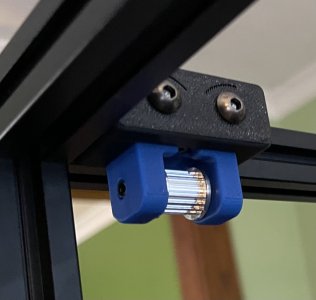
I started building the belt drive assemblies and spent much time futzing around with calipers trying to get an exact 33mm shaft length (as shown on page 33 of the assembly manual).

Then I stumbled across this video by Nero3D, which shows how the drives fit into the printed housing (which I don’t have yet), no futzing and calipering required.
Nero3d has some amazing fundamental videos around squaring the frame, linear rails, hotends, first start checks etc. do check them out as they are great help. Also when you have any doubts about anything always seek clarification on voron discord or here.
 
In a fit of impatience while waiting for parts, I ran out the other day and bought a Creality Ender v3 KE. I figured I could use it to start learning how all this 3D printing business actually works.

Despite all the dire commentary about Creality online, it seems to work pretty well! Here’s my first printed thing.

IMG_3673.jpeg

Not too terrible, even with the sample filament (whatever it is) that came in the box!

Naturally, my printed Voron parts just came in.
 
In a fit of impatience while waiting for parts,

Don't worry, this won't go away even when your Voron is up and running. 😁

Having two printers is quite often advantageous. You can configure them with different nozzle sizes, leave different materials in each, etc. And your printing throughput with 2x printers is way better than just one - even if that one is a fast printer.
 
In a fit of impatience while waiting for parts, I ran out the other day and bought a Creality Ender v3 KE. I figured I could use it to start learning how all this 3D printing business actually works.

Despite all the dire commentary about Creality online, it seems to work pretty well! Here’s my first printed thing.

View attachment 4388

Not too terrible, even with the sample filament (whatever it is) that came in the box!

Naturally, my printed Voron parts just came in.

great do share how the E3 V3 KE is and if you print ABS with it how it goes.
 
great do share how the E3 V3 KE is and if you print ABS with it how it goes.

It’s funny- that WAS part of my impatient plan when I bought the thing the other day, and I fortuitously ran across your build log where you described your enclosure for the v1. (I’d been overthinking the whole thing and it turns out I can just use a cardboard box!!)

At any rate, I do plan to keep it - it’ll be a bit before the Voron is built, and I’ve been having fun just mucking around with the Ender. I’m planning to try some ABS on it this weekend for a Voron mod, and will let you know how it goes!
I was earlier looking at creality enclosures but they were priced roughly 70 to 75 usd which I did not want to spend as I knew once the voron is built it can do abs printing as it’s enclosed so this will be a temporary expense and I just wanted to get started quickly so I had cardboard boxes from my travel luggage and a tv box which I used on top and made this make shift case and a yoga mat up front to quickly see what’s going inside. I don’t sit in same room while printing so have a remote camera arrangement via a webcam hooked to pi running octoprint on it which works out great.
 
Okey dokey, finally making some progress here!

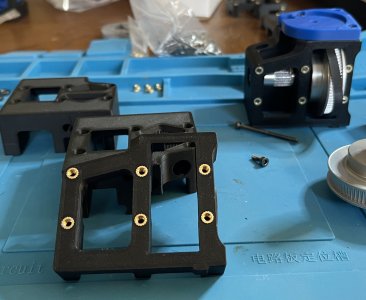
With my new shiny (matte) parts, i’m able to put together the z assemblies. For once, I resisted the impulse to buy a fancy tool that would make everything put itself together with greatest of ease and expertise. Inserting the heatsets was totally fine without it; in fact, other than a measuring tape , soldering iron, and square, I have yet to use any of the tools I so carefully and spendthriftily acquired in anticipation of this build. So far (which, fair, isn’t very far) the several ball-ends that come with the kit are the only tools I’ve used.

IMG_3679.jpeg

The biggest pain was getting those blue endcaps on; it requires a relatively loose hex nut to be installed on the backside while you’re trying to screw the cap in place. A random passer-by suggested placing it against the assembly in the vertical plane rather than horizontal, and that worked well.

I also got the motors/pulleys set up. My goal is to get the feet/assemblies mounted today, but I got so aggravated trying to line up the T nuts with the screws, I took a break and wrote this up.

Working on: pages 41-46 of 259.
 
Calamity!

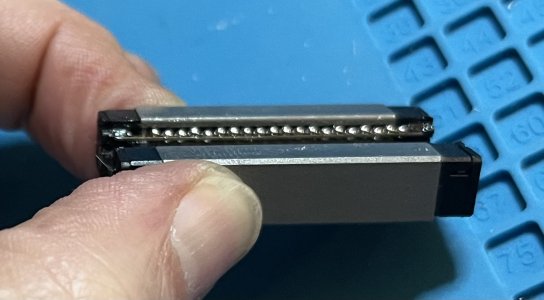
While pondering how to get these dang assemblies on, I idly ran the bearing up and down the rail. And the end stops popped out and next thing I know, the whatchacallit and several tiny balls are in my hand.

I don’t see any others. How ‘full’ should each side be? If totally, then I’m estimating I’m probably missing 4-6 total.

Example;

IMG_3684.jpeg

If this is no good as is, I do happen to have a random 12 rail/bearing (the kit comes with 3 9s and a 12); I bought it when I didn’t know what I was doing.

Question: can I replace one of the 9s with my extra 12? If so, which one (or does it matter?)
 
Mine were not full either - so that must be by design?

There is a 3D printable stop that you can install to keep the carriages from rolling past the ends of the rails. Like you, I found out about that part AFTER letting one come apart. 😁
 
It's normal to be "missing" a few on each side. I would not be super concerned.
 
Thanks, y’all. Every time I tried sliding the carriage back on the rail, it was leaving bearings at the end of the rails. I finally figured out that the sideways pressure from the rail on the bearing wires was squeezing bearings out from the bottom of the wire.

I did eventually find this video, which shows the carriage being completely disassembled and bearings repacked, so I’ll give it another shot.

In the meantime, I got the shoes on! Motors, z assemblies, feet. (After putting things on backwards several times.) I’m struggling to get a pic uploaded due to size limitations; next time.

Next up: z idlers (Rama)
Time spent so far (building and cursing): about 8 hours.
 
Shoes:

IMG_2024-03-18-141056.jpeg

(I’ll try to up my photo game after this post.)

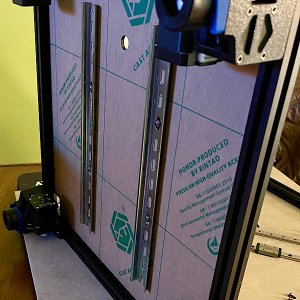
YACN moment: belatedly realizing that brown paper on the sides of the deck had to be removed.

While trying to figure that out, I randomly came across this post about deck supports, which are mentioned in the LDO notes as something to install around page 29 of the Voron manual. These supports are never mentioned again in either the LDO notes or the Voron manual (that I can find), although the STLs exist on both Githubs. Of course I do not have either version in my pile of printed parts (or in my V0.2 parts).

How important are they for an acrylic deck? (They seem to be, if I don’t want to have to replace a warped deck in 0-300 hours of print time.)

Options:
- try printing them on my Creality in something other than ABS.
- get an aluminum or poly deck
- say the hell with it and move on.

Appreciate any input on that.

In the meantime, I put the z idlers together and installed:


IMG_3690.jpeg

In other notes, I replaced the rail with the loose carriage/bearings with one of the others and ordered a new one from Fabreeko. Maybe one day I’ll try again with repacking the bearings, but I gotta move on with my life at this point.

One last question: I’ve seen a lots of build logs where the builder leaves off installing the bed til later. This is the next step in the Voron manual. Should I wait, or do it now?

I’m gonna start building the a/b drives and idlers in the meantime.
 
Top