What's new
VORON Design

Register a free account today to become a member! Once signed in, you'll be able to participate on this site by adding your own topics and posts, as well as connect with other members!

YACN* Builds an LDO Voron 2.4r2 300

Things like that are probably why they recommend you build it stock first. šŸ˜

I did find this mount adapter for the "standard" (non-USB / non-CAN) Stealthburner PCB on the Dragon Burner:

At the end of the day, it's a pretty small PCB - and the thing that is most "Stealth Burner"-specific about it is the fan adapter, which is only a breakout board. So that seems like an obstacle that could be overcome if necessary.
Humm, it might work..... Looks like you have to turn the board 90 degrees which is not the end of the world and yeah you won't need the front PCB.....
If it works I might do try it, I love the USB toolhead so if this works....
 
@Dave32 - thanks so much for your response!

One of the issues I run into with mods of similar functionality is not having a clear idea of how theyā€™re different. Klicky is probably the main one that comes to mind - I donā€™t get the differences between Klicky, Klicky PCB, KlickyNG, unklicky, etc.

Anyway, Iā€™ve printed the Beefy stuff and am waiting for the pins they require. Iā€™m settling for the RocknRollas for electronics access (vs switching to Doom, a backpack, a side pack, inverted, etc. )

Current plan for mods:

- deck supports (printed and installed)
- Beefy (vs stock drives and Rama idlers; printed, waiting on pins)
- RockandRollas (and stilts)
- Klicky clack door
- Nitehawk whenever it shows up

Galileo 2 extruder
Iā€™ve thought about this - any thoughts on G2 vs Orbiter 2/3? (Mostly because I somehow ended up with a filament sensor for the Orbiter 2.)
 
Iā€™ve thought about this - any thoughts on G2 vs Orbiter 2/3? (Mostly because I somehow ended up with a filament sensor for the Orbiter 2.)

I've read great things about both of them.

The Orbiter 2 is mature, popular, and well understood by the community. You purchase it as an assembled unit, and all kinds of toolheads have mounts for it.
The Galileo 2 is a kit - you have to print your own parts and assemble it. But that gives you flexibility to print it in the form that fits your toolhead.

What I do like about the Galileo 2 is that it uses a single filament drive gear, which eliminates a whole range of misalignment, gear meshing, and other issues that can cause VFAs. That's the reason why I would lean that direction over the Orbiter 2.


Orbiter 3 is a different system altogether, with the extruder and hotend integrated into one package. So you would be on your own with an entirely different toolhead approach for that. And then you are comparing it with systems like the E3D Revo Roto, BIQU H2 series, etc.. That approach isn't very popular in the Voron community from what I can tell.
 
Thanks, Dave! I broke down and got a Galileo. It also turns out that the Nitehawk is designed to work with it, so that tipped me over.

Iā€™m leaning towards Beacon vs Tap for extra ā€œexcitementā€.
 
Beacon is amazing. Lighter, faster, harder stronger...I kid but it is lighter and faster, easier to setup. I love it.
 
Thanks, Dave! I broke down and got a Galileo. It also turns out that the Nitehawk is designed to work with it, so that tipped me over.

Iā€™m leaning towards Beacon vs Tap for extra ā€œexcitementā€.
the only reason i have not ventured into beacon is price and availability in India. I also feel its base price is just too high forget shipping and duties. I have no clue why this costs so much.
 
Yeah, you know, I might retract one of my prior statements and move Beacon into my "do the first time" upgrades set instead of PCB Klicky. It would be faster and would avoid all of the docking/undocking. Plus there are nice CNC carriages with mounts for it.
 
The problem I found with Klicky, Euclid, and all the little dock probs is they fail. The are pretty cheap so you can make a few but its sort of a PITA to deal with them.
I also had an issue with the mount on the toolhead came just a little loose, not really noticeable but I was getting inaccurate probing with Klicky, took me some time to track down.
I have had zero issues with Beacon.
Why does it cost so much? R&D and the first to market for starters. But trust me the first time you see it scan the bed you will see why it is worth every cent. I think the new one has an accelerometer built in as well.
 
Why does it cost so much? R&D and the first to market for starters.
Yeah, and I'm personally fine with that. Someone had to take the risks, do the R&D, prove the concept, figure out the software side, etc.

The 3D printing world is kinda split right now - some companies are for good reasons patenting their ideas. When you invest tens of thousands in R&D, and your product is cloned within a week of release, that may be the only way you can survive - and the only way the R&D can be justified - which is the only way that some of these ideas ever come to light. So when a company makes something awesome and *doesn't* patent it - I try to buy genuine when possible to support their efforts. (y)
 
The problem I found with Klicky, Euclid, and all the little dock probs is they fail. The are pretty cheap so you can make a few but its sort of a PITA to deal with them.
I also had an issue with the mount on the toolhead came just a little loose, not really noticeable but I was getting inaccurate probing with Klicky, took me some time to track down.
I have had zero issues with Beacon.
Why does it cost so much? R&D and the first to market for starters. But trust me the first time you see it scan the bed you will see why it is worth every cent. I think the new one has an accelerometer built in as well.

Let me reconsider and see what I can do about beacon.
 
Small progress: A and B drives built.

IMG_2024-03-23-172309.jpeg

Gantry comes next, but I did a little research and am currently printing these ā€œz locksā€ to help keep it in place.

While Iā€™m at it, Iā€™m also printing these extrusion jigs to help ensure my frame is square. I built it on a flat table, then went and got a concrete tile to make sure it was square. It doesnā€™t rock on any axis/side, diagonal measurements seem good, and the joints feel even under my thumb, but while Iā€™m still in this early phase, I figure Iā€™ll just quadruple-check.

Since I had some free time while waiting for pins for the Beefy mods, I also went ahead and got a Galileo 2, Beacon, and the extrusion backers. Still waiting on the Nitehawk.

I have refrained from researching a/b drive mods. Okay, thatā€™s a lie, but it made me realize that if I donā€™t know/understand what problem or preference is being addressed with a given mod, then build stock. (Repeating this til I believe it - getting there!) For example: upgrading from 6mm to 9mm belts.

I think if I were to start over, Iā€™d use @sanketss84 ā€™s initial build post as a template for thinking/researching/deciding about all this stuff ahead of time. (Also, waiting for your next update, sir! :)) As a newbie, itā€™s difficult to know what you donā€™t know - ā€œanythingā€œ probably covers it, but lacks actionable specifics.

Up next: gantry.
 
Gantry comes next, but I did a little research and am currently printing these ā€œz locksā€ to help keep it in place.

While Iā€™m at it, Iā€™m also printing these extrusion jigs to help ensure my frame is square. I built it on a flat table, then went and got a concrete tile to make sure it was square. It doesnā€™t rock on any axis/side, diagonal measurements seem good, and the joints feel even under my thumb, but while Iā€™m still in this early phase, I figure Iā€™ll just quadruple-check.

For the Z-locks, I found four pieces of painters tape wrapped around the Z joints to be more than adequate to hold things in place. Doing it that way saved a lot of time and material for something that would have only been a short term assembly need.

On the extrusion squaring - note that if you use a printed squaring guide, you are not ensuring squareness - only ensuring that your new printer will be out-of-square in the same way as your printer that printed the jig. šŸ˜ So make sure you go through the squaring process for that printer first (mechanical followed by software skew correction to refine) before printing your alignment fixtures.
 
I found four pieces of painters tape
Good tip! For me, part of the printing of these random things is just ā€œlearning how to 3D printā€ - using a slicer, fiddling with settings, etc.

note that if you use a printed squaring guide, you are not ensuring squareness - only ensuring that your new printer will be out-of-square in the same way as your printer that printed the jig.

Dang you, Dave, thatā€™s a good point that never occurred to me. Although, thinking further, do Crealitys get ā€˜out of squareā€™? Itā€™s level, and doesnā€™t have a frame (enclosure, more accurately). Still, something to think about. Did you look at the jig? It basically hooks onto 2 extrusions in a corner and ensures theyā€™re meeting at a 90-degree angle.
 
As an aside, the right xy drive shouldnā€™t do this, should it? Basically, the screw through the idler pulley goes straight through the top hole (no anchored to top piece), and the other screws donā€™t seem to be biting into the plastic- I can just pull the parts apart with no effort. I assume this is a bad printed part(s), just want to make sure! (Left drive seems fine, actually the pulley screw on the left drive is also not biting into the plastic.)
 

Attachments

  • IMG_3718.jpeg
    IMG_3718.jpeg
    385 KB · Views: 7
  • IMG_3720.jpeg
    IMG_3720.jpeg
    508.8 KB · Views: 7
Last edited:
Dang you, Dave, thatā€™s a good point that never occurred to me. Although, thinking further, do Crealitys get ā€˜out of squareā€™? Itā€™s level, and doesnā€™t have a frame (enclosure, more accurately). Still, something to think about. Did you look at the jig? It basically hooks onto 2 extrusions in a corner and ensures theyā€™re meeting at a 90-degree angle.

Yep, all printers can be out of square. The motion system X/Y/Z all have to be exactly perpendicular to each other, and the bed needs to be parallel to the X/Y plane. Small amounts of skew from misalignments might be completely unnoticeable on organic shapes, but can really wreak havoc on tools/fixtures such as alignment jigs.

And the modern helpers can work against you too - for example, say you stick a pair of 10mm spacers under the left side of the bed in a V2.4. What would happen? The QGL would dutifully make sure that the gantry was exactly parallel to the bed, the Z-probe would make sure your first layer conformed to this, and since the gantry is now at an angle to the Z direction rails, the print job would happily print you a part with a strong left-leaning skew. In the "old days" before the fancy probes, prints would have flat out failed if certain aspects were out of square, making problems immediately obvious instead of masking them.
 
As an aside, the right xy drive shouldnā€™t do this, should it? Basically, the screw through the idler pulley goes straight through the top hole (no anchored to top piece), and the other screws donā€™t seem to be biting into the plastic- I can just pull the parts apart with no effort. I assume this is a bad printed part(s), just want to make sure! (Left drive seems fine, actually the pulley screw on the left drive is also not biting into the plastic.)
check my discussions around similar topic in voron discord here https://discord.com/channels/460117602945990666/551488536256184331/1206524364531441729
hope this is helpful
 
Okay, where did I leave off?

Oh yes, a couple more CN mistakes:

I went to put the xy drives together, and had various issues with the screws not fastening. I spent 8 hrs reprinting the parts on the Creality. Well. Turns out that
a) I somehow completely missed the part in the manual about putting nuts into the back of the printed part and
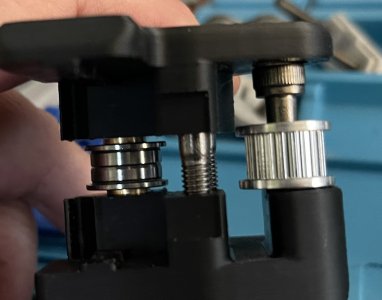
b) I installed the bearings and pulley in the wrong places.

This isnā€™t the first time Iā€™ve installed something backwards; Iā€™m really starting to question my spatial reasoning (and/or ability to read the manual)!

And whew - I wasnā€™t feeling 100% confident in my ABS printing with the Creality for such critical parts, although I used the recommended settings for the parts and they looked good.

The gantry is mostly assembled, although I **cannot** get one screw into the z block. (The one you insert from the bottom into the xy drives when the gantryā€™s suspended.). The LDO manual recommends doing this while you have it upside down on your workspace, but I couldnā€™t get it in (I suspect the nut was falling down in its socket a bit, just out of reach of the screw.)

So I flip it over, rest it on the rails, and 3 screws go in like butter. One has resisted all attempts. I took the gantry down, flipped it back over, undid the belt clamp, to make sure Iā€™d actually put a nut in the dang socket (ahem). I had! I tested the screw in the nut while I had it down; not a bad screw or nut. I did find that Iā€™d forgotten to tighten the drives and blocks, so I guess something good came of all this messing around.

Put it back up, and nope - still wonā€™t tighten. Iā€™ve tried exerting gentle downward pressure from above, making sure the screwā€™s in the right socket, driving the screw in the other direction (at least one other screw is lefty-tighty); nothing.

So, Iā€™ll give it another go tomorrow unless someoneā€™s got thoughts. Itā€™s very possible Iā€™m missing something dumb.

(Red shape for location of offending screw.)

IMG_3727.jpeg
 
Itā€™s very possible Iā€™m missing something dumb.

Took the gantry down again, thinking maybe the z bearing block itself was an issue, then it turned out that ā€¦..THERE WAS NO NUT in place. When I checked that yesterday, I checked the wrong (mirrored) side.

IMG_3395.jpeg
 
Top