What's new
VORON Design

Register a free account today to become a member! Once signed in, you'll be able to participate on this site by adding your own topics and posts, as well as connect with other members!

YACN* Builds an LDO Voron 2.4r2 300

Shoes:

View attachment 4407

(I’ll try to up my photo game after this post.)

YACN moment: belatedly realizing that brown paper on the sides of the deck had to be removed.

While trying to figure that out, I randomly came across this post about deck supports, which are mentioned in the LDO notes as something to install around page 29 of the Voron manual. These supports are never mentioned again in either the LDO notes or the Voron manual (that I can find), although the STLs exist on both Githubs. Of course I do not have either version in my pile of printed parts (or in my V0.2 parts).

How important are they for an acrylic deck? (They seem to be, if I don’t want to have to replace a warped deck in 0-300 hours of print time.)

Options:
- try printing them on my Creality in something other than ABS.
- get an aluminum or poly deck
- say the hell with it and move on.

Appreciate any input on that.

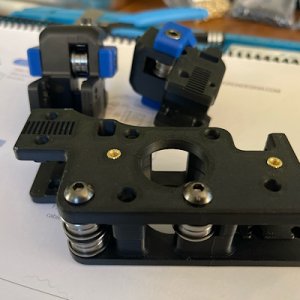
In the meantime, I put the z idlers together and installed:


View attachment 4408

In other notes, I replaced the rail with the loose carriage/bearings with one of the others and ordered a new one from Fabreeko. Maybe one day I’ll try again with repacking the bearings, but I gotta move on with my life at this point.

One last question: I’ve seen a lots of build logs where the builder leaves off installing the bed til later. This is the next step in the Voron manual. Should I wait, or do it now?

I’m gonna start building the a/b drives and idlers in the meantime.
the bed is heavy and with wiring left and you needing to flip the printer and move it here and there having that heavy bed will make things cumbersome. also put some stops on linear rails as you dont want them sliding back and forth as you still complete the rest of your build. once you finish most of your electronics then finally you can put the bed.

i will be doing the same. i just did one test for my trident while i assemble it is check if my trident three z-axis motors dont sag with bed + heater + magnetic sheet + print surface + some more weight as it has a moving bed. I dont want that once the printer is powered off and bed is mid air it all comes crashing down. so once this test was done i removed the bed.
 
Yes, I think you’re right. I just wanted to make sure this wasn’t an alteration to the manual more suited to experienced builders.

In a small update, I discovered I do actually have some ABS on hand, so will attempt to print the deck supports on the Creality. Not having them will bug the crap out of me over time. :)
 
While trying to figure that out, I randomly came across this post about deck supports, which are mentioned in the LDO notes as something to install around page 29 of the Voron manual. These supports are never mentioned again in either the LDO notes or the Voron manual (that I can find), although the STLs exist on both Githubs. Of course I do not have either version in my pile of printed parts (or in my V0.2 parts).

How important are they for an acrylic deck? (They seem to be, if I don’t want to have to replace a warped deck in 0-300 hours of print time.)

The deck supports can be installed at any time. I installed them when LDO's instructions said to, and they just got in the way (or fell out) as I worked through the rest of the assembly, so doing it later might actually have been better.

I don't care much for how the twist-in supports function. They really have one purpose (holding weight/pressure from the top), so in that sense they are cheap ("efficient") and easy. But a simple printed block with a hole for a bolt, and a roll-in nut in the extrusion, would have been MUCH more secure/stable... and wouldn't fall out when lightly bumped.
 
YACN moment: belatedly realizing that brown paper on the sides of the deck had to be removed.
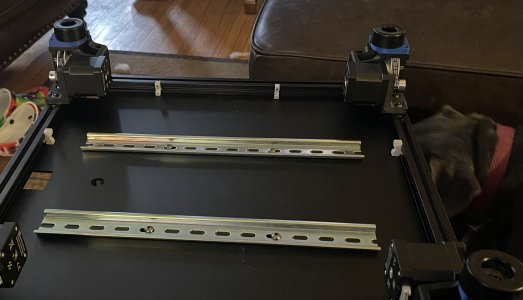
If you are taking that apart again, note that LDO has you orient the DIN rails 90-degrees rotated from the Voron build guide.

I believe you have it correct - but I just remember that it was a "gotcha" for me - so it might be worth triple-checking.
 
I don't care much for how the twist-in supports function.

Well, they’re being printed atm, so it’s a good test for the ABS on an unenclosed Creality v3 KE, anyway. :)

I did find these, which, agreed, seem to make more mechanical sense. The others have an hour print time (!) so I’ll give these new ones a whirl later.
 
I did find these, which, agreed, seem to make more mechanical sense.

Oooo... those look perfect! Thanks!

Really you would only have to print the lower sections to replicate the twist clips - but having positive retention on the top too would be great. (y)
 
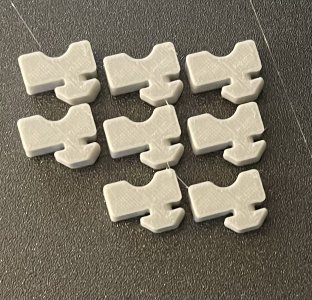
So hey @san4esss777 - the ABS on unenclosed Creality turned out pretty well! Bit of stringing, but I’ve literally made no other adjustments to the printer/Mainsail other than temp. I have no idea what I’m doing, so this may all be beginner’s luck.

I had the extruder at 260C, and the bed at 105C.

This is “Inland ABS”: Microcenter house brand, although I think I’ve read it’s rebranded eSun. Got it for $16.99 when I bought the Creality.


IMG_3692.jpeg

Gonna try them on the deck, and if they’re as easily knocked around as @Dave32 mentioned, will print the others linked above.
 
So hey @san4esss777 - the ABS on unenclosed Creality turned out pretty well! Bit of stringing, but I’ve literally made no other adjustments to the printer/Mainsail other than temp. I have no idea what I’m doing, so this may all be beginner’s luck.

I had the extruder at 260C, and the bed at 105C.

This is “Inland ABS”: Microcenter house brand, although I think I’ve read it’s rebranded eSun. Got it for $16.99 when I bought the Creality.


View attachment 4409

Gonna try them on the deck, and if they’re as easily knocked around as @Dave32 mentioned, will print the others linked above.

this looks neat but enclose for large parts or you might see warping or deformation. also hope you have calibrated a slicer profile by voron specs. they are mentioned in the manual.
 
Shoes:


(I’ll try to up my photo game after this post.)

YACN moment: belatedly realizing that brown paper on the sides of the deck had to be removed.

While trying to figure that out, I randomly came across this post about deck supports, which are mentioned in the LDO notes as something to install around page 29 of the Voron manual. These supports are never mentioned again in either the LDO notes or the Voron manual (that I can find), although the STLs exist on both Githubs. Of course I do not have either version in my pile of printed parts (or in my V0.2 parts).

How important are they for an acrylic deck? (They seem to be, if I don’t want to have to replace a warped deck in 0-300 hours of print time.)

Options:
- try printing them on my Creality in something other than ABS.
- get an aluminum or poly deck
- say the hell with it and move on.

Appreciate any input on that.

In the meantime, I put the z idlers together and installed:


In other notes, I replaced the rail with the loose carriage/bearings with one of the others and ordered a new one from Fabreeko. Maybe one day I’ll try again with repacking the bearings, but I gotta move on with my life at this point.

One last question: I’ve seen a lots of build logs where the builder leaves off installing the bed til later. This is the next step in the Voron manual. Should I wait, or do it now?

I’m gonna start building the a/b drives and idlers in the meantime.
I would say the deck supports are pretty important to help stop the warping. It's going to happen anyway but they will help. Also, just print them on the Creality in ABS, they should be fine. If they warp the part is so small you won't really notice it.
I have ACM panels so not worries about warping but they can get expensive.

I would put the bed on now. I so no major reason not to follow the build flow and it is well thought out. You can wait but I say just go for it.

Edit, sorry I just saw the rest of this tread and you have moved well past this stuff I mention.
 
sorry I just saw the rest of this tread and you have moved well past this stuff I mention.

Not at all - I appreciate the input! Glad I printed the deck supports. It’s still early enough in the build that I can take in new info and incorporate it.

After going full tilt on mod research before actually starting to build, I resolved to stick to stock unless the mod:

a) provides some objectively better experience than stock (mostly in terms of quality of life vs “faster prints”, for example), and
b) would be easier to install during the build rather than afterwards.

In that light, I’m reconsidering doing the inverted electronics mod, for example.

So if y’all have any suggestions for that type of thing, let me know!

Today’s goals: a/b drives, Rama idlers.

Research: inverted electronics.
 
Two things that are what I would consider great mods would be a better probe. I use Beacon and love it but I still think that is something you can do after stock.
Or Klicky, or Euclid.

But the one thing I might do during the build is the LDO Nitehawk toolhead. This way you can reduce the wiring down to 4 at the toolhead, configuration is super easy. But again, there is something to be said by going full stock and then modding.
 
It will arrive immediately after you finish wiring your cable chains with the factory wiring.


Of course! Of course, I also do a fine job of crossing myself up, to wit:

- I put the A drive and Z idlers together-

IMG_2024-03-19-162731.jpeg

then realized that:

a) while I used the parts from the Rama idler kit, I used the stock printed parts, and

b) decided to go with Beefy idlers instead. So now I’m waiting on some dang steel dowels for the BFI and BZI instead.

I also realized that due to the acrylic deck (and the supports I installed), inverted electronics won’t work. Since I have really GOT to quit spending money on this damn thing, at least until it’s built, I’m not going to upgrade that panel yet. (I also spent too much time looking at the Doom Cube, for the sole purpose of having the electronics up top. )

Note to self: build what you got! Damn!!!
 
Note to self: build what you got! Damn!!!

Everyone says that. I think it's an attempt to mitigate FOMO and keep newbies from getting over their heads.
Given a time machine, I would have definitely done more mods during the initial build. Because some of them are a LOT more work after the fact.
 
I would have definitely done more mods during the initial build

Got any examples? :)

I did ask in another thread about umbilicals (without can) mostly because I’ve read too many anecdotes about wires breaking in the chains. I’m trying to futureproof without really understanding the present, I suspect., and yes, getting in over my head!)

I suppose that’s why I keep dithering around - “I don’t want to have to dismantle the whole printer to install cool/convenient/better thing later!” It’s dumb too, because there will always be a new thing, later.

(I’m gonna keep telling myself this until I believe it! )
 
Got any examples? :)

Sure. Starting from the LDO v2.4r2 350 "Rev C" kit, I would have done:
  1. Dragon Burner toolhead. (Better cooling, smaller size, popular and well tested.)
  2. Galileo 2 extruder (it's getting great reviews, and the possibilities of reduced VFAs makes worth it.) My CW2 was not a perfect out-of-box experience.
  3. LDO Nitehawk-SB USB toolhead board. Substantially simplifies the wiring both above and below the deck, and also means that the accelerometer isn't a fiddly add-on that has to be connected/disconnected, etc.
  4. PCB Klicky. More accurate and faster than the inductive probe for QGL, and just seems more robust than the Unklicky (which uses press-fits for both alignments and electrical contacts).
  5. Z-endstop elimination - possible because of #4
  6. Drilled-and-tapped screws/washers on the back of the bed for the build sheet stops instead of the printed versions
  7. Revo High Flow nozzle. Very happy with the 0.6 HF. Wish I would have just installed that first before any others, as I ended up doing all of my calibrations and tuning twice.
  8. Alternate electronics bay fan guards. The original fans are noisy - but a lot of the noise comes from the air being "cut" between the printed guards and the fan blades.
 
I don't think you can do the Nitehawk and Dragon Burner since the Nitehawk is designed for StealthBurner.
I could be wrong though.
 
Top