VORON Design

You are using an out of date browser. It may not display this or other websites correctly.
You should upgrade or use an alternative browser.
You should upgrade or use an alternative browser.
LDO 2.4/300 Build Log
- Thread starter Dave
- Start date
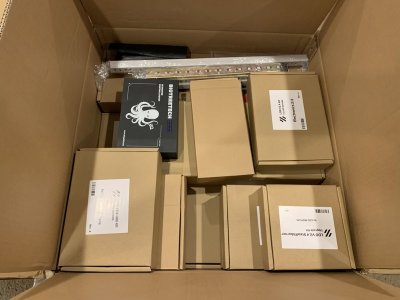
Context/Disclaimers: I won the LDO 2.4/300mm kit that will be central to this build in a holiday giveaway. I did not receive it in exchange for any promotion, review, or anything other than the fact that my name came up on a random number generator. But I do want to make it clear that I did not pay for it. The folks at LDO are fantastic contributors to/collaborators with the Voron community, and I can’t thank them enough for providing great prizes to the community for the holidays! (Specifically @JasonfromLDO is amazing to deal with, and I want to thank him publicly for all that he does for the Voron community!) But they did NOT provide the kit in exchange for promotion or review.
This is NOT a retail kit, so it may not be representative of what you would buy from a reseller. Lots of resellers customize their kits, so be sure to check with them about specifics prior to assuming that this kit is representative of a specific kit that you are considering buying.
Any opinions about the kit are my own and are not intended to represent the opinions of anyone else.
I don’t like raw onions or yellow mustard. Or capers. This probably isn‘t important in this context, but I like to get that out of the way up front.
Last edited:
LoadMaster7
Well-known member
Dave, enjoy building your new printer. I am nearing the end of my build of a Voron 2.4 R2 350 X 350 X 350 kit by Formbot. Great kit and all good parts. It is fun watching the printer making parts for itself.
Does your kit include the printed parts?
Does your kit include the printed parts?
OK, so what am I actually going to build with this? I’m in the middle of building two other Trident 300mm printers as the moment (I’m sure that some of those builds will seep into this thread), so I haven’t thought about what to do with a new 2.4. My son’s First Robotics team is about to start their big build season, and I’ve had three printers running regularly to keep up with their First Tech Challenge, which is their smaller, less complicated robot. So I know that we will put this 2.4 to good use!
I’ve been considering building a Doom-style printer, but there is a lot that I don’t like about the “default” Doom Cube. Not because it isn’t good, but because I want to do something slightly different, and I like to tinker. I know that I’ll add a single-piece door at some point. That upgrade to my old 2.4 may have been the best upgrade that I ever did. I’ll probably end up with CAN at some point, but to be honest, the wiring harnesses and adapter boards that LDO provides are super spiffy, and I may just run those because they are so convenient.
I do need to source a Pi or something like it. No complaints that the kit didn’t ship with one! Pi’s are still unicorns. When the supply is back up, I have zero doubt that LDO will start including them again.
I’ve still got one of WhoppingPochard’s beta kinematic mounts hanging out, and I’ll absolutely use that for this build. There were a lot of things that were improved from the beta to the final version, so I may break out my Dremel and do some modifications before it goes in. Plus, if I repainted it to match the grey frame, then I could make whatever cuts I wanted and it would still look good. Yeah! That’s a good idea! I think I’ll do that.
I’ll need air filtration. LDO includes Nevermore parts with the kit, which is pretty amazing! I’m just not sure if I want to do a Nevermore for this build. I sort of want to do a new style of air filter than I’ve been thinking about, but I’m not sure if I want to do that out of the gate. Hmmm. . . Decisions, decisions.
Definitely need a touchscreen for Klipper Screen.
Definitely need a webcam.
Do I want to work multi-material into this printer? Hmmmm. I have a weird idea for adapting the Chameleon multi material system into the lid of a Doom Cube, but that’s another long project.
Or, I could just build this thing stock! I do want to see what this LDO kit will do out of the box, so to speak. I’ve got a ton of crazy ideas, and I could always just do them later on my “old” 2.4/350. Or on one of the Tridents.
If that does me up happening, I’m sure that I’ll either start a thread here or talk about it on Discord. But now it’s time for bed. The dogs are snoring, and I’m the only one still awake. No decisions for tonight.
The kit did not include printed parts. Which is just as well because half of the parts I’ll be using are either mods or custom. I do NOT recommend starting with modded parts for a first build since it’s tough to make things work and troubleshoot, but I’ve built several printers and have a few things that I think are worthwhile changes to the stock 2.4 configuration. For example, I would NEVER recommend starting with a klicky probe on your first build because the setup can cause crashes if you get anything wrong. But since I’ve got a stable software config, I’ll be starting with a klicky probe. Little stuff like that.Does your kit include the printed parts?
Coincidentally, I also bought a Formbot kit for my first 2.4. My kit was fine for the most part, but there were a few parts that did have issues. I think that they have been getting better about their quality, so hopefully those issues are in the past, but do be careful if something doesn’t appear to be working right.
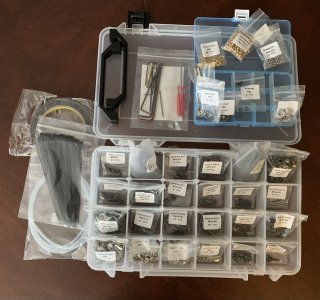
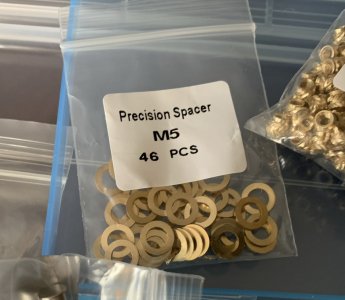
Before anything else, let’s get organized! The best thing I ever did for helping my printer builds run smoothly was to make a screw bin. I’ve already got one with my stainless hardware, but LDO uses hardware with a black coating, so I don’t want to mix those bins. I’m not entirely sure what the coating is, but it’s NOT black oxide. The hardware is high quality. This is nowhere more obvious than in the brass 5mm spacers. They are much better than the stamped washers that I’ve seen in some kits. As long as they are the right thickness, they will work, but this attention to detail in a “minor” part is indicative of the quality of the kit top to bottom.
This brings up my only real gripe with the LDO kits: I think that they are too expensive. I, personally, would not have splurged on machined brass spacers, for example (but man, are they well made!--see picture). I don’t think that they provide a good return on investment in terms of performance. There are other, similarly overly nice parts throughout the kit that I think are overkill for their job. And to be fair, that's exactly what LDO is trying to do with this kit! They aren’t trying to compete with the cheap kits. They are trying to provide a no-compromises, extremely high quality kit for folks who want the best parts out of the box. They are selling the Lexus experience when others are selling Toyotas. and even though I, personally, am not a Lexus guy, there is no denying that the premium experience comes with a lot of nice perks.
The thing that I DID really appreciate was the metal handles. I always print out handles to help make working on and moving printers easier, but these handles will make that unnecessary. The feel like good quality, and they look great. This is an addition that I can get behind!
A few other things to note: the tools that come with the kit are just about all that you will need to build the printer. You will need scissors and a soldering iron, but I think that’s about it in terms of extra tools. I’ll be using my own tools because nice handles are nice, but it is good that LDO includes a solid tool selection. The heat set insert tool is especially nice if you don’t already have one. A generous roll of VHB tape, appropriately sized zip ties, and some Bowden tubing round out this box. Lots of good stuff.
Attachments
Last edited:
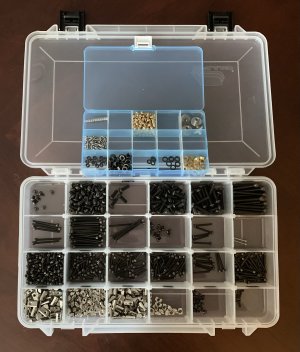
Just like that, screws and hardware have been de-trashed. Everything got labels in the bins. This is well worth the extra time it takes for the sake of organization and not constantly sorting through bags. Plus, it lets you easily see what screws you are missing when it’s time to order spares!
Attachments

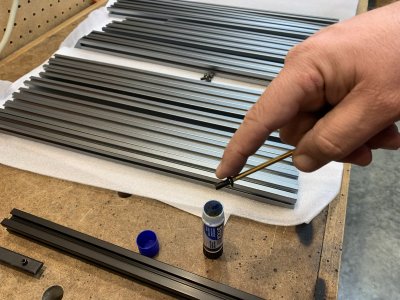
I always throw on thread locker to frame screws just for good measure. I really like the glue stick style thread locker, but obviously other types work as well. Do NOT use the permanent thread locker! You probably want the option to take things apart later without having to use a blow torch.
Attachments
happy_mfg.
Active member
love that space gray! ordered a v0s1 in that color! what color filament you gonna use?
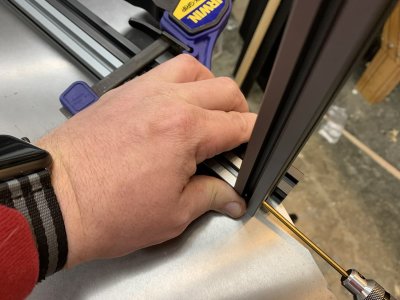
So, this is the WRONG way to assemble the frame. I was trying to get a good picture of how to clamp a backer piece of extrusion to help with alignment, and had the vertical extrusion in the air. It didn’t make a good connection because it was a little unstable. Both pieces should be flat when you are assembling. If you are curious, I’m using my table saw as a flat reference surface. It’s ground extremely flat, and after my granite plates, it’s the flattest surface that I have in my shop.
Attachments
Not sure yet. I’m betting that the primary will be black, and the accent will be blue, but still not quite sure yet. I’ve also got a few other options, but I haven’t started printing parts since I’ve got other parts for two other printers in line to print before this one!love that space gray! ordered a v0s1 in that color! what color filament you gonna use?
Just a heads up to anyone building an LDO 2.4 kit, the angle brackets had slightly asymmetrical thicknesses, so one orientation didn’t have enough thickness to allow the brackets to tighten on the frame. The “thin” side of the bracket should go on the end of the build plate extrusion. The “thick” side should be “down” flat against the frame.
Edit: Apparently I just can't read instructions. There are supposed to be washers in these brackets under the BHCSs that would make the differences irrelavent. I completely forgot to drop those washers in. Sigh. This is what I get for trying to build these sections from memory.
Edit: Apparently I just can't read instructions. There are supposed to be washers in these brackets under the BHCSs that would make the differences irrelavent. I completely forgot to drop those washers in. Sigh. This is what I get for trying to build these sections from memory.
Attachments
Last edited:
I mentioned earlier that I was building two Tridents while building this 2.4. Here are all three frames—knocked them all out today before taking a break until the new year. The printed parts for one of the tridents are done, and the second batch is about half way done. But I still haven‘t even started printing parts for the 2.4! I’ll start printing them in about a week or so, but for now, this printer will be in the back burner until at least one of the Tridents is done.
Last edited:
Update: Jason from LDO had confirmed that the frame is NOT powder coated, but that the surface is anodized. The practical concern about the surface feature holds, but I wanted to make sure that I set the record straight
—————————-
Some SUPER nit-picky thoughts on LDO’s frames: I’ve built four of LDO’s frames at this point, so my experience is limited, but I did have a few observations that I’ve been rolling around in my head. First of all, the frames are excellent! No doubt about that! The V0 frames I built (I’ve built three of these frames) had a smooth surface finish that I THINK was a dyed anodized coating. It was flat, and looked great. The 2.4 frame, on the other hand, had what looked like a lightly textured power coated finish. It looks AMAZING, and seems to be pretty durable. I banged a tool into the side of the frame in a way that I fully expected to have damaged a painted or anodized coating, but I couldn’t see any damage to the powder coat. It’s VERY well done and looks like it will be a durable finish in the long run. I like it!
However, because the ends are machined and tapped prior to coating, it means that the tapped holes are looser than I would really like (to leave tolerance for the coating), and the mating surfaces of the blind joints are textured. For me, this led to an ever-so-slight misalignment in a corner. I was able to twist and turn the parts a little to get them to mate more squarely, but this was a SLIGHT concern for me. I love the look of the parts that have been coated after being cut—the ends look so much better than bare aluminum. but this means that the ends may not be perfectly flat due to the texture of the coated end mating with the texture of the side if the vertical supports. With an anodized coating, this isn’t an issue since the anodizing doesn’t change the geometry by enough to impact the squareness of the frame, but with the powder coating, there is some chance that the corners won’t be square. I’m honestly not sure what to think about this since I have a sample size of one powder coated frame, but I can’t get this out of my head that it may cause a squareness issue at some point. I seriously doubt that it will large enough to impact functionality, but it’s something that I would keep an eye on if I were using a frame with a textured surface finish.
Aesthetically, the powder coating looks phenomenal and appears to be durable (again, I’m assuming here—it may not be a powder coating!). I, personally, am fine with fettling the mating surfaces to get parts perfectly square. I’m just thinking out loud about other builders who may not be as aware that there is a potential for things needing a bit of TLC. I think I’m being overly concerned here, but I’m writing this down just because it’s been in my head for a day, and I needed to get it out. Ok. Done!
————————
TL/DR: The coating on the LDO frames sure is pretty, and appears to to be durable! Make sure that you square it well.
Last edited:


Similar threads
- Replies
- 67
- Views
- 12K