What's new
VORON Design

Register a free account today to become a member! Once signed in, you'll be able to participate on this site by adding your own topics and posts, as well as connect with other members!

Self Sourced Voron Trident 300 Detailed Build Log India Edition

Did bed heater wiring and tested if the bed heats up and cools down properly.
Happy to report that things are working as expected.

summary
I was able to push bed to 110C and then see it cool down.

notes on wiring
  • routed wiring to the best of what I could make.
  • not applied red RTV to the thermal fuse but ensured that the fuse is holding the bed as I screwed it down.

during assembly checks
  • ensured that all connections are proper with a multimeter , probed all possible line , neutral and ground connections using multimeter.
  • checked that bed does not touch the z-endstop to transfer heat to it in any way.

observations
  • the bed heats up pretty quickly with a 750W heater
  • once the temp is reached the PWM switching to keep the bed hot is reduced drastically.
  • the cooldown from 100 to 40 took a good time it was not quick so I would say easily a couple of minutes.
  • checked wire is not getting pinched in anyway across its entire movement along z-axis.
  • check drag chain moves freely along the entire movement along z-axis.

These observations are preliminary and I need to do PID tuning yet.

bed drag chain wiring-med.jpg

bed ssr and controller wiring-med.jpg
it was fascinating to see the led blinking pattern ( near the heater cable mosfets and on SSR ) as the pwm signal was switching on and off the SSR to increase bed temperatures.

bed wagos connections-med.jpg

that black clip though which all wires are passing was needed so that I could take off some strain and route the wires.
this is a tradeoff because I have reduced 5mm of my print volume on z-axis so now its down to 245 from 250mm on z-axis.
 
Last edited:
Did Dragon Burner Assembly and Filament Extrusion Test

dragon burner assembly notes
  • if it looks like it was all done in one day believe me it was not.
  • dont forget to make the 3010 and 4010 fan jst connectors as when you have all the wires zip tied its tricky to figure which jst connector was used for which fan
  • not used any leds on dragon burner as I have case led which is enough for my needs, I will add one to dragon burner if need be.
  • I have intentionally kept the dragon burner in black as the red abs filament which I had did not give me best results at the time I was printing it. so went with black as I wanted to move ahead.
  • everything was tested prior in isolation on EBB36 pins before I plugged all wires in and assembled this.
    • thermistor was checked independent
    • orbiter v2 was checked for retraction and extrude commands without toolhead and any klipper tweaks to its config was done in isolation
    • then heater and dragon burner were heated and checked
    • fans were also checked on its pins
    • once all was ok and config looked in good place I assembled the toolhead
pid calibration notes
  • performed pid calibration for bed
  • performed pid calibration for toolhead heater
  • note make sure the [extruder] and [heater_bed] config is present in printer.cfg else SAVE_CONFIG command wont work.
followed the steps here for pid tune

if you want to find the jst xh pcb you can find here
[sanketss84/voron_mods](https://github.com/sanketss84/voron_mods/tree/master)


toolhead assembly back 1-med.jpg

toolhead assembly back 2-med.jpg

toolhead assembly side 3-med.jpg

toolhead assembly side 5-med.jpg

toolhead assembly front 4-med.jpg

PID Tuning
pid tune 1-med.jpg

pid tune 2-med.jpg

Dragon Burner Extrude command in action to test if my tool head would smoothly extrude filament when its heated up.
 

Attachments

  • toolhead assembly side 5-med.jpg
    toolhead assembly side 5-med.jpg
    215.7 KB · Views: 1
  • toolhead assembly side 3-med.jpg
    toolhead assembly side 3-med.jpg
    190 KB · Views: 1
today was all about fixing mistakes in the build. a lot of rework but its ok its also part of the build process. its important to get things right else they can cause unnecessary headaches ahead.

  • brought drag chains 10x10mm and 10x15mm instead of 3d printing the panzer drag chains from voron mods as the prints were just not latching properly and had very little flex.
    • so purchased non openable drag chains as its quick and fast to unscrew both ends and pass wire through them rather than opening each hook for each chain.
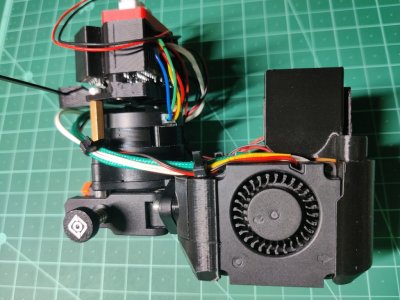
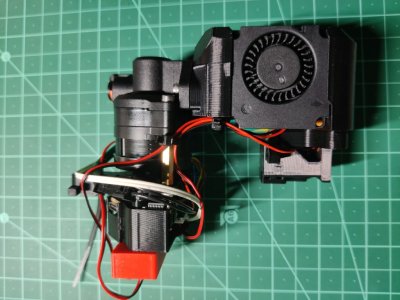
  • dragon burner
    • the cowl I had printed with was the one with klicky probe fixed on side , need to print fresh no probe cowl
    • even the carriage base section was not hitting my x-endstop switch so needed to print and test carriage base part with end stop
    • redo the x-gantry as carriage was getting blocked at the end on right so I had to undo the x-gantry screws and that needed to remove the belts to recheck smooth rails movement from front to back.
  • testing cartographer cnc metal bracket for steapth burner to dragon burner 3d printed adapter which was also not mounting correctly so I had to make some edits to this model in fusion to fix the mount, this is a work in progress.

Dragon Burner corrections

View attachment 4524

View attachment 4525


so this klicky probe cowl on left was hitting the front right lead screw.

View attachment 4523

this bottom carriage mount on left replaced with on on right so that my x end stop can be hit.

View attachment 4526

cartographer adapter fix and test with varying heights. will share more details on this as I get it sorted.


will add more images tomorrow as its been a long and tiring day for sorting things out
Can you post finished stl for mounting plate please?
 
As someone coming from an Ender 3 S1 Pro where I had to manually set the z-offset having the algorithm calculate the z-offset for you is a boon and this was something I really wanted to automate as that means I can save some time. Getting this sorted was crucial as I had visualized how my Voron Trident would be. The Auto-Z calibration script works wonderfully for this.

Integrated Auto Z calibration script by protoloft
This integrated very well with Klicky Probe that I have on my Trident 300.
The process is very well documented here

I was able to then test the z height with a 0.1 mm of paper and with the nozzle at 0.1 mm above on z-axis it perfectly touches the paper which is 0.1 mm thick.
the paper thickness was tested using digital Vernier Calipers.

I documented the Auto Z and shared it on video.

Please make sure to run homing on all axis then z-tilt then run this auto-z. I also ensure that my nozzle was clean.
 
Last edited:
Just some advise on getting Z offset dialed in. I like to use a large square flat print and make sure the Z is right where I want it when printing. You can make baby steps though the interface and then save it once you have a nice flat first layer. Just make sure you save it in both locations, where the baby stepping is and then Save the config.
 
Just some advise on getting Z offset dialed in. I like to use a large square flat print and make sure the Z is right where I want it when printing. You can make baby steps though the interface and then save it once you have a nice flat first layer. Just make sure you save it in both locations, where the baby stepping is and then Save the config.
is there some advice on setting orca slicer for the first time for a voron trident build. I am right now working on setting my print start and print end macros.

referring this for print start

I still have to do my first print. so far things have been just about calibration and printer over all checks.
I think I had to add one or two lines but the default Orca is setup pretty well already. And I do like the better print startup, after reviewing it, it looks pretty close to my startup.
 
After months of hard work I finally did my first print.
Huge thanks to Voron Community and Voron India for all your help and guidance I could not have pulled this without all of you.

IMG_20240516_035038-med.jpg

IMG_20240516_035029-med.jpg

in action

My bed mesh using klicky probe prior to the print.
bed mesh.png
 
Last edited:
Top