What's new
VORON Design

Register a free account today to become a member! Once signed in, you'll be able to participate on this site by adding your own topics and posts, as well as connect with other members!

Self Sourced Voron Trident 350 - Yet Another India Build

d4h

Member
Why build a 3D printer?
I started on the 3D printer build journey when I was trying to create some printed parts for a custom rack. It took me a few weeks to learn enough of Autodesk Fusion 360 to create the parts. When I tried to print the parts from an online service, the quote for cost of printing was enough to fund an entry level 3D printer. That set me thinking that maybe I should buy a 3D printer. To cut the story short, somewhere along my search for selecting a 3D printer, I pivoted to building an open source Voron Trident 350. My main motivation is learning something new.

Why VT350 and not a smaller size?
Because, my custom part is large enough to warrant a VT350.

Why self source and not use a kit?
I believe that the learning experience self sourcing provides is much richer than using a kit. It allows you to cherry pick printer components. It’s a little cheaper. I initially thought of doing a stock build as people have been advising. But, I realised that I would rather have some of the mods to start with rather than retrofitting them later. The guiding principle for making choices and picking some of the components was to use things that are slightly ahead in the technology curve.

Here goes my first post.
 
It has taken me around 2 months to get comfortable with the 3D printer terminologies, Voron Trident reference design, figure my way around the manufacturers and the vendors that can be used to source the VT350 components.

A big thanks goes to the post Self Sourced Voron Trident 300 Detailed Build Log India Edition by sanketss84. Given the fact that AliExpress cannot be used to source the parts in India, his post gave me confidence that self sourcing is indeed possible in India without it. His post gives a detailed source of all the parts from BOM. I did an independent search for all the parts, but have referred to it when I had trouble finding vendors for some of the parts. The discussions on Voron Design Forum has been very helpful in a lot of my decision making.

I just finished ordering the last of the parts. So the parts are slowing tricking in.
 
Last edited:
Voron Trident 350 Wiring
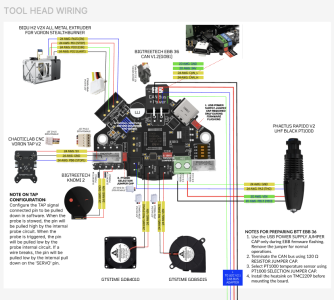
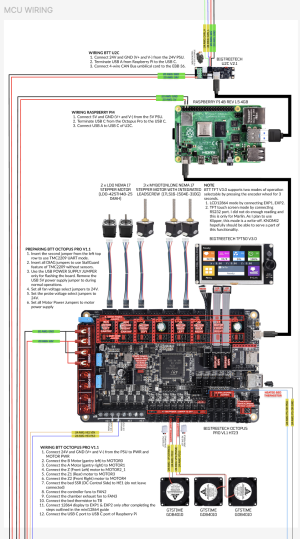
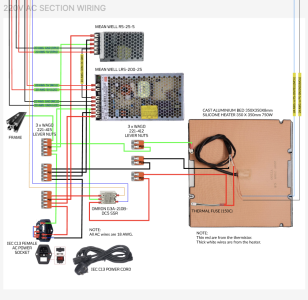
This is the wiring diagram for the build. This is my way of practicing the wiring virtually where I can afford to do mistakes. It consists of 3 sections.
(1) Tool Head section - build around BTT EBB 36 V1.2 (G0B1)
(2) MCU and SBC section - build using BTT Octopus Pro V1.1 (H723), Raspberry Pi 4B that I had lying around and BTT U2C V2.1 to connect the Extruder Breakout Board
(3) 220 V AC section - has the 24V PSU, 5V PSU, Heating Bed and SSR

1730097228540.png
1730097242895.png
1730097258320.png
 
Last edited:
Tool List:

This is the set of tools I've procured. I'm hoping that they'll see me through the finish line.

Cutters & Strippers
I've gone for one good quality traditional wire stripper with manually selected holes and the second one a low cost self adjusting wire stripper.
  1. Manual Wire Stripper - Ideal T®-6 T®-Stripper Wire Stripper for 16-26 AWG stranded and 14-24 AWG solid [Goodwill]
  2. Self Adjusting Wire Stripper - Multitec MT-02DX for 0.2-8mm² (24-16 AWG) wires, with cutter [Sunrom]
  3. Flush Cut Type Wire Cutter - TriangleLab® Model Plier [TriangleLab]
Crimping Tools
VT350 build requires three gauges of wires; AWG18 (0.75 mm²): AC Power Wiring, AWG20 (0.5 mm²): DC Power Wiring and AWG24 (0.25 mm²): Stepper Motors, all other wiring. Micro-connector terrminal crimping tool should be able to handle AWG18, while the bigger terminal crimping tool that can handle AWG20-24.
  1. Micro Connector Crimping Tool - IWISS IWS-2820M Mini Micro Open Barrel Crimping Tool works on AWG20-28 JAM, Molex, Tyco, JST Terminals and Connectors [dc3d]
  2. Terminal Crimping Tool - KNIPEX - Crimping Pliers - 97 21 215 for 0.5—6.0mm² (20-10 AWG) terminals [Goodwill]
  3. Ferrule Crimping - Truvic HSC8 6-4A AWG23-10 Wire Stripper Self Adjusting Crimping Plier Ratcheting Ferrule Crimper Tool [Amazon]
Screwdrivers and Hexdrivers
Primary type of screw used in the Voron reference design is the hex socket screw. Other types of screws are used in the third party components used such as the electronic boards etc. I went with two kinds of hex drivers or Allen key drivers; one full set of L shaped keys and the other three T handle drivers for the socket sizes used in the Voron build (M2, M3, M5).
  1. Screwdriver small - Taparia 810 Screwdriver - 100mm length Reversible - Minus Plus - [Sunrom]
  2. Screwdriver medium - Taparia 853 Screwdriver - 200mm length Reversible [Pre-existing]
  3. Precision Screwdrivers - Novo 24 Pieces Precision Screwdriver Set [Amazon]
  4. Hex Driver - Allen Keys [Omrook 2mm, 3mm, 5mm]
  5. T-handle Hex Driver - Allen T–Handle Hex key Hard Metal [Omrook 1.5mm, 2mm, 2.5mm, 3mm, 4mm, 5mm, 6mm, 8mm, 10mm]
Soldering Tools
I have an existing analog temperature controlled soldering iron. I'm getting the tips required for installing the M3 threaded inserts.
  1. Soldering Iron - Noel Analog Temperature Controlled Soldering Iron (60W) [Pre-existing]
  2. Soldering Iron Tips - Tips For Installing Threaded Inserts (M2-M8) [dc3d]
Measuring Tools
Apart from the recommended measuing tools, I came across Chaoticlab CNC Right-angle Ruler for 2020 profiles which I thought might be a good luxury to have for ensuring square corners.
  1. Vernier Caliper - Freemans FDC150 Digital Vernoer Caliper 150mm [Pre-existing]
  2. Steel Ruler - Steel ruler 30cm, 60cm [Local stationary shop]
  3. Engineer's Precision Square - GROZ Engineer’s Precision Square - Blade Length 75 mm [Amazon]
  4. CNC Right-angle Ruler - Chaoticlab CNC Right-angle Ruler for 2020 profiles [biqu]
Heat Shrink Tube Tools
Another luxury I'm procuring is the tools for labelling the wires using label printed heat shrink tubes.
  1. Heat Shrink Tube Labelling - Casio KL-HD1 EZ-Label-Printer [Pacific Computers] - I got misled by listed price that was minus the 18% GST. Anyway, I went ahead with it.
  2. Hot Air Gun - Inditrust 2000 Watt professional heat gun hot air gun with dual temperature setting [Amazon]
 
Last edited:
BOM (1/3):

I've tried to catalogue almost all the BOM items that I've procured. Let me say it upfront that without dc3d, I'd have found it difficult to source all the parts in India. dc3d has the most complete stock for self sourcing the Voron Trident printer parts in India. The only expection I took was to source the electronics and some of the kinematics directly from Biqu, and the hotend and PEI sheet directly from TriangleLab.

I had been looking for a pre-cut DIN rail. A new online store StellarForge delivers this. Cable gland with strain relief for the umbilical was another hard to source part. I had sourced it from Tanotis who import it for you on-demand. StellarForge now stocks this.

Weirdest one is the Igus, India store. I ordered an umbilical cable (Igus Chainflex CF113-018-D) from them. They took the order. I haven’t heard from them inspite on email to them. Luckily they did not take an upfront payment. I'm planning on modifying the BigTreeTech CAN Bus cable to fit EBB36 instead of SB2209/SB2240.

Kinematics
I'm planning to go senseless XY homing given that TMC2209 already supports it.
  1. Z Motors - Steperonline Nema 17 Stepper Motor With Integrated Leadscrew and Wires [dc3d x 3]
  2. A/B Motors - LDO-42STH48-2504AC RevA 1.8° 48MM Nema 17 Motor for Voron 2.4 [biqu x 2]
  3. Voron Trident 350 Linear Rail Kit [dc3d]
  4. GT2 Open Belt LL-2GT-6 (6mm wide) biqu x 4m]
  5. GT2 20T Toothed Idler (5mm ID 6mm W) [biqu) x 5]
  6. GT2 20T Pulley (5mm ID 6mm W) [biqu x 5]
  7. GE5C Spherical Bearing [dc3d x set of 3]
  8. F695 Bearing [dc3d x 20]
  9. Mobilux EP2 Grease For 3D Printer Maintenance [dc3d] - for grfeasing the linear rails
  10. Silicon Grease - Super Lube Silicon 88.7 ml Grease [flipkart] - for greasing the Z motor integrated leadscrews
  11. Isopropyl Alcohol [Amazon] - for cleaning the linear rails
Buildplate
  1. PEI 0.04" Sheet - 14"x14" [TriangleLab]
  2. MIC6 5/16" Plate - 14"x14" [dc3d]
  3. Silicone AC Heater w/ thermistor - 350x350mm (750W) [dc3d]
  4. Magnetic Adhesive Sheet - 14"x14" [dc3d]
  5. Thermal Fuse (150C) [StellarForge]
Electronics

I'm planning on CAN Bus using BTT U2C and EBB 36. What I gathered from various posts that U2C was the most reliable way to get CAN Bus working.
  1. Bigtreetech Octopus Pro V1.1 H723 Control Board with 8 x TMC2209 [biqu]
  2. Raspberry Pi 4 [Pre-existing] - I've put it into an Alunimium enclosure with fan. During firmware installation for BTT boards, I was running it without cooling. It ran so hot that it fried the micro SD card. I hope that I did not do any permanent damage.
  3. BigTreeTech U2C V2.1 1 [biqu]
  4. BigTreeTech BTT BB36 CAN Bus V1.2 Expansion Board [biqu]
  5. TFT50 V3.0 Display [biqu] - I wouldn't pick this again as the touch screen mode is intended to work only with Marlin. It'll work with Klipper only in the 12864 mode. All Vorons run on Klipper only!
  6. 60x60x20 Fan (24V) [dc3d x 3]
  7. Keystone CAT6 Insert (Optional) [Ranka] - It's a Cat6 Keystone Jack In-Line Coupler which saves you the hassle of procuring another crimping tool for the Ethernet cabling. I want the Ethernet connectivity as I've seen the Raspberry Pi's WiFi get a little finicky about physical placement when put in an Aluminium enclosure.
Printhead

This has the most modifications using out-of-the-box Tap and Extruder.
  1. CNC Voron Tap Sensor V2.1 [biqu]
  2. BIQU H2 V2X All Metal Extruder for Voron [biqu] - replacement for Clockwork 2.
  3. Trianglelab Phateus Rapido Hotend 2 UHF PT1000 1 [TriangleLab]
  4. 50x50x15 Centrifugal Fan (GTSTime) [dc3d]
  5. 40x40x10 Axial Fan (GTSTime) [dc3d]
  6. KNOMI 2 [biqu] - I put KNOMI2 touch screen after a snafu with the TFT display.
220V AC Section
  1. IEC Female AC Power Socket [dc3d]
  2. Omron G3A-210B-DC5 SSR [dc3d]
  3. Mean Well TBC-09 Terminal Cover [Custom 3D printed] - No one seems to stock it in India. I don't want to pay overseas shipping for importing it.
  4. Mean Well RS-25-5 PSU [3dprintronics]
  5. Mean Well LRS-200-24 PSU [3dprintronics]
  6. DIN Rail Mount Bracket for G3A SSR [3dprintronics]
  7. C13 Power Cord [Pre-existing]
  8. WAGO 221-415 Lever-Nuts [zbotic]
  9. WAGO 221-412 Lever-Nuts [zbotic]
 
BOM (… continued 2/3):

Printed parts

  1. Voron Trident Printed Functional Parts + Custom Printed Parts [dc3d]
Frame
  1. Voron Trident 350 Frame Kit (Black) [dc3d]
  2. DIN 3 Rails (35mm W) - 470mm [StellarForge x 2]
  3. Rubber Foot [dc3d x 4]
  4. Voron Trident Panel Kit [dc3d]
Wires
  1. CAN Cable - BIGTREETECH CAN Cable for EBB SB2209/SB2240 CAN V1.0 [biqu] - The intension is to change the terminal plug to fit the EBB 36.
  2. Steel wire for Umbilical Support [dc3d] - for supporting the CAN Cable. BTT CAN cable looks very flexible in the photos.
  3. 24AWG PFTE Wires (m) - 20m [dc3d Use configuration for 4 colours x 5 m each]
  4. 20AWG High-Flex Wire (m) - 2 colours x 5 meters 10meter [dc3d Use configuration for 4 colours x 5 m each]
  5. 18AWG PTFE Wire for AC - 6m [sharvi Red x 2m, Black x 2m, Green x 2m] - I ordered the wires from them as they stock the little-hard-to-source Butt Terminals. On receiving the delivery, I fould the insulation of the red wires was thrashed. I raised a complain. But there is no response. It's not a big deal as the item value is low. But, I would not order any high value items from them.
  6. 10x11 Cable Chain - 1m, 1 End Set [dc3d]
  7. 1/2" Braided Cable Sheathing (5ft) [zbotic]
  8. Cable Duct - Salzer Grey B 40x60 Thin Cable Duct Slot STD WWB4060TG (1 meter) [industrybuying] - I've seen videos of folks with neatly organized wires using the cable duct. I'm hoping mine would come out the same.
Terminals and Connectors
Terminals and connectors have been a steep learning curve for me. It took me some time to figure out why so many crimping tools are required for the assembly.
  1. Molex 3mm Pitch Micro-Fit Male Connector Housing With Crimping Pins [roboticsdna [4 Pin x2, 3 Pin x 1, 2 Pin x 3]
  2. Spade Crimp Terminal 4.8mm Female x 20 [sunrom]
  3. Wire Ferrule [sunrom Black 0.5 sq. mm x 30, Black 0.75 sq. mm x 30, Black 1.0 sq. mm x 30
  4. Dual Wire Ferrule [sunrom 2x0.5 sq. mm Yellow x 10, 2x0.75 sq. mm Red x 10, 2x1.0 sq. mm Red x 10]
  5. Ferrule [sunrom Gray 0.75 sq. mm x 10, Blue 1.0 sq. mm x 10]
  6. Fork Insulated Terminal for wire size 0.5 to 1.5 sq.mm [sunrom x 20]
  7. Pin Insulated Terminal for wire size 0.5 to 1.5 sq.mm [sunrom x 10]
  8. Red Insulated Ring Terminal for wire size 0.5 to 1.5 sq.mm [sunrom x 10]
  9. BV1.25 - Fully Insulated Butt Terminal, Red 22-16 AWG Cable Butt Connector [sharvi x 10] - Locating a source for procuring this took some searching on Google. I want it for connecting to the Silicone AC heater wires and the thermal fuse.
  10. JST XH Connector Plug [sunrom Use the configurator for 4 Position x 5, 3 Position x 4, 2 Position x 2)
 
BOM (… continued 3/3):

Fastners

Omrook has a nice well-stocked online store for mechanical fasterners. I once ordered some extra fasteners by mistake. I emailed them to cancel the order. They did it very promptly.
  1. M5 SHCS [Omrook 40mm x 12]
  2. M5 BCHS [Omrook 30mm x 8, 16mm x 45, 10mm x 60]
  3. M4 BCHS [Omrook 6mm x 10]
  4. M3 SHCS [Omrook 50mm x 9, 40mm x 13, 30mm x 25, 25mm x 18, 20mm x 10, 16mm x 20, 12mm x 80, 10mm x 5, 8mm x 180]
  5. M3 BCHS [Omrook 6mm x 40]
  6. M3 FHCS [Omrook 12mm x 12, 10mm x 4, 6mm x 25]
  7. M5 Hexnut [Omrook x 20]
  8. M3 Hexnut [Omrook x 9]
  9. M3 Locknut [Omrook x 8]
  10. M3 Washer [Omrook x 100]
  11. M2 Self Tapping Screws [dc3d x 10]
  12. M4 Knurled Nut [dc3d x 3]
  13. M5 1mm Shim/Washer [dc3d x 30]
  14. M3 Threaded Insert [dc3d x 100]
  15. M3 Roll-in T-nut [dc3d x 100]
  16. M3 Hammer Head T-nuts [dc3d x 100]
  17. M12 Cable Grand with Strain Relief - Multicomp PRO PP001700 Cable Gland Spiral Strain Relief Metric IP68 M12 x 1.5 3 mm 6.5 Nylon (Polyamide) Black [Tanotis] - StellarForge now stocks this.
  18. Nylon Cable ties 4” [Amazon x 100]
  19. Wire Loom Harness Tape [Amazon]
  20. Loctite Blue Threadlocker Stick [Amazon]
Phew! That took a lot of my free time over last 2 months. It was absolutely worth it as I was totally green on 3D printing couple of months ago. By self-sourcing parts for my Voron Trident, I was able to gain a deeper understanding of the design process, some underlying understanding that are not explicitly stated in the assembly manuals and challenges faced by the original designers for creating an open source 3D printer.
 
BOM (1/3):

I've tried to catalogue almost all the BOM items that I've procured. Let me say it upfront that without dc3d, I'd have found it difficult to source all the parts in India. dc3d has the most complete stock for self sourcing the Voron Trident printer parts in India. The only expection I took was to source the electronics and some of the kinematics directly from Biqu, and the hotend and PEI sheet directly from TriangleLab.

I had been looking for a pre-cut DIN rail. A new online store StellarForge delivers this. Cable gland with strain relief for the umbilical was another hard to source part. I had sourced it from Tanotis who import it for you on-demand. StellarForge now stocks this.

Weirdest one is the Igus, India store. I ordered an umbilical cable (Igus Chainflex CF113-018-D) from them. They took the order. I haven’t heard from them inspite on email to them. Luckily they did not take an upfront payment. I'm planning on modifying the BigTreeTech CAN Bus cable to fit EBB36 instead of SB2209/SB2240.

Kinematics
I'm planning to go senseless XY homing given that TMC2209 already supports it.
  1. Z Motors - Steperonline Nema 17 Stepper Motor With Integrated Leadscrew and Wires [dc3d x 3]
  2. A/B Motors - LDO-42STH48-2504AC RevA 1.8° 48MM Nema 17 Motor for Voron 2.4 [biqu x 2]
  3. Voron Trident 350 Linear Rail Kit [dc3d]
  4. GT2 Open Belt LL-2GT-6 (6mm wide) biqu x 4m]
  5. GT2 20T Toothed Idler (5mm ID 6mm W) [biqu) x 5]
  6. GT2 20T Pulley (5mm ID 6mm W) [biqu x 5]
  7. GE5C Spherical Bearing [dc3d x set of 3]
  8. F695 Bearing [dc3d x 20]
  9. Mobilux EP2 Grease For 3D Printer Maintenance [dc3d] - for grfeasing the linear rails
  10. Silicon Grease - Super Lube Silicon 88.7 ml Grease [flipkart] - for greasing the Z motor integrated leadscrews
  11. Isopropyl Alcohol [Amazon] - for cleaning the linear rails
Buildplate
  1. PEI 0.04" Sheet - 14"x14" [TriangleLab]
  2. MIC6 5/16" Plate - 14"x14" [dc3d]
  3. Silicone AC Heater w/ thermistor - 350x350mm (750W) [dc3d]
  4. Magnetic Adhesive Sheet - 14"x14" [dc3d]
  5. Thermal Fuse (150C) [StellarForge]
Electronics

I'm planning on CAN Bus using BTT U2C and EBB 36. What I gathered from various posts that U2C was the most reliable way to get CAN Bus working.
  1. Bigtreetech Octopus Pro V1.1 H723 Control Board with 8 x TMC2209 [biqu]
  2. Raspberry Pi 4 [Pre-existing] - I've put it into an Alunimium enclosure with fan. During firmware installation for BTT boards, I was running it without cooling. It ran so hot that it fried the micro SD card. I hope that I did not do any permanent damage.
  3. BigTreeTech U2C V2.1 1 [biqu]
  4. BigTreeTech BTT BB36 CAN Bus V1.2 Expansion Board [biqu]
  5. TFT50 V3.0 Display [biqu] - I wouldn't pick this again as the touch screen mode is intended to work only with Marlin. It'll work with Klipper only in the 12864 mode. All Vorons run on Klipper only!
  6. 60x60x20 Fan (24V) [dc3d x 3]
  7. Keystone CAT6 Insert (Optional) [Ranka] - It's a Cat6 Keystone Jack In-Line Coupler which saves you the hassle of procuring another crimping tool for the Ethernet cabling. I want the Ethernet connectivity as I've seen the Raspberry Pi's WiFi get a little finicky about physical placement when put in an Aluminium enclosure.
Printhead

This has the most modifications using out-of-the-box Tap and Extruder.
  1. CNC Voron Tap Sensor V2.1 [biqu]
  2. BIQU H2 V2X All Metal Extruder for Voron [biqu] - replacement for Clockwork 2.
  3. Trianglelab Phateus Rapido Hotend 2 UHF PT1000 1 [TriangleLab]
  4. 50x50x15 Centrifugal Fan (GTSTime) [dc3d]
  5. 40x40x10 Axial Fan (GTSTime) [dc3d]
  6. KNOMI 2 [biqu] - I put KNOMI2 touch screen after a snafu with the TFT display.
220V AC Section
  1. IEC Female AC Power Socket [dc3d]
  2. Omron G3A-210B-DC5 SSR [dc3d]
  3. Mean Well TBC-09 Terminal Cover [Custom 3D printed] - No one seems to stock it in India. I don't want to pay overseas shipping for importing it.
  4. Mean Well RS-25-5 PSU [3dprintronics]
  5. Mean Well LRS-200-24 PSU [3dprintronics]
  6. DIN Rail Mount Bracket for G3A SSR [3dprintronics]
  7. C13 Power Cord [Pre-existing]
  8. WAGO 221-415 Lever-Nuts [zbotic]
  9. WAGO 221-412 Lever-Nuts [zbotic]
Hi @d4h, thanks for the great build log. I am from India as well and planing to build one for myself.

I had one question though : can we buy directly from biqu here from India ?
 
Hi @d4h, thanks for the great build log. I am from India as well and planing to build one for myself.

I had one question though : can we buy directly from biqu here from India ?
Yes. I didn’t have any issues. Nothing extra to be paid over the price paid on the online store. They usually give a 5% discount over the listed prices. The delivery took couple of weeks.
 
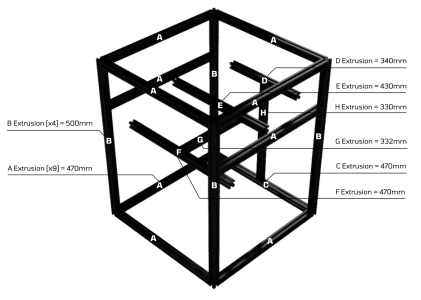
I got most of the parts delivered few days ago and started on the build. I thought I had the Voron Trident 350mm frame assembly figured out. The assembly manual gives the dimensions for 250mm and you have to figure it out for the other dimensions. I had to rework my understanding of the placement of the extrusions once I started building.

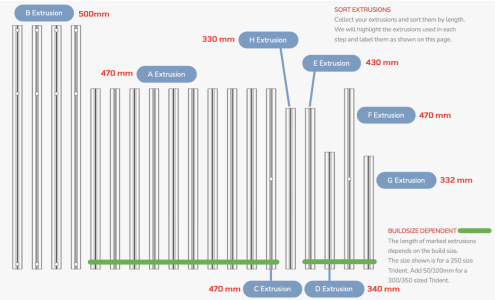
The lengths of 19 Aluminium extrusions used in the Voron Trident 350mm and their placements in the assembly are in the table below.
Extrusion​
Length​
Quantity​
Placement in Assembly​
A​
470mm​
9​
Top and bottom horizontal​
B​
500mm​
4​
Vertical​
C​
470mm​
1​
Lower back horizontal​
D​
340mm​
1​
Horizontal rear A-B motor joiner​
E​
430mm​
1​
X axis Gantry​
F​
470mm​
1​
Left to right bed support​
G​
332mm​
1​
Front to back bed support​
H​
330mm​
1​
Vertical rear support for D extrusion​
Total
19​


Here is the marked up image from the assembly manual.

1731022623547.png

Marked up image of the assembly I copied off Aliexpress.

1731022706394.png
 
Last edited:
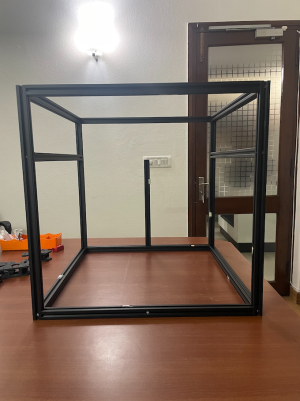
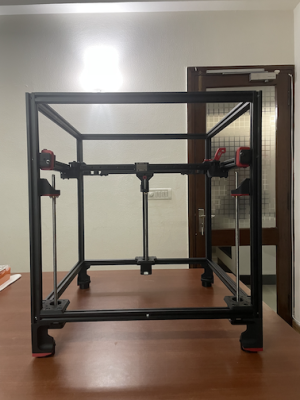
The very first image of my build. Only one of the diagonal is off by 2mm. Other are under 1mm difference.
1731024137575.png
 
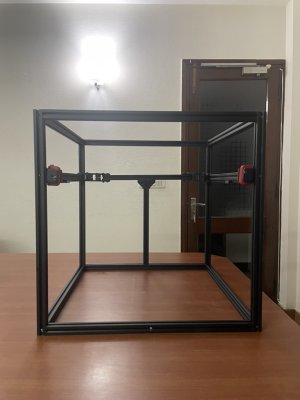
Here is the progress. I've completed the "A/B DRIVE AND IDLER" and the "Y AXIS" section of the assembly manual. I'm still awaiting the delivery of the A/B motors so those aren't installed.

There were no major issues. The idler assembly took some time. I hope I've cleaned the linear rails enough. The carriage doesn't slide down on its own when I hold it vertically even after generous amount of greasing.

VT350_2.jpeg
 
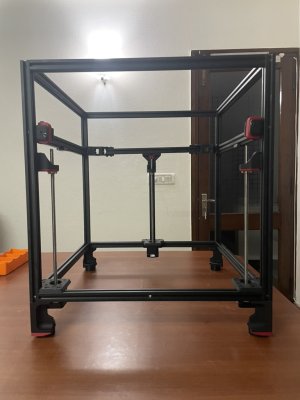
I've completed the "Z AXIS" section of the assembly manual. It's started to look like a 3D printer now.

There were a few things I did differently.
(1) I used WD-40 on the linear rails before the Isopropyl alcohol cleaning. I had used a self made squirter for the alcohol for cleaning the earlier rails. I think that the pressure of spraying the WD-40 using the small thin straw did help in better cleaning. I let it soak for an hour before giving them an alcohol bath.
(2) I used the plastic packaging of the linear rails to make an Isopropyl bath as described in the LDO Motor's Linear Rail Greasing Guide. Why didn't I think of this earlier? One of the plastic packing was a leaky. But, it held long enough for the soaking. For one of the rails, a black chip also came out when I drained the alcohol. I think the cleaning worked.
(3) I got the ball end hex drivers. They were a lifesaver. It's an effort t saver. I think it saved me lot of grunt work in fixing the feet to the frame.

1731373564023.jpeg
 
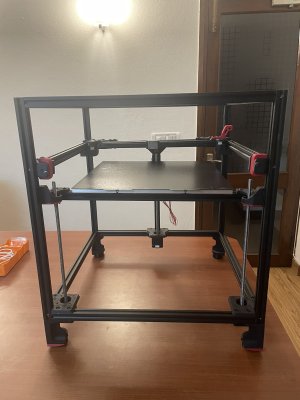
Completed the "X AXIS" section of the assembly manual minus the idlers. I'll be skipping over the "BELTS" section till it gets delivered. Going on to the "PRINT BED" now.

Not much of an issue assembling it. Keeping the screws loose during squaring was the key. I followed the instructions for squaring in the linked video of the assembly manual.

1731506073037.png
 
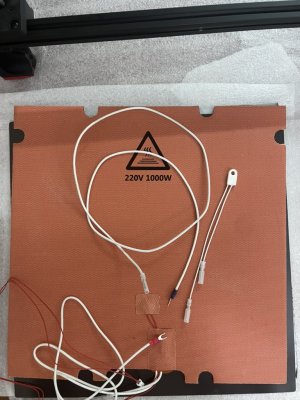
I had a pleasant surprise when I was preparing all parts needed for the Printer Bed. I had ordered a High Quality Silicone Heater 350 X 350mm 750W. What I have received is a 350 x 350mm 1000W Heater. There is a thick pre-crimped teflon sheath earth wire along with a pre-crimped heat fuse. Heater wires and the micro connector to the temperature sensor wires are also pre-crimped. It’s a shame that had to snip away three of the pre-crimped terminals for connecting to WAGO connector.

1731885193503.jpeg

My last order from Biqu is delayed. I had raised an issue with them They responded with the message, “We have received your notification about the logistics problem and will contact the logistics company as soon as possible to verify. Please wait for a moment, we will provide you with updated information as soon as possible after verifying the situation”.

Work took up most of my time and it was slow progress on the Printer Bed. There was only one hitch while assembling the printer bed. I had used the F extrusion in place of an A extrusion. Luckily the swap cost me only about 30 min. I’ve completed the PRINT BED section of the assembly manual.

Another thing that posed a minor problem was making neat holes in the magnetic sheet to accommodate the M3x16 SHCS mounting bolts. Utility knife is not the best tool for the job. What worked best was poking a small hole, inserting and rotating the Flush Cut Type Wire Cutter back and forth to scrape the magnetic pad get a neat round hole.

1731885250154.jpeg
 
Last edited:
Moving on to the StealthBurner toolhead assembly. This is a heavily modified toolhead is not going to look anything like the stock build of SB toolhead. Major parts, not including the printed parts, are the following:
  • Phaetus Rapido V2 UHF Black PT1000
  • Biqu H2 V2X All Metal Extruder for StealthBurner
  • ChaoticLab CNC Voron TAP V2
  • BTT KNOMI 2 - still awaiting delivery
  • BTT EBB 36 CAN VL.2(GOB1) - going umbilical
  • GTSTime fans for parts cooling and hotend cooling
 
Last edited:
Regular Voron StealthBurner consists of 5 subassemblies based on the SB Assembly Manual. The modifications are as follows.
  1. Voron ClockWorks2 Extruder - This is replaced by Biqu H2 V2X All Metal Extruder using the umbilical print parts and M12 Cable Gland. I haven’t seen any official assembly instructions from Biqu. I think they assume that you should be able to figure it out from the STEP files. I followed the Use a BIQU H2 in a Stealthburner video on YouTube. I did run into couple of problems. First, the printed part for screwing the cable gland broke while screwing. I’ll just superglue it till I can print some modifications for it. Second, one of the threaded inserts if spinning loose and I can’t get the screw out. I think I’ll just put some Locktite on it.
  2. Tool Cartridge - This assembly is retained from the SB stock build and assembled using the Phaetus Rapido V2 instructions in GitHub.
  3. Distinctive SB main body (front cover) - Replaced by KNOMI 2 main body. I had to use a combination of the original StealthBurner Assembly Manual and KNOMI 2 User Manual. Though KNOMI 2 User Manual is well written, it’s not complete in itself for the full main body assembly. The instructions for cutting off the ears off the 5015 are in the How to use StealthBurner 5015 fan ear cutting jig.
  4. X Carriage - It’s not mounted as I’m still missing the A/B motors. If the shipment doesn’t arrive by the time I finish mounting my electronics, then, I'll just buy some extra ones from a different source. Biqu is still trying to figure out the status of the shipment.
  5. ADXL Mount - I’m not using this mount as ADXL is built into the EBB 36. EBB 36 sits towards the back of the extruder on printed parts.

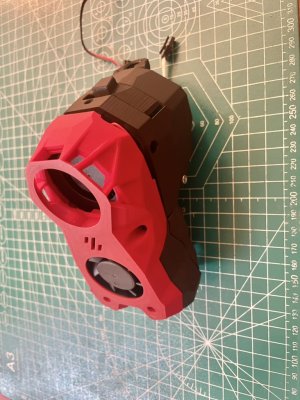
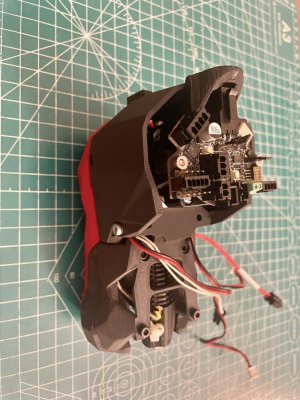
Here are a couple of pics of the progress so far. It’s not a full assembly. I’ve just put it together for understanding the assembly. My overall impression is that the printed parts for the H2 V2X extruder could have been better designed structurally. It’s not as forgiving for a first time builder and does not have the same solid feel as the rest of the Voron Trident printed parts.
1732205786280.jpeg

1732205865935.jpeg

I’ll be unscrewing, prepping up the hotend, putting the blue Locktite on all bolts, screwing the bolts again, then connecting the power and data wires to the EBB 36.
 
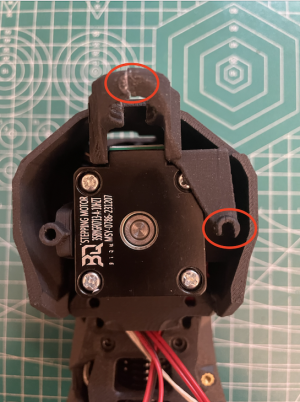
That was a BAD decision to do the StealthBurner assembly in 2 steps. Given the quality of the H2 V2X umbilical printed parts, I shouldn't have disassembled them.

As I had mentioned earlier, the cable gland mount had snapped earlier. It does not hold up under super glue. EBB 36 screw mount also snapped. I'll need to get it printed online. Probably go for a higher infill.

It's no wonder that the stock Voron build without modifications is recommended as a the first build. I might also assemble the Clock Work 2 for a comparison in build quality.

1732364505279.png
 
Top