What's new
VORON Design

Register a free account today to become a member! Once signed in, you'll be able to participate on this site by adding your own topics and posts, as well as connect with other members!

Tridentish 300

Onewayne

Member
I build better printers than build logs and that will become evident rather quickly. I will post infrequently and forget to post important information and just like any good printer it will never be finished. More photos less details on this one will hopefully make it easier to keep up to date. Lastly this is an afterthought so a lot of the following information will be from memory as this build is close to going brrr so ill do my best to somewhat cohesive and close to the build timeline.

How things started....
dllpdf.jpeg

this will take awhile.
 
The Frame

Dimensions - x500 x y500 x z670

Build volume - 300x300x300

2020, 2040 and 4040 extrusions machined by dllpdf mfg and powder coated in ground up fairie wings.

The extrusions took quite awhile to receive due to high demand on a small company , they make really nice stuff so it was worth the wait.

frame.jpegIMG_0326.jpg

Printed some feet.
IMG_0385.JPG
 
Last edited:
All parts are being printed on my other Trident which makes life so much easier, when I built my first Voron it was with a creality CR6 which although heavily modified and about as tuned as a printer of that caliber can get the lack of any enclosure makes for printing ABS rather challenging but I was not about to have that minor detail stand between me and a Voron so I went high tech and threw a carboard box and a blanket over it , problem solved. Looking back im still shocked by how good my first set of functional parts came out, only when insulated panels replaced acrylic did those parts start to fail but to be fair all ABS parts have a hard time in temps north of 75c.

All internal parts for this printer are done it PCCF following voron print standards with the exception of the gantry which I will get to shortly.

The external parts are done in ffdphaetus black ABS-gf and hatchbox pastel green ABS

print.jpegparts.jpeg

I am printing as I go this time rather than everything at once so I can build as I finish the parts and because I havent bought a lot of the hardware nor am I 100% on the final layout for the electronics but I do have the frame so rather than installing the skirts last as per the Voron build manual im going ahead and knocking them out first and it makes me feel like its further along than it is. As always I think I would have liked to go with a different green and made a more subdued color combination but since I had a brand new roll of this laying around why not. I absolutely love the ABS/CF from phaetus as well as thier ASA/CF it prints perfectly although it doesnt have the strength I would have liked to have in some of my other projects, it is more than enough for this one.

fans.jpgskirts.jpg

skirts2.jpeg
 
Last edited:
Finished up the skirts which took some work, the doomcube stl files on the github are not modeled for a 300mm machine, theres 250 and 350 and also two different front skirt styles depending on the door cfg. The old ones left the skirts back 20mm like if you have added a clicky clack door on your machine and havent redone the skirts. I luckily found a complete cad file for the entire machine that included the new front skirts with the additional 20mm ledge and was able to hack my way thru with fusion to make them the right size for my machine.

Electronics up next. So i decided to remodel the layout of the electronics bay that Voron uses and almost everyone else, as well as use the inverted electronics bay mod, honestly it shouldn’t be a mod and should be adopted as how it should be done since it makes everything easier down the road. I wanted this build clean and tidy with very little wire showing as well as mounting the electronics perpendicular to the din rails rather than parallel and divide everthing like a tv dinner, so each item has its own place. I also fmirrored the build plate drag chain because i can and because the layout lends itself to wires running up the right side rather than left.

Fan mods are from printables running berzerker fans from west3d , total overkill but I had them laying around in a box.

electronics.jpg

Rails greased and installed, Berserker mgn9s from West3d, as well as titanium backers which arent really needed supposedly with the motion system im going to run.

Motors for zed are LDO 300mm steppers with teflon coated lead screws along with the spacer mod to drop the end of the the leadscrews like 12mm, I did this on my trident in order to run the mjolnir toolhead from armchair engineering but for this its 100% for vanity, it just looks better. The z linear rails are mgn12h rather than the usual mgn9, yes it looks beefier and no it is not needed but I had rails lying around so why not save a buck or two. The build plate is the Mandala Roseworks superflat magbed, this was also lying in my ridiculous pile of spare parts due to its unwillingness to play nicely with beacon, I took it off my Trident but wasnt about to buy another plate again even though this build was going to run beacon as well. I honestly have no idea why anyone doesnt run beacon or even the carto but to each their own, I will never build another printer that doesn’t unless something new comes out that’s better. To utilize the build plate I came up with the idea to print some inserts the same dimensions as the magnets in the plate to begin with and cover them with a magnetic sheet, I used PC which I hope holds up to the heat planned but for now it worked perfect and a chunk of cash saved.

Electronics

Meanwell LRS-200-24

Raspberry pi 4b

Octopus Pro f446 1.1

btt 2209 drivers

Meanwell LRS 25-5

Since im writing this in the future several things are going to change before we get current but i will write to match the photos

I had a different plan for the voltage and drivers up to this point but decided to stick with what i knew rather than have to figure out 48v and 5160 drivers and the setup associated with going that route. I have only built one other trident before this several years ago and though ive modded it to death I really dont have the technical knowledge to do some of the more exotic mods so I opted for the easier safer route so i could actually finish this someday.

I designed the mounting system for the wire channels and modified the cad for the wire channels themselves so that it would all fit nicely as well as my version of cad for all the electronic mounts since nothing really fit, of course i would have done a few things differently now but I think it came out ok and besides it will give me something to change later .

electronics_frame.jpg
 
Last edited:
Im stuck waiting on parts for the gantry so jumped to the toolhead to get it done, this wont be the actual toolhead when the build is further along since the one im planning to run isnt released yet but ive seen it and know its going to be better than everything available at the moment, its all hush hush for now, but its coming.

Toolhead - A4T by Tas at Armchair Engineering.

Board - LDO Nitehawk 36 (temporary for setup and dialing in printer).

Hotend - Phaetus dragon ace volcano CHCB series w/ 100watt heater cartridge.

Nozzle - only west3d undertakers, theres no reason to ever run anything else and they last forever so a real no brainer.

Fans - Always Deltas when it counts.

Extruder - WWBMG modified for A4T.

Filament - 3dxtech ezPCCF.

About this toolhead, Tas did a great job on designing this one, its a really nice build and fairly easy even with finicky plastic to print, if you need a new one or want to replace your dated SB for something with decent cooling and a really broad compatibility list of hotends and extruders give this a try.

IMG_0649.thumb.jpg.8f61201159dab4d0bd3fc726040efd37.jpga4t.jpga4trear.jpg

I really like the nitehawk board and would keep it if it played well out in the heat but I dont think its gonna like the chamber temps north of 70c once im paneled up and insulated but for setup you cant beat it, so much easier than CANbus but back to straight umbilical ill be going in the near future or moving it outside the chamber.

Installed the bed fans as well, I decided to try a new approach rather than the usual 4 5015s, these are Artic 120mm 12v hardware controlled pwm fans, I made up a little splitter for the connections as well but havent got it done yet, these fans are silent, super low profile and move a ton of air.

bedfans.jpg

Started with the dreaded wiring, I have zero electronic experience other than basic soldering skills, I dont really understand much of what does what and why and def not enough knowledge to be changing anything to drastically so I plan on sticking to the guides which is partially why I abandoned the idea of 48v and external drivers, I just dont have any idea what the hell im doing.

It always seems like there isnt that much to do but somehow the wires keep coming.

electronics.jpeg
 

Attachments

  • monolithrear.jpeg
    monolithrear.jpeg
    80 KB · Views: 2
  • monolithfront.jpeg
    monolithfront.jpeg
    83 KB · Views: 2
  • lowercaselight.jpeg
    lowercaselight.jpeg
    49.4 KB · Views: 3
Last edited:
Parts finally arrived for the next step.

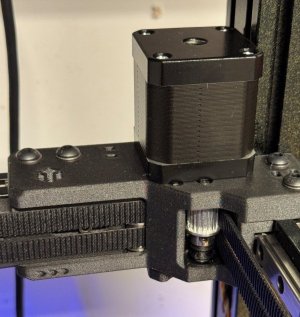
Gantry - Monolith 2wd 9mm belts

Steppers - steppersonline 17hs19-2504s-h-v1 2.5amp

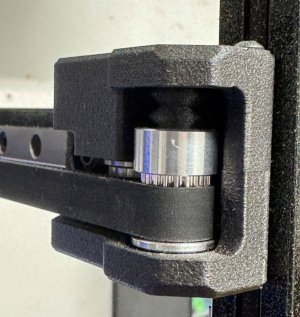
Pulleys - genuine Gates

Bearings - West3d berzerker flanged 695

Belts - Gates G2 EPDM 9mm

Belting monolith was actually really easy, I remember having some issues the first time i did my other trident but this was really easy.

IMG_0659.JPG

This took some time to complete, there is no manual or setup guide just a configuration generator and a bom the rest is on you.
If you do decide to ever go down this path which I strongly suggest you do if your looking for the best perfomance upgrade available, its just better, stronger , faster, and the way it should be done, make sure you have fusion so you can view the cad, its how you figure out what goes where.

Once you figure it out its actually fairly simple but at first it got pretty overwhelming but as with all these kind of things make sure your printed parts are as good as you can do, the fitment is everything and will either go swimmingly or bite you in the ass down the road.

monolithfront.jpegmonolithrear.jpeg


Parts for monolith need to be incredibly strong due to the extreme belt tension so again i used the pccf with 12 walls and 12 top and bottom , sure i could have gone even more exotic with my platic and even gone as far a annealing but I think this will live long enough to be replaced with the cnc version, fingers crossed.
I spent a good amount of time making sure the filament was tuned perfectly or as good as i could anyway so that my tolerances were spot on. I also decided to go 2wd instead of AWD for now , im in pretty much over my head on this build and dealing with AWD just seemed to be to much but I do plan on upgrading as soon as wayne releases the cnc kits for monolith.

After getting this installed I realized I had made a tactical mistake and purchased generic 695 flanged bearings because the good ones were out of stock and I didnt want to wait, I should have waited , as soon as it was belted and i pushed it around manually I had a bad feeling, I also had no idea what to expect nor how a gantry feels at 205hz on the belts so I started asking newbie questions in the discord and as usual left feeling like I still had no idea what to do.

For now it will stay, I have to finish wiring , leds, and some other bits and bobs along with the most frustrating part, the cfg.

Part of the reason I went the easy route and left the 48v and awd to the side is that I have a working cfg on my other trident, same drivers, same type of board only this ones a pro but thats easy enough to figure out so getting up and running shouldnt be to difficult.​
 
Last edited:
The dreaded flick the switch and pray for no smoke.
Its alive

IMG_0665.JPG

Took about 5 or 6 reboots to clear the klipper complaints , its nice that I know what they are usually and know how to fix it without help these days and before to long we booted into klipper.
I did have to remember how to setup sensorless, its always fun trying to get a printer going from scratch with no endstops to begin with but I managed.
I still find it odd that people still havent adopted sensorless thinking its like some voodoo or that its to technical a setup to mess with, especially with 2209s theres really nothing to it but one thing that does help is running kalico or dangerklipper which is another thing that if you dont you maybe should or at least take a look.

Added some neopixel strips that were laying around
I will see if they are bright enough glow to use with a few macros to let me know where in the print I am or something along those lines.
lowercaselight.jpeg
IMG_0749.JPG


Getting closer now.

IMG_0748.JPG
 
Idle Hands

Steppers buzzed
Sensorless working and adjusted.
Beacon installed and calibrated.
PID tuned hotend and bed.
Rotation distance set.
Shaper_calibrate
all good
go.

IMG_0812.JPG
quick PA tower.

Everything runs and runs really well , input shaper graphs were textbook and really good, print quality great so far, this is a really really nice printer.

except

its a fancy trident with a very rigid frame and not exactly what I need since I already have one , its also not what i set out to do, and then theres this box on my bench that was supposed to be returned that has the stuff to fix my wants.

f_ck it, im all in.

Now things get good , monolith was designed for more, the frame i ordered and built was designed for more and I want more. I hadnt built a printer in years and the last few weeks got me back
into the comfort zone and why not its done at this point so now its just an upgrade to a brand new printer.

I already had the steppers running , they are high temp and 2.5 amps and running them at 24v which works just fine is really not where they want to be so heres whats replacing the other stuff.

Meanwell UHP 24 - 200
Meanwell UHP 48 - 200
2x BTT TMC 5160T Plus V1.0
Mellow WS 7040 cpap
Armchair Enginnering XOLpap
Mellow VZHextrudort low


I have plenty of wire and now I need to figure out how this will all fit into the electronics bay, I need a new mount for the power supplies and a place for the external 5160s plus the most important part, I need to figure out how to wire this all up, how to configure the drivers and hope they do sensorless. I also will need more cooling since the A4T isnt gonna cut it and i have a cpap lying around. The only toolhead that fits the bill is the xolpap since it will save me from reprinting a carriage since the A4T uses the xol carriage and I have a hextrudort lying around ill use , mostly for the small size and weight savings. Time to undo some things and rewire.
 
Last edited:
Top