What's new
VORON Design

Register a free account today to become a member! Once signed in, you'll be able to participate on this site by adding your own topics and posts, as well as connect with other members!

YACN* Builds an LDO Voron 2.4r2 300

I'm sorry, yes Beacon does replace them all. I don't know what I was thinking....

I don't think you were wrong.

Beacon detects the distance to the metal surface of the build plate, and still requires a manually calibrated offset to correlate the sensed distance, to the nozzle tip to top of the build surface distance. So while Beacon does awesomely high resolution meshes insanely fast, it doesn't compensate for nozzle length differences or build plate thickness differences like TAP would.

Sooo... theoretically, there is a case where a person might employ both. If you change nozzles or build plates often, and don't want to recalibrate manually, but still want the high-speed meshing of Beacon, then Beacon + TAP could get you there.

In my admittedly very limited view, I'm not aware of anyone who has done this. I think once you have TAP, most people would just use TAP for everything, accepting the longer print start times in favor of build and configuration simplicity.
This is true. I did go from TAP to Beacon and yes, you have to do a Beacon_Calibrate if you change plates or nozzle but that is easy enough, at least for me. Using beacon cut down on weight a lot as well.
A downside to beacon is the carriage options are pretty limited but those don't change much.
 
Weekly update:


The Galileo parts came in, but the printer forgot to include the x-carriage, so I fiddled around with some smaller things this past week. Carriage should be here tomorrow (22 May). I’ll be very interested to see how much it actually varies from the original; ie, whether I could have easily modified the stock part to fit the Beacon.

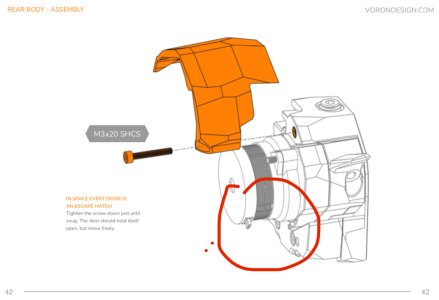
So I built the Galileo, although, after watching a video, I can see the wiring is on the wrong side. Is the manual wrong?
IMG_3776.jpeg

The Steve Builds video shows the wiring on the other side (coming out under the cover), which makes sense.

Another G2 question- the kit comes with a collet for the filament, but the printed housing doesnt have a hole large enough to install it.

1 - can I manually bore the existing hole?

2 - barring that, do I just use the PTFE tube here?

Started putting together the SB, and the hotend (may have already mentioned the hotend).

IMG_2024-04-21-090143.jpg


Built the Clicky-Clack door mod - the kit from West3D is very nice and easy to put together.

I’ve avoided the wiring so far because I’m a little worried about confusing the shit out of myself - in between the manual, the SB manual, the G2 manual, the LDO build notes (which seem to have their own issues with page numbers) and whatever else (I haven’t even gotten to Nitehawk or Beacon yet!) - it seems very easy to lose track of things.

Still, I try to do some little thing every day, so for today:

- while the build is still in a somewhat minimal state, recheck frame squareness and belts in advance of X carriage arrival.

- flash / configure the Pi.

- rebuild G2 with wiring in correct position.
 
For the Motor postion, it does not really matter. What ever works for you. I have mine like the pic above and wrap the wires up to my Nitehawk.
I don't use a Collet, just push the PTFE into the opening.
 
Top